- Top Spring Boot Interview Questions and Answers
60+ Spring Boot Interview Questions With Answers (2026)
Spring Boot helps us in the construction of web apps and microservices by using the Java-based open-source framework. The Spring Boot framework is developed and maintained by Pivotal Team. It provides us with pre-configured libraries and tools that enable developers to create standalone, production-grade Spring-based applications that can be run directly without the need for deploying WAR files and manual configuration.
The framework is opinionated, meaning it provides a specific view of the Spring platform and third-party libraries, so developers can get started with minimum fuss.
This blog will take you through important Spring Boot interview questions to excel in your technical interview.
Looking for guidance to boost up your career? Explore Here
Top Spring Boot Interview Questions and Answers
Q1. Explain Spring Boot and also tell the features of Spring Boot.
Spring Boot is a Java-based open-source rapid application development framework that is used to build microservices and web applications. With the help of the prebuilt code found in its codebase, Spring Boot offers an entirely flexible environment that does not need a manual configuration and provides powerful batch processing.
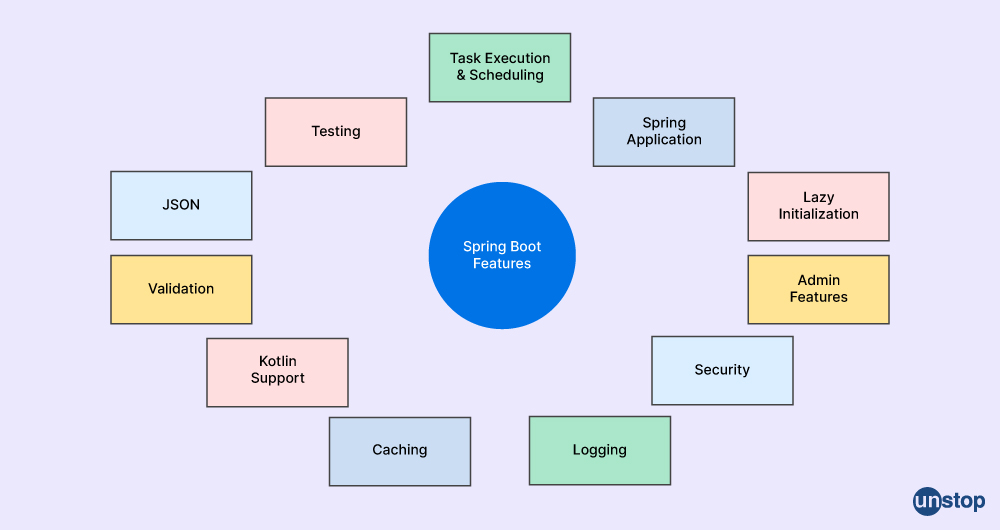
Some key features of Sprint Boot are:
- It is a combination of Spring Framework and Embedded Servers
- An important feature of Spring Boot is that there is no requirement for XML configuration.
- It provides an opinionated "starter" dependencies version to simplify build configuration
- It automatically configures Spring and third-party libraries
- Spring Boot Supports microservice architecture and powerful batch processing.
- It offers a versatile approach to setting up XML configurations, database transactions, and Java Beans.
Q2. Tell the steps involved in the creation of the spring boot project in Eclipse.
We can create the Spring Boot project in Eclipse by using the spring Initializer, the steps involved are:
- Go to https://start.spring.io
- Choose the project's details, such as group ID, artifact ID, dependencies, and packaging type.
- Click on the 'Generate' button to download the Spring Boot project.
- Import the project into Eclipse using the 'Existing Maven Projects' option in the 'Import' menu.
Q3. If you want to deploy the Spring Boot application in Tomcat, how will you do that?
To deploy the Spring Boot application in Tomcat, we can follow these steps:
- Firstly, we will modify the Spring Boot application to create a WAR file instead of a JAVA-Jar file:
- Add the Spring Boot Maven plugin to the pom.xml file.
- We will then set the packaging type to 'war' and exclude the embedded application server Tomcat dependency from the pom.xml file.
- Then we add the Tomcat dependency with the provided scope to the pom.xml file.
- We execute the 'mvn clean package', and the WAR file will be built and copied to the Tomcat web apps resources folder.
- To launch the Tomcat server, we will run the 'startup.bat' or 'startup.sh' script in the bin folder
- Then, at last, we can access the application by going to http://localhost:8080/application-name, where application-name is the name of the WAR file without the ".war" extension.
Q4. Can you distinguish between a spring and a spring boot?
Spring and Spring Boot are both Java frameworks that are used in web applications. The points of dissimilarities are:
SPRING:
- Spring is a popular Java EE framework used for creating apps, and it consists of boilerplate code.
- Struts, JSP, Hibernate, and other frameworks are supported by Spring.
- Java EE 7 developers may create straightforward, dependable, and scalable enterprise apps using Spring.
SPRING BOOT:
- The extension of the Spring framework is called Spring Boot which helps in removing the boilerplate configuration.
- Spring Boot is a microservices-based framework that is primarily used to quickly create production-ready features.
- Everything in Spring Boot is pre-configured, so we only need to utilize the appropriate settings when using a specific functionality, which helps in removing boilerplate code.

Q5. What is a spring boot actuator?
Spring Boot Actuator is a sub-project of the Spring Boot framework that provides additional features for monitoring and managing Spring Boot applications. The Spring Actuator exposes operational information about any running application using HTTP endpoints, allowing developers to easily monitor and manage their applications. It is important to secure the Spring Actuator because it contains a lot of confidential information.
Some key features of the Spring Boot Actuator are:
- Spring Boot Actuator enables developers to monitor the health of their application and CPU usage using the /actuator/health endpoint.
- Spring Boot Actuator provides secured endpoints for monitoring and managing Spring Boot applications.
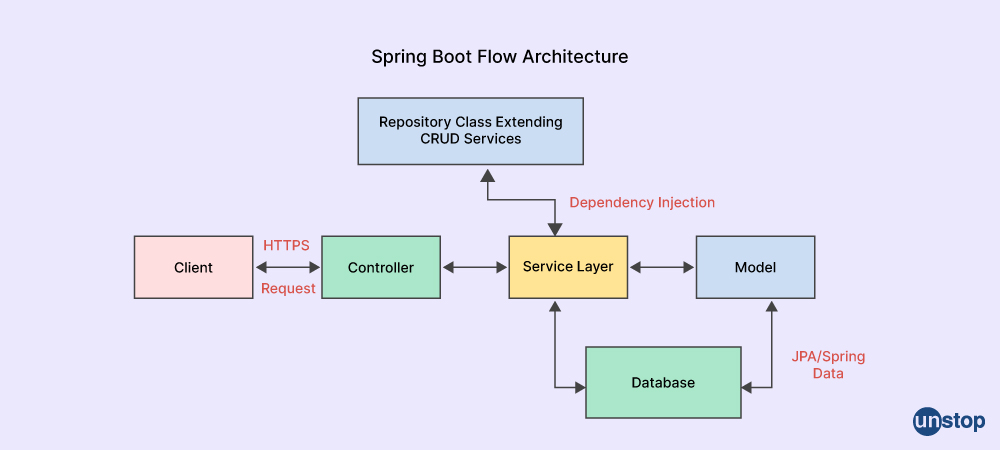
- With the help of the Spring Boot Actuator, developers can audit their applications using the /actuator/audit events endpoint.
Q6. Explain how you can modify a port in a Spring Boot.
The steps to change the port number in a Spring Boot application using application.properties file are:
- Open the application.properties file.
- Add the following line to the file: server.port={port-number}.
- Replace {port-number} with the desired port number.
- Save the changes.
- The application will now be running on the new port number.
Q7. What is the process to build a war file in Spring Boot?
To create a war file in Spring Boot, we can follow these steps:
Updating the pom.xml file:
Add the spring-boot-starter-tomcat dependency.
Set the packaging type to "war".
Modifying the main class:
We will extend the main class to SpringBootServletInitializer.
Override the configure() method.
Building the WAR file:
Run the "mvn clean package" command.
The WAR file that is created will be in the "target" resources folder.
Q8. Explain JPA in Spring Boot.
The specification for managing relational data in Java programming language application code is called JPA (Java Persistence API). Using Object-Relation Mapping (ORM), JPA enables us to access and persist data between Java objects or classes and relational databases. JPA is a collection of interfaces that gives Java applications access to a runtime EntityManager API for managing relational data.
Q9. Is it possible to save images in the database using Spring Boot, how will you do that?
Yes, it is possible to save an image in the database using Spring Boot. For that, we can follow these steps:
- Create an entity class to store the image data in the database.
- Define a RestController class with a POST method to upload the image.
- Handle the image upload using MultipartFile[] file as a parameter.
- Compress the image and store it in the database or store the direct image in the database.
- Update the handler method, which is responsible for handling the form submission to store the image in the database.
- Display the uploaded image in the browser.
Q10. Explain the auto-configuration class in Spring Boot?
The Spring Boot Auto-Configuration class feature helps the Spring-based application code to set up automatically, which is based on the Java -jar package phase or Jar dependencies version that has been added to the classpath. Spring Boot Auto-Configuration feature eliminates the need for developers to define certain beans included in the auto-configuration classes. This feature makes development faster and easier by providing fundamental settings required to configure the application with various spring framework.
Q11. I am getting a whitelabel error page in the Spring Boot application code, what should I do?
To solve the Whitelabel error page in the Spring Boot application, we can use these methods:
1. Customizing the Whitelabel Error Page:
Developers can create a custom error page to align with the UI of their Spring Boot application. So to customize the error page, developers can create a Custom Error Controller and define the error handling logic in that controller class. This controller will map any errors to the customized error page.
2. Excluding the ErrorMvcAutoConfiguration Bean:
Another way to disable the Whitelabel error page is by excluding the ErrorMvcAutoConfiguration bean.
This may be done by adding:
spring.autoconfigure.exclude=org.springframework.boot.autoconfigure.web.ErrorMvcAutoConfiguration section to the properties file.
3. Creating a Custom Auto-Configuration:
In order to manage problems in a Spring Boot application code, developers can also define a custom auto-configuration. If there is a problem, the user will receive more detailed t information due to customized auto-configuration.
Q12. How will you fetch data from the database in Spring Boot?
To fetch data from the database in spring boor, we can follow these steps:
- Define an entity class to map to the table in the database.
- Define a repository interface that extends JpaRepository to perform CRUD operations on the entity.
- Define a service class that uses the repository to fetch data from the database.
- Define a controller class that uses the service to return the fetched data as an HTTP response.
Q13. Describe the meaning of bootstrapping in Spring Boot?
In Spring Boot, the term "bootstrapping" refers to the setup or initialization of a Spring Boot application. The initial project structure, application context, and essential dependencies version must all be configured throughout this procedure.
Q14. Tell me the steps to create Java -jar file in Spring Boot?
The steps to create Java -jar file in Spring Boot are:
- Add the Spring Boot Maven plugin to the pom.xml file.
- After that, we will use the Maven plugin package command to build the project and produce a Java -JAR file.
- Java -JAR file will be created in the target folder of the project.
- Run the Java -JAR file by the command "java -jar jar-file-name.jar".
Q15. Have you heard about dependency injection in the Spring Boot?
Dependency injection is a design approach that removes dependencies from computer code, which makes the code easier to manage and test the application. Dependency Injection is implemented in Spring Boot by using the Inversion of Control (IoC) architectural paradigm.
There are three kinds of dependency injections, that is - constructor dependency injection, property dependency injection, and method dependency injection.
Q16. If I want to save images in MongoDB using Spring Boot, what should be done?
In order to use Spring Boot to save an image in MongoDB, we must configure the required Spring Boot properties and add the spring-boot-starter-data-mongodb dependency to the pom.xml file. We may also utilise GridFS for bigger files and MongoDB BSON for smaller ones.
Here is a basic structure code for storing an image in MongoDB using GridFS:
@Autowired

private GridFsTemplate gridFsTemplate;

public String store(MultipartFile file) throws IOException {

DBObject metaData = new BasicDBObject();

metaData.put("type", file.getContentType());

ObjectId objectId = gridFsTemplate.store(file.getInputStream(), file.getOriginalFilename(), metaData);

return objectId.toString();

}
Q17. Discuss or mention the steps involved to configure hibernate in Spring Boot?
To configure Hibernate in Spring Boot, we should add the spring-boot-starter-data-jpa dependency to the pom.xml file. The step to configure Hibernate are:
STEP1- We will Add the spring-boot-starter-data-jpa dependency to the pom.xml file.
STEP2- Then we will Create JPA entities.
STEP3- After creating the entities we will Create a JPA repository.
STEP4- We will Configure the database properties in the application.properties file.
STEP5- In the last step we need to Configure the Hibernate properties in the application.properties file.
Here is a basic structure code for configuring Hibernate in the Spring Boot framework:
<dependency>

<groupId>org.springframework.boot</groupId>

<artifactId>spring-boot-starter-data-jpa</artifactId>

</dependency>
Q18. Discuss the benefits of Spring Boot.
The benefits of Spring Boot are:
- Spring Boot is quick and have a safe environment property configuration.
- It reduces code length and simplifies the development process.
- With the help of Spring Boot one can avoid writing boilerplate code and XML configuration.
- Spring Boot creates stand-alone programs with a variety of non-functional features that are common to large classes of projects.
- It provides a toolbox that is effective and scalable for creating Spring apps using microservices in spring boot.
- Spring Boot combines well with the various components of the Spring Ecosystem, including Spring JDBC, Spring ORM, Spring Data, and Spring Security.
Q19. Describe the term thyme leaf.
Thymeleaf is an advanced server-side Java EE template engine for both web and standalone contexts that can interpret HTML, XML, JavaScript, CSS, and plain text. It is a powerful engine that is more flexible than JSP and is responsible for dynamic content rendering on UI.
To use Thymeleaf in a Spring Boot project, we first have to add the spring-boot-starter-thymeleaf dependency to the pom.xml file, configure the ViewResolver, and create templates in HTML format with Thymeleaf syntax. There are many use cases of Thymeleaf in the view layer of the Spring MVC application class.
Q20. Explain what is the need for Spring-Boot-DevTools Module is.
The DevTools module provides several features to improve the development experience, such as caching static content resources, automatic restarts, live reload, global settings, and running remote applications.
Here are some reasons why we need Spring-Boot-Devtools module:
- It provides additional development-time features that make the application development experience more pleasant.
- It avoids the need to manually set the configuration of the Spring-based application.
- It improves the performance of the application by caching static content/template files to serve them faster to the browser/client.
To use Spring Boot DevTools, we need to add the spring-boot-devtools dependency to the pom.xml or build.gradle file and DevTools is included in the repackaged archive, and the spring-boot-devtools module automatically applies the sensible development-time configuration.
Q21. How will you change the port of the embedded Tomcat server in Spring Boot?
To change the port of the embedded Tomcat server, we can use any of the following ways:
- By setting the resource file's server.port property.
- By updating the server.port properties.
- By using the EmbeddedServletContainerCustomizer interface to change the default port in Spring Boot 1.x version.
- By using the WebServerFactoryCustomizer interface to change the default port in Spring Boot 2.x version.
Q22. List the steps which you will need to connect a Spring Boot application to a database using JDBC.
The steps to connect a spring boot application to a database using JDBC are:
- Add the Spring Boot Starter JDBC dependency to the build configuration file.
- Configure the database connection properties in the application.properties or application.yml file.
- Create a database bean using XML or Java config. programming language.
- Then Autowire the JdbcTemplate class to access the relational database.
- Utilize JdbcTemplate in a Spring Boot application to access a relational database; the Spring Boot Starter JDBC dependency must be included in the build configuration file.
The following dependencies can be added by Maven plugin users in the pom.xml file:
<dependency>

<groupId>org.springframework.boot</groupId>

<artifactId>spring-boot-starter-jdbc</artifactId>

</dependency>

<dependency>

<groupId>mysql</groupId>

<artifactId>mysql-connector-java</artifactId>

</dependency>
The database connection settings can then be configured in the application.properties or application.yml file.
For example, the basic structure code is:
spring.datasource.driverClassName=com.mysql.jdbc.Driver

spring.datasource.url=jdbc:mysql://localhost:3306/mydb

spring.datasource.username=root

spring.datasource.password=password
Next, we can create a database bean using XML or Java config. For example the basic structure code is:
<bean>

<property name="driverClassName" value="${spring.datasource.driverClassName}" />

<property name="url" value="${spring.datasource.url}" />

<property name="username" value="${spring.datasource.username}" />

<property name="password" value="${spring.datasource.password}" />

</bean>
The JdbcTemplate class can now be autowired to access the relational database. For example the basic code snippet is:
@Autowired

JdbcTemplate jdbcTemplate;

public List<Customer> findAll() {

return jdbcTemplate.query(

"SELECT id, first_name, last_name FROM customers",

(rs, rowNum) -> new Customer(rs.getLong("id"), rs.getString("first_name"), rs.getString("last_name"))

);

}
Q23. Explain @RequestMapping and @RestController annotation use in Sprint Boot.
We make use of the @RequestMapping annotation to map HTTP requests to handler methods of MVC and REST controller class in Spring Boot. It is one of the most common annotations used in Spring Web applications.
The @Controller and @ResponseBody annotations are combined into the @RestController annotation for simplicity. As a result, there is no need for the @ResponseBody annotation to be present in each request-handling function of the controller class level. RESTful API web services are developed using the @RestController annotation.
Q24. How will you disable the auto-configuration in sprint boot?
To disable the auto-configuration, we can use any of the following ways:
By utilizing @EnableAutoConfiguration annotation of the exclude attribute . We can specify the classes that we want to exclude from auto-configuration.
By utilizing the @EnableAutoConfiguration annotation's of excludeName attribute. The fully qualified names of the classes that we want to keep out of auto-configuration can be specified.
For example, the basic code snippet is:
@SpringBootApplication(exclude = { DataSourceAutoConfiguration.class, HibernateJpaAutoConfiguration.class })

public class MyApp {

public static void main(String[] args) {

SpringApplication.run(MyApp.class, args);

}

}
Q25. Give an example of ReadOnly as true in Transaction management?
An illustration of a Spring Boot application that uses @Transactional with readOnly=true is:
If we have a UserService class that gets user data from a database, so we can declare the method @Transactional(readOnly=true) to enhance the performance of database transactions as we are only reading the data.
Basic structure code example:
@Service

public class UserService {

@Autowired

private UserRepository userRepository;

@Transactional(readOnly=true)

public User getUserById(Long id) {

return userRepository.findById(id).orElse(null);

}

// other methods

}
Q26. What are the advantages of the YAML file?
The advantages of the YAML file are:
- YAML files have a hierarchical structure that makes them easier to read and write.
- YAML files support maps, lists, and scalar types, which makes them more versatile than properties files.
- YAML files have more clear and human-readable syntax than properties files.
- YAML files provide unique and useful features like anchors, aliases, and references that are not available in properties files.
Q27. Explain Spring Data REST.
A framework called Spring Data REST expands on Spring Data repositories and automatically exports them as REST resources. It makes use of hypermedia to enable clients to swiftly discover functionality made available by the repositories and incorporate these resources into associated hypermedia-based functionality and business logic.
Some advantages of Spring Data Rest are:
- Spring Data REST is designed to create RESTful API easily and quickly.
- Spring Data REST automatically exposes Spring Data repositories as REST endpoints, which reduces the amount of boilerplate code needed to create RESTful API.
- Spring Data REST leverages hypermedia to make the APIs discoverable, self-documenting, and easy to navigate.

Q28. What are Spring profiles?
An approach to separate the configuration of an application and make them only available in specific situations is through the use of profiles in Spring and the Spring Profiles allow developers to map beans to different environments like dev, test, and prod. It provides a way to activate a bunch of configurations with a single profile parameter.
Q29. What are the steps needed to insert data in MySQL using Spring Boot?
The steps needed to insert data into a MySQL database using Spring Boot are:
- Add MySQL dependency to the pom.xml file.
- Configure the database connection in the application.properties file.
- Create an entity class level that represents the table in the memory database.
- Create a repository interface that extends the CrudRepository interface.
- Inject the repository interface into the service or controller class.
- Use the repository's save() method to insert data into the table.
For example:
// Step 1: Add MySQL dependency to pom.xml file
<dependency>

<groupId>mysql</groupId>

<artifactId>mysql-connector-java</artifactId>

</dependency>
// Step 2: Configure the database connection in the application.properties file
spring.datasource.url=jdbc:mysql://localhost:3306/mydatabase

spring.datasource.username=root

spring.datasource.password=mypassword
// Step 3: Create an entity class level that represents the table in the database
@Entity

@Table(name = "users")

public class User {

@Id

@GeneratedValue(strategy = GenerationType.IDENTITY)

private Long id;

private String name;

private String email;

// getters and setters

}

// Step 4: Create a repository interface that extends the CrudRepository public interface

public interface UserRepository extends CrudRepository<User, Long> {

}
// Step 5: Inject the repository into the service or controller class level.
@Service

public class UserService {

@Autowired

private UserRepository userRepository;
// Step 6: Use the repository's save() method to insert data into the table
public void addUser(User user) {

userRepository.save(user);

}

}
Q30. Tell me the steps involved in the creation of a login page in spring boot.
The steps needed in the creation of a login page in spring boot are:
STEP1- Add Spring Security dependency to the pom.xml file.
STEP2- Create a security configuration class that extends WebSecurityConfigurerAdapter.
STEP3- Override the configure(HttpSecurity http) method to configure the environment property security settings.
STEP4- Create a login page with a form that collects the username and password.
STEP5- Configure the login page in the configure(HttpSecurity http) method.
STEP6- Create a controller class level that handles the login form submission.
STEP7- Configure the logout URL and redirect in the configure(HttpSecurity http) method.
For example:
// Step 1: Add Spring Security dependency to the pom.xml file
<dependency>

<groupId>org.springframework.boot</groupId>

<artifactId>spring-boot-starter-security</artifactId>

</dependency>
// Step 2: Create a security configuration class that extends WebSecurityConfigurerAdapter
@Configuration

@EnableWebSecurity

public class SecurityConfig extends WebSecurityConfigurerAdapter {
// Step 3: Override the configure(HttpSecurity http) method to configure the security settings
@Override

protected void configure(HttpSecurity http) throws Exception {

http.authorizeRequests()

.antMatchers("", "/home").permitAll()

.anyRequest().authenticated()

.and()

.formLogin()

.loginPage("/login")

.permitAll()

.and()

.logout()

.logoutUrl("/logout")

.logoutSuccessUrl("/login?logout")

.permitAll();

}

@Autowired

public void configureGlobal(AuthenticationManagerBuilder auth) throws Exception {

auth.inMemoryAuthentication()

.withUser("user").password("{noop}password").roles("USER");

}

}
// Step 4: Create a login page with a form that collects the username and password
<!DOCTYPE html>

<html>

<head>

<title>Login Page</title>

</head>

<body>

<h1>Login Page</h1>

<form action="/login" method="post">

<label for="username">Username:</label>

<input type="text" name="username" /><br />

<label for="password">Password:</label>

<input type="password" name="password" /><br />

<input type="submit" value="Login" />

</form>

</body>

</html>
// Step 5: Create a controller that handles the login form submission
@Controller

public class LoginController {

@GetMapping("/login")

public String login() {

return "login";

}

}
// Step 6: Configure the logout URL and redirect in the configure (HttpSecurity http) method
Q31. What do you understand by the main class in spring boot?
A public static void main() method that launches the Spring ApplicationContext , is the main class in Spring Boot and this is the entry point of a Spring Boot application. The main class is typically annotated with @SpringBootApplication, which is a combination of @Configuration, @EnableAutoConfiguration, and @ComponentScan, which needs to be added to the application class.
Example code for a main application class in Spring Boot:
@SpringBootApplication

public class MyApplication {

public static void main(String[] args) {

SpringApplication.run(MyApplication.class, args);

}

}
Q32. What is the use of the crud repository in spring boot?
To use the crud repository in Spring Boot we can follow these steps:
- Create an entity class that represents the data to be stored in the memory database.
- Create a repository interface that extends CrudRepository.
- Inject the repository into the service or controller class file.
- At last, we will use the repository's methods to perform CRUD operations on the entity.
For Example:
// Step 1: Create an entity class that represents the data to be stored in the memory database
@Entity

public class Employee {

@Id

@GeneratedValue(strategy = GenerationType.IDENTITY)

private Long id;

private String name;

private String email;

// getters and setters

}
// Step 2: Create a repository interface that extends CrudRepository public list.
public interface EmployeeRepository extends CrudRepository<Employee, Long> {

}
// Step 3: Inject the repository into the service or controller class file.
@Service

public class EmployeeService {

@Autowired

private EmployeeRepository employeeRepository;

// Step 4: Use the repository's methods to perform CRUD operations on the entity

public Employee save(Employee employee) {

return employeeRepository.save(employee);

}

public Employee findById(Long id) {

return employeeRepository.findById(id).orElse(null);

}

public List<Employee> findAll() {

return (List<Employee>) employeeRepository.findAll();

}

public void deleteById(Long id) {

employeeRepository.deleteById(id);

}

}
Q33. Explain Spring Boot CLI(command line interface).
A command-line interface or command prompt tool, which is called Spring Boot CLI enables programmers to create Spring applications that are expressed as Groovy files. The CLI also makes it simple to quickly create Spring projects and run Groovy files.
For developers who wish to quickly design, test, and run their Spring applications from the command line interface or the command prompt, the Spring Boot CLI(command line interface) is a powerful tool.

Q34. What should be the approach or method to handle the 404 error in spring boot?
To handle the 404 error in Spring Boot we can Create a custom error page for the 404 error and Configure Spring Boot to use the custom error page.
For example:
// Step 1: Create a custom error page for the 404 error
@ControllerAdvice
public class CustomErrorController {
@RequestMapping("/error")
public String handleError(HttpServletRequest request) {
Object status = request.getAttribute(RequestDispatcher.ERROR_STATUS_CODE);
if (status != null) {
int statusCode = Integer.parseInt(status.toString());
if (statusCode == HttpStatus.NOT_FOUND.value()) {
return "error-404";
}
}
return "error";
}
}
// Step 2: Configure Spring Boot to use the custom error page
server.error.path=/error
Q35. Tell me the latest version of the Spring Boot.
The latest stable version of Spring Boot is 3.0.0.
Q36. Can you check the environment variable properties in your Spring boot application?
Yes, we can check the environment properties in our spring boot application.
Q37. In what part of the Spring Boot application do we define properties?
In a Spring Boot application, properties can be defined in various ways, including command-line properties, properties files, YAML files, and externalized properties.
Q38. Can you tell me the tasks performed by an IOC container?
The tasks that are performed by the IoC container are:
- Instantiating the objects
- Configuring the objects
- Assembling the objects
Q39. Tell me the basic Annotations that are offered by spring boot?
The basic annotations offered by Spring Boot are:
- @SpringBootApplication
- @EnableAutoConfiguration
- @ComponentScan
- @Configuration
- @Bean
- @Controller
- @Service
- @Repository repository
- @Autowired
Q40. Explain Spring Boot Dependency Management.
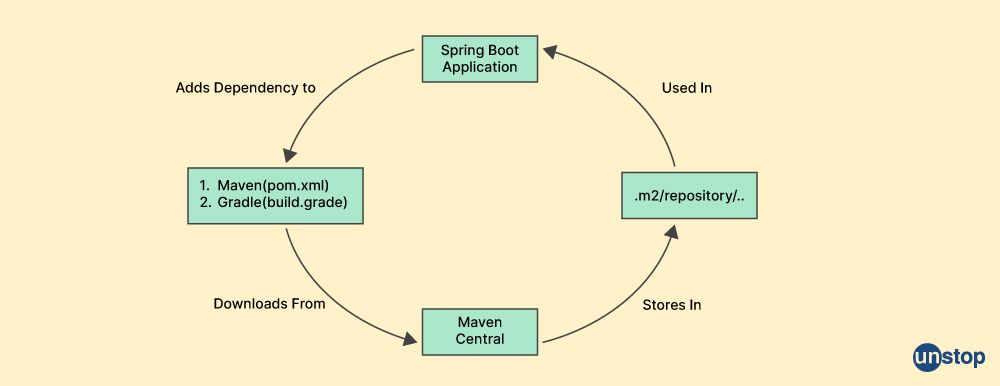
Spring Boot Dependency Management is a feature that manages dependencies and configurations automatically. A list of dependencies that Spring Boot supports is provided with each release.
The Bills of Materials (spring-boot-dependencies) that can be used with the Maven project contain a list of the dependencies. Therefore, in our configuration, we do not need to provide the version of the dependencies because Spring Boot manages itself, so When we update the Spring Boot version, Spring Boot automatically and consistently upgrades all dependencies.
Q41. Is it possible for us to create a non-web application in Spring Boot?
Yes, It is true that Spring Boot allows us to build non-web applications. Beyond only creating web applications, Spring Boot has many more uses.
Additionally, it may be used to create console applications, task scheduling programs, serverless apps, batch or stream processing programs, and more.
Q42. Tell me the default port in the spring boot of the Tomcat server.
The default port of the Tomcat server in spring boot is port 8080.
Q43. Will you be able to override or replace the embedded Tomcat server in spring boot?
Yes, we can override or replace the embedded Tomcat server in Spring Boot. Spring Boot provides flexibility to use different embedded servers like Jetty, Undertow, and Netty. We can also replace the Tomcat server by utilizing starter dependency. We can exclude the default Tomcat dependency and add the desired server dependency in the pom.xml file.
Q44. Is it feasible to disable the spring boot application's default web server?
Yes, it is possible to disable the default web server in the spring boot because there are other web servers available.
Q45. Differentiate between Restful web service @RestController and @Controller in Spring Boot?
The @RestController Annotation:
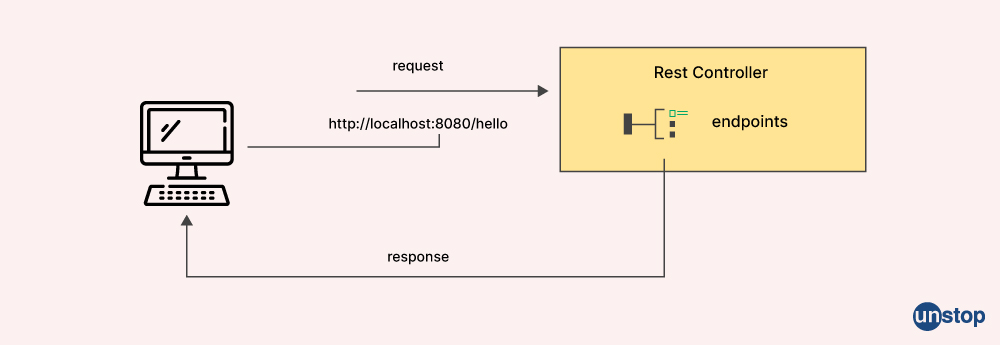
- @RestController is used for creating RESTful API web services.
- When used at the class level, @RestController enables the class file to respond to client requests.
The @Controller Annotation:
- @Controller is used for traditional Spring controllers.
- Also, the @Controller annotation is typically used in combination with a @RequestMapping annotation for request-handling methods
Q46. Can you tell the flow of HTTPS requests through the Spring boot app?
The flow of HTTP request through the spring boot are:
- The client will send the server an HTTPS request.
- The embedded web server in the Spring Boot application will take in the request.
- The request is then forwarded to the DispatcherServlet, which is auto-configured by Spring Boot.
- Based on the request URL and HTTP method, the DispatcherServlet transfers the request to the appropriate controller method.
- Once the request has been processed, the controller method will return a response.
- The response will be sent back to the DispatcherServlet.
- The DispatcherServlet will convert the response into an appropriate format based on the request's Accept header.
- At last, The response is sent back to the client over HTTPS.
Q47. Do you know about the points of disimilarities between RequestMapping and GetMapping?
1. RequestMapping
It is used at the class level and method level.
It Can be used to map any HTTP request method (GET, POST, PUT, DELETE, etc.).
It supports the consumes attribute to specify the media type of the request body.
2. GetMapping
It is used only at the method level.
It is used specifically for HTTP GET requests.
It Does not support the consumes attribute.
Q48. What are the methods available to get the list of all the beans which is in the Spring Boot application?
There are several ways to obtain a list of every bean in our spring boot application, some of them are:
1. By using the ListableBeanFactory interface.
Example:
@Autowired

private ListableBeanFactory beanFactory;

public void displayAllBeans() {

String[] allBeanNames = beanFactory.getBeanDefinitionNames();

for (String beanName : allBeanNames) {

System.out.println(beanName);

}

}
2. By using a spring actuator
Example: http://localhost:8080/actuator/beans
3. By using appContext.getBeanDefinitionNames()
Q49. Name the spring actuator endpoints in the spring boot.
Some of the spring Actuator endpoints in the spring boot are:
- Shutdown
- Sessions
- Threaddump
- Metrics
- Loggers
- Health
- Flyway
- Caches
Q50. Explain Spring Initializr.
Spring Initializr is a powerful web-based application tool that simplifies the process of setting up Spring Boot projects by generating a project with just what you need to start quickly and offering an extensible API for creating JVM-based projects. It is helpful when we are starting to build a project from scratch. Spring Initializr offers web-based application endpoints for third-party clients.
Q51. Explain the default package.
In Spring Boot, a class file that does not have any package declaration is considered to be a default package.
Q52. What do you mean by Spring security?
Spring Security is a powerful and customizable authentication and access-control framework that provides comprehensive support for both authentication and authorization. Spring Security provides comprehensive protection against attacks, which makes it an ideal choice for securing Spring-based applications.
Q53. Describe an IOC container.
The Spring IoC container is a Spring implementation using the IoC pattern paired with DI (Dependency Injection). It is a software container that offers an application environment that may be customised for the creation, initialization, caching, and management of pluggable objects, also known as beans. The application's components are managed by the container using Dependency Injection (DI). There are two types of IoC containers in Spring: BeanFactory and ApplicationContext.
Q54. Do you know about microservices in Spring Boot?
A modern approach to software development is known as "microservices" in spring boot that entails the delivery of application code in manageable chunks, each free of other components with non-functional features. Microservices are made up of a number of tiny, autonomous services that communicate with one another with minimal configuration. A well-liked framework for creating microservices applications is Spring Boot with minimal configuration.
Q55. Give an example for the @PUT rest endpoint and @DELETE rest endpoint.
@PUT rest endpoint
@PutMapping("/users/{id}")
public ResponseEntity<User> updateUser(@PathVariable(value = "id") Long userId, @Valid @RequestBody User userDetails) throws ResourceNotFoundException {
User user = userRepository.findById(userId)
.orElseThrow(() -> new ResourceNotFoundException("User not found on :: " + userId));
user.setEmail(userDetails.getEmail());
user.setLastName(userDetails.getLastName());
user.setFirstName(userDetails.getFirstName());
final User updatedUser = userRepository.save(user);
return ResponseEntity.ok(updatedUser);
}
@DELETE rest endpoint
@DeleteMapping("/users/{id}")
public Map<String, Boolean> deleteUser(@PathVariable(value = "id") Long userId) throws ResourceNotFoundException {
User user = userRepository.findById(userId)
.orElseThrow(() -> new ResourceNotFoundException("User not found on :: " + userId));
userRepository.delete(user);
Map<String, Boolean> response = new HashMap<>();
response.put("deleted", Boolean.TRUE);
return response;
}
Q56. How can logging levels be used with Spring Boot?
Some ways to use log level in spring boot are:
1. By using Spring Boot Apache Commons Logging for all internal logging:
Spring Boot's default configurations provide support for the use of the programming language Java Util Logging, Log4j2, and Logback, and using these, we can configure the console logging as well as file logging. We can specify the log file path and name using the logging.path and logging.file properties, respectively.
2. By using Spring Boot to define logging groups or log level or internal logging in our Spring Environment:
For example, adding logging.group.tomcat=org.apache.catalina, org.apache.coyote, org.apache.tomcat in the tomcat group.
Q57. Explain the term Spring Cloud.
Spring Cloud framework offers tools and services in order to make it simple for developers to create and deploy distributed systems that implement common patterns. The base of Spring Cloud is Spring Boot, which offers a wide range of functionality to assist you in managing and monitoring your application.
Q58. Explain @componentScan in the class file.
We use the @ComponentScan annotation to specify the base packages that Spring should scan for components or beans that are annotated with stereotype annotations. By default, Spring scans the current package and all of its sub-base packages. We can specify the packages to be scanned by using the @ComponentScan annotation along with the @Configuration annotation and providing the basePackages argument. It specifies base packages by using the basePackages attributes.
Q59. Name the key components of the spring boot.
Spring boot has the following key components:
- Spring Boot Starters
- Spring Boot AutoConfigurator
- Spring Boot CLI
- Spring Boot Actuator
These key components help to simplify the development of Spring applications by reducing the number of manual configurations required and providing production-grade features to monitor and manage the application.
Q60. Can you explain command-line properties?
Command-line properties are a way to pass configuration values to a Spring Boot application when it starts up. Command-line arguments are transformed into properties by Spring Boot and added as environment variables. Command-line properties are given priority over all other sources of property information.
Q61. Will you be able to run a Spring boot project by using spring boot CLI?
To execute the Spring Boot project using Spring Boot CLI, we can follow these steps:
- Install the Spring Boot CLI.
- Run the CLI.
- Initialize a new project.
- After initializing the new project, run the Spring Boot application by using any of the following commands: java -jar command: "java -jar target/myapplication-0.0.1-SNAPSHOT.jar",
- Using Maven command: "mvn spring-boot:run".
- Using Gradle command: "gradle bootRun".
Q62. What is the minimum version of JAVA that you will need to run the Spring Boot?
The minimum version of JAVA needed to run the Spring Boot is JAVA 8.
Q63. Tell me how JPA and Hibernate vary from one another.
JPA
- JPA stands for Java Persistence API.
- JPA is only a specification, which means that there is no implementation.
- JPA is just an interface that must be followed.
- The query language of JPA is Java Persistence query language.
Hibernate
- Hibernate is an ORM tool used for saving the state of the Java object in the database.
- It is an implementation of the JPA specification.
- Hibernate is a framework that supports JPA.
- Hibernate supports a Java Virtual Machine (JVM).
- The query language of Hibernate is Hibernate Query language.
Q64. Name the key HTTP method that can be used in Spring Boot rest services.
The key HTTP method that can be used in spring boot services are:
- GET: With this key HTTP method, it reads a resource.
- PUT: We can update an existing resource with PUT key HTTP method.
- POST: With this key HTTP method, it helps in the creation of a new resource.
- DELETE: The DELETE method deletes the resource.
- PATCH: It updates a part of an existing resource.
Q65. What should be the way to implement command-line applications in Spring Boot?
To use Spring Boot for command-line applications, we need to create a new Spring Boot project or use an existing one and then update the pom.xml file of the project and build the Spring Boot app into a single executable Jar dependencies file with Maven, and run the Spring Boot app from the command line application.
Q66. What do you mean by debug logging?
Debug logging is a feature that stores thorough details about each stage of a process in a log file which allows for further analysis and problem-solving. Debug logging can be enabled by adjusting an application's logging preferences or by specifying particular environment variables.
Due to the advent and popularity of cloud computing, the focus is on the core business, where a delegation of logistics is handled by expert service providers. Several service tools enable the developer to save cost and time. Hence, the microservices have been developed in an Agile manner. These microservices need to be lightweight and converging. This is where Spring Boot is useful. It allows applications to focus entirely on the business while Spring Boot handles the rest of the operations. Spring Boot includes default files for every operation and allows you to choose what you want to configure for the application.
We hope the above article helped you grasp the essential concepts of Spring Boot. For more interview questions on the same topics or other topics, stay tuned to Unstop.
Suggested Reads:
As a biotechnologist-turned-writer, I love turning complex ideas into meaningful stories that inform and inspire. Outside of writing, I enjoy cooking, reading, and travelling, each giving me fresh perspectives and inspiration for my work.
Login to continue reading
And access exclusive content, personalized recommendations, and career-boosting opportunities.
Subscribe
to our newsletter
Blogs you need to hog!

This Is My First Hackathon, How Should I Prepare? (Tips & Hackathon Questions Inside)
10 Best C++ IDEs That Developers Mention The Most!
Advantages and Disadvantages of Cloud Computing That You Should Know!


Comments
Add comment