
Asian Paints Alchemy 2026
C++ Programming Language
- A Brief Intro To C++ & Its History
- The Detailed History & Timeline Of C++ (With Infographic)
- Importance Of C++
- Versions Of C++ Language
- Structure Of A C++ Program
- Comparison With Other Popular Programming Languages
- Conclusion
- Frequently Asked Questions
- Test Your Skills: Quiz Time
- What Are Variables In C++?
- Declaration & Definition Of Variables In C++
- Variable Initialization In C++
- Rules & Regulations For Naming Variables In C++ Language
- Different Types Of Variables In C++
- Different Types of Variable Initialization In C++
- Conclusion
- Frequently Asked Questions
- Test Your Skills: Quiz Time
- What Are Primitive Data Types In C++?
- Derived Data Types In C++
- User-Defined Data Types In C++
- Abstract Data Types In C++
- Data Type Modifiers In C++
- Declaring Variables With Auto Keyword
- Conclusion
- Frequently Asked Questions
- Test Your Skills: Quiz Time
- Structure Of C++ Program: Components
- Segment 1: Documentation Section Of Structure Of C++ Program (With Example)
- Segment 2: Preprocessing & Namespace (Linking) Section Of CPP Program
- Segment 3: Definition Section In Structure of a C++ Program (With Examples)
- Segment 4: Main Function In Structure Of A C++ Program (With Example)
- Compilation & Execution Of C++ Programs | Step-by-Step Explanation
- Explaining Structure Of C++ Program With Suitable Example
- Conclusion
- Frequently Asked Questions
- Test Your Skills: Quiz Time
- What is Typedef in C++?
- The Role & Applications of Typedef in C++
- Basic Syntax for typedef in C++
- How Does typedef Work in C++?
- How to Use Typedef in C++ With Examples? (Multiple Data Types)
- The Difference Between #define & Typedef in C++
- Conclusion
- Frequently Asked Questions
- Test Your Skills: Quiz Time
- What Are Strings In C++?
- Types Of Strings In C++
- How To Declare & Initialize C-Style Strings In C++ Programs?
- How To Declare & Initialize Strings In C++ Using String Keyword?
- List Of String Functions In C++
- Operations On Strings Using String Functions In C++
- Concatenation Of Strings In C++
- How To Convert Int To Strings In C++
- Conclusion
- Frequently Asked Questions
- Test Your Skills: Quiz Time
- What Is String Concatenation In C++?
- How To Concatenate Two Strings In C++ Using The ‘+' Operator?
- String Concatenation Using The strcat( ) Function
- Concatenation Of Two Strings In C++ Using Loops
- String Concatenation Using The append() Function
- C++ String Concatenation Using The Inheritance Of Class
- Concatenate Two Strings In C++ With The Friend and strcat() Functions
- Why Do We Need To Concatenate Two Strings?
- How To Reverse Concatenation Of Strings In C++?
- Conclusion
- Frequently Asked Questions
- Test Your Skills: Quiz Time
- What Is Find In String C++?
- What Is A Substring?
- How To Find A Substring In A String In C++?
- How To Find A Character In String C++?
- Find All Substrings From A Given String In C++
- Index Substring In String In C++ From A Specific Start To A Specific Length
- Conclusion
- Frequently Asked Questions
- Test Your Skills: Quiz Time
- What Are Pointers In C++?
- Pointer Declaration In C++
- How To Initialize And Use Pointers In C++?
- Different Types Of Pointers In C++
- References & Pointers In C++
- Arrays And Pointers In C++
- String Literals & Pointers In C++
- Pointers To Pointers In C++ (Double Pointers)
- Arithmetic Operation On Pointers In C++
- Advantages Of Pointers In C++
- Some Common Mistakes To Avoid With Pointers In Cpp
- Conclusion
- Frequently Asked Questions
- Test Your Skills: Quiz Time
- Understanding Pointers In C++
- What Is Pointer To Object In C++?
- Declaration And Use Of Object Pointers In C++
- Advantages Of Pointer To Object In C++
- Pointer To Objects In C++ With Arrow Operator
- An Array Of Objects Using Pointers In C++
- Base Class Pointer For Derived Class Object In C++
- Conclusion
- Frequently Asked Questions
- Test Your Skills: Quiz Time
- What Is 'This' Pointer In C++?
- Defining ‘this’ Pointer In C++
- Example Of 'this' Pointer In C++
- Describing The Constness Of 'this' Pointer In C++
- Important Uses Of 'this' Pointer In C++
- Method Chaining Using 'this' Pointer In C++
- C++ Programs To Show Application Of 'This' Pointer
- How To Delete The ‘this’ Pointer In C++?
- Conclusion
- Frequently Asked Questions
- Test Your Skills: Quiz Time
- What is Reference?
- What is Pointer?
- Comparison Table Of C++ Pointer Vs. Reference
- Differences Between Reference And Pointer: A Detailed Explanation
- Why Are References Less Powerful Than Pointers?
- Conclusion
- Frequently Asked Questions
- Test Your Skills: Quiz Time
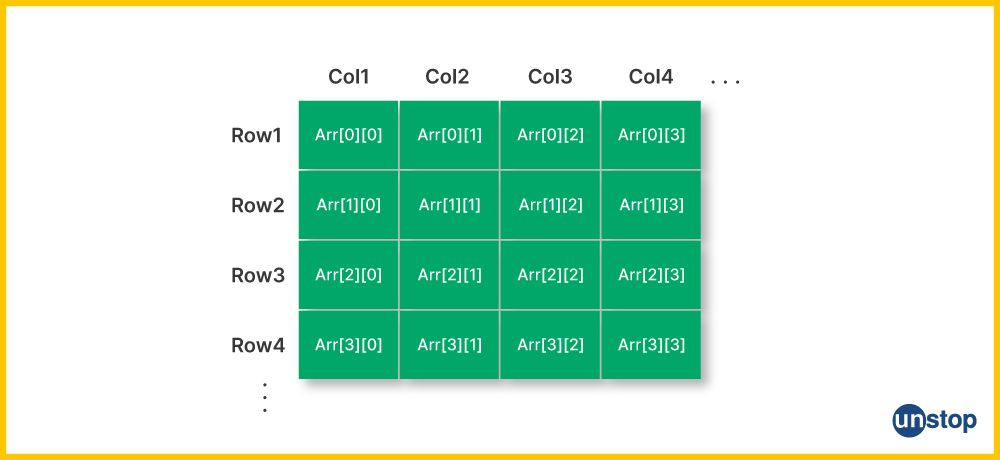
- How To Declare A 2D Array In C++?
- C++ Multi-Dimensional Arrays
- Ways To Initialize A 2D Array In C++
- Methods To Dynamically Allocate A 2D Array In C++
- Accessing/ Referencing Two-Dimensional Array Elements
- How To Initialize A Two-Dimensional Integer Array In C++?
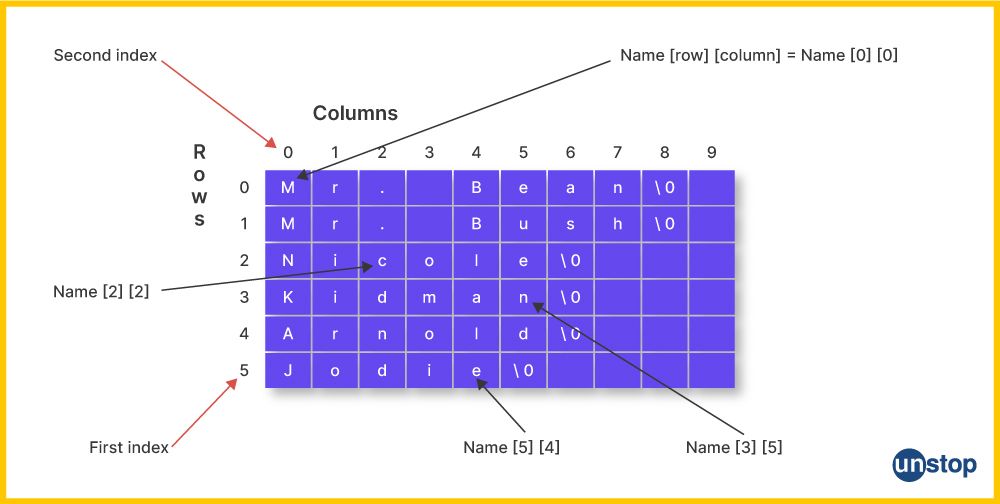
- How To Initialize A Two-Dimensional Character Array?
- How To Enter Data In Two-Dimensional Array In C++?
- Conclusion
- Frequently Asked Questions
- What Are Arrays Of Strings In C++?
- Different Ways To Create String Arrays In C++
- How To Access The Elements Of A String Array In C++?
- How To Convert Char Array To String?
- Conclusion
- Frequently Asked Questions
- What is Memory Allocation in C++ & Why Do We Need It?
- How Does Dynamic Memory Allocation Work?
- The new Operator in C++
- The delete Operator in C++
- Dynamic Memory Allocation in C++ | Arrays
- Did You Know: Companies That Ask About Dynamic Memory Allocation
- Dynamic Memory Allocation in C++ | Objects
- Deallocation of Dynamic Memory in C++
- malloc(), calloc(), and free() Functions in C/C++
- Applications of Dynamic Memory Allocation in C++
- Conclusion
- Frequently Asked Questions
- Test Your Skills: Quiz Time
- What Is A Substring In C++ (Substr C++)?
- Example for substr() in C++ | Finding Substring Using Positive and Negative Indices
- Understanding substr() Basics with Examples
- Use Cases/ Examples of substr() in C++
- How to Get a Substring Before a Character Using substr() in C++?
- Use substr() in C++ to Print all Substrings of a Given String
- Print Sum of all Substrings of a String Representing a Number
- Minimum Value of all Substrings of a String Representing a Number
- Maximum Value of all Substrings of a String Representing a Number
- Points To Remember For Substr In C++
- Conclusion
- Frequently Asked Questions
- Test Your Skills: Quiz Time
- What Is Operator In C++?
- Types Of Operators In C++ With Examples
- What Are Arithmetic Operators In C++?
- What Are Assignment Operators In C++?
- What Are Relational Operators In C++?
- What Are Logical Operators In C++?
- What Are Bitwise Operators In C++?
- What Is Ternary/ Conditional Operator In C++?
- Miscellaneous Operators In C++
- Precedence & Associativity Of Operators In C++
- Conclusion
- Frequently Asked Questions
- Test Your Skills: Quiz Time
- What Is The New Operator In C++?
- Example To Understand New Operator In C++
- The Grammar Elements Of The New Operator In C++
- Storage Space Allocation
- How Does The C++ New Operator Works?
- What Happens When Enough Memory In The Program Is Not Available?
- Initializing Objects Allocated With New Operator In C++
- Lifetime Of Objects Allocated With The New Operator In C++
- What Is The Delete Operator In C++?
- Difference Between New And Delete Operator In C++
- Conclusion
- Frequently Asked Questions
- Test Your Skills: Quiz Time
- Types Of Overloading In C++
- What Is Operator Overloading In C++?
- How To Overload An Operator In C++?
- Overloadable & Non-overloadable Operators In C++
- Unary Operator Overloading In C++
- Binary Operator Overloading In C++
- Special Operator Overloading In C++
- Rules For Operator Overloading In C++
- Advantages And Disadvantages Of Operator Overloading In C++
- Function Overloading In C++
- What Is the Difference Between Operator Functions and Normal Functions?
- Conclusion
- Frequently Asked Questions
- Test Your Skills: Quiz Time
- What Are Operators In C++?
- Introduction To Logical Operators In C++
- Types Of Logical Operators In C++ With Example Program
- Logical AND (&&) Operator In C++
- Logical NOT(!) Operator In C++
- Logical Operator Precedence And Associativity In C++
- Relation Between Conditional Statements And Logical Operators In C++
- C++ Relational Operators
- Conclusion
- Frequently Asked Important Interview Questions:
- Test Your Skills: Quiz Time
- Different Type Of C++ Bitwise Operators
- C++ Bitwise AND Operator
- C++ Bitwise OR Operator
- C++ Bitwise XOR Operator
- Bitwise Left Shift Operator In C++
- Bitwise Right Shift Operator In C++
- Bitwise NOT Operator
- What Is The Meaning Of Set Bit In C++?
- What Does Clear Bit Mean?
- Conclusion
- Frequently Asked Questions
- Test Your Skills: Quiz Time
- Types of Comments in C++
- Single Line Comment In C++
- Multi-Line Comment In C++
- How Do Compilers Process Comments In C++?
- C- Style Comments In C++
- How To Use Comment In C++ For Debugging Purposes?
- When To Use Comments While Writing Codes?
- Why Do We Use Comments In Codes?
- Conclusion
- Frequently Asked Questions
- Test Your Skills: Quiz Time
- What Are Storage Classes In Cpp?
- What Is The Scope Of Variables?
- What Are Lifetime And Visibility Of Variables In C++?
- Types of Storage Classes in C++
- Automatic Storage Class In C++
- Register Storage Class In C++
- Static Storage Class In C++
- External Storage Class In C++
- Mutable Storage Class In C++
- Conclusion
- Frequently Asked Questions
- Test Your Skills: Quiz Time
- Decision Making Statements In C++
- Types Of Conditional Statements In C++
- If-Else Statement In C++
- If-Else-If Ladder Statement In C++
- Nested If Statements In C++
- Alternatives To Conditional If-Else In C++
- Switch Case Statement In C++
- Jump Statements & If-Else In C++
- Conclusion
- Frequently Asked Questions
- Test Your Skills: Quiz Time
- What Is A Switch Statement/ Switch Case In C++?
- Rules Of Switch Case In C++
- How Does Switch Case In C++ Work?
- The break Keyword In Switch Case C++
- The default Keyword In C++ Switch Case
- Switch Case Without Break And Default
- Advantages & Disadvantages of C++ Switch Case
- Conclusion
- Frequently Asked Questions
- Test Your Skills: Quiz Time
- What Is A For Loop In C++?
- Syntax Of For Loop In C++
- How Does A For Loop In C++ Work?
- Examples Of For Loop Program In C++
- Ranged Based For Loop In C++
- Nested For Loop In C++
- Infinite For Loop In C++
- Conclusion
- Frequently Asked Questions
- Test Your Skills: Quiz Time
- What Is A While Loop In C++?
- Parts Of The While Loop In C++
- C++ While Loop Program Example
- How Does A While Loop In C++ Work?
- What Is Pre-checking Process Or Entry-controlled Loop?
- When Are While Loops In C++ Useful?
- Example C++ While Loop Program
- What Are Nested While Loops In C++?
- Infinite While Loop In C++
- Alternatives To While Loop In C++
- Conclusion
- Frequently Asked Questions
- Test Your Skills: Quiz Time
- What Are Loops & Its Types In C++?
- What Is A Do-While Loop In C++?
- Do-While Loop Example In C++ To Print Numbers
- How Does A Do-While Loop In C++ Work?
- Various Components Of The Do-While Loop In C++
- Example 2: Adding User-Input Positive Numbers With Do-While Loop
- C++ Nested Do-While Loop
- C++ Infinitive Do-while Loop
- What is the Difference Between While Loop and Do While Loop in C++?
- When To Use A Do-While Loop?
- Conclusion
- Frequently Asked Questions
- Test Your Skills: Quiz Time
- What are 2D Vectors in C++?
- How to Declare 2D Vectors in C++
- How to Initialize a 2D Vector in C++?
- Creating a 2D Vector in C++ with User Input for Column & Row Size
- Methods for Traversing 2D Vectors in C++
- Interview Spotlight: 2D Vectors in FAANG Interviews
- Printing 2D Vector in C++ Using Nested Loops
- Example C++ Programs for Creating 2D Vectors
- How to Access & Modify 2D Vector Elements in C++?
- Adding Elements to 2D Vector Using push_back() Function
- Removing Elements from Vector in C++ Using pop_back() Function
- Did You Know? Real-World Outage: Crash Cause Linked to 2D Vector Usage
- Advantages of 2D Vectors Over Traditional Arrays
- Conclusion
- Frequently Asked Questions
- Test Your Skills: Quiz Time
- How To Print A Vector In C++ By Overloading Left Shift (<<) Operator?
- How To Print Vector In C++ Using Range-Based For-Loop?
- Print Vector In C++ With Comma Separator
- Printing Vector In C++ Using Indices (Square Brackets/ Double Brackets & at() Function)
- How To Print A Vector In C++ Using std::copy?
- How To Print A Vector In C++ Using for_each() Function?
- Printing C++ Vector Using The Lambda Function
- How To Print Vector In C++ Using Iterators?
- Conclusion
- Frequently Asked Questions
- Definition Of C++ Find In Vector
- Using The std::find() Function
- How Does find() In Vector C++ Function Work?
- Finding An Element By Custom Comparator Using std::find_if() Function
- Use std::find_if() With std::distance()
- Element Find In Vector C++ Using For Loop
- Using The find_if_not Function
- Find Elements With The Linear Search Approach
- Conclusion
- Frequently Asked Questions
- What Is Sort() Function In C++?
- Sort() Function In C++ From Standard Template Library
- Exceptions Of Sort() Function/ Algorithm In C++
- The Stable Sort() Function In C++
- Partial Sort() Function In C++
- Sorting In Ascending Order With Sort() Function In C++
- Sorting In Descending Order With Sort Function In C++
- Sorting In Desired Order With Custom Comparator Function & Sort Function In C++
- Sorting Elements In Desired Order Using Lambda Expression & Sort Function In C++
- Types of Sorting Algorithms In C++
- Advanced Sorting Algorithms In C++
- How Does the Sort() Function Algorithm Work In C++?
- Conclusion
- Frequently Asked Questions
- What Is Function Overloading In C++?
- Ways Of Function Overloading In C++
- Function Overloading In C++ Using Different Types Of Parameters
- Function Overloading In C++ With Different Number Of Parameters
- Function Overloading In C++ Using Different Sequence Of Parameters
- How Does Function Overloading In C++ Work?
- Rules Of Function Overloading In C++
- Why Is Function Overloading Used?
- Types Of Function Overloading Based On Time Of Resolution
- Causes Of Function Overloading In C++
- Ambiguity & Function Overloading In C++
- Advantages Of Function Overloading In C++
- Disadvantages Of Function Overloading In C++
- Operator Overloading In C++
- Function Overriding In C++
- Difference Between Function Overriding & Function Overloading In C++
- Conclusion
- Frequently Asked Questions
- What Is An Inline Function In C++?
- How To Define The Inline Function In C++?
- How Does Inline Function In C++ Work?
- The Need For An Inline Function In C++
- Can The Compiler Ignore/ Reject Inline Function In C++ Programs?
- Normal Function Vs. Inline Function In C++
- Classes & Inline Function In C++
- Understanding Inline, __inline, And __forceinline Functions In C++
- When To Use An Inline Function In C++?
- Advantages Of Inline Function In C++
- Disadvantages Of Inline Function In C++
- Why Not Use Macros Instead Of An Inline Function In C++?
- Conclusion
- Frequently Asked Questions
- Test Your Skills: Quiz Time
- What Is Static Data Member In C++?
- How To Declare Static Data Members In C++?
- How To Initialize/ Define Static Data Member In C++?
- Ways To Access A Static Data Member In C++
- What Are Static Member Functions In C++?
- Example Of Member Function & Static Data Member In C++
- Practical Applications Of Static Data Member In C++
- Conclusion
- Frequently Asked Questions
- What Is A Constant In C++?
- Ways To Define Constant In C++
- What Are Literals In C++?
- Pointer To A Constant In C++
- Constant Function Arguments In C++
- Constant Member Function Of Class In C++
- Constant Data Members In C++
- Object Constant In C++
- Conclusion
- Frequently Asked Questions(FAQ)
- What is the Friend Function in C++?
- Declaration of Friend Function in C++ with Example
- Characteristics of Friend Function in C++
- Types/ Ways to Implement Friend Function in C++
- Global Friend Function in C++ (Global Function as Friend Function )
- Member Function of Another Class as a Friend Function in C++
- Function Overloading Using Friend Function in C++
- Advantages & Disadvantages of Friend Function in C++
- Interview Spotlight: Friend Functions in Cognizant Interview
- What is a C++ Friend Class?
- A Function Friendly to Multiple Classes
- C++ Friend Class vs. Friend Function in C++
- Some Important Points About Friend Functions and Classes in C++
- Conclusion
- Frequently Asked Questions
- What Is Function Overriding In C++?
- The Working Mechanism Of Function Overriding In C++
- Real-Life Example Of Function Overriding In C++
- Accessing Overriding Function In C++
- Accessing Overridden Function In C++
- Function Call Binding With Class Objects | Function Overriding In C++
- Function Call Binding With Base Class Pointers | Function Overriding In C++
- Advantages Of Function Overriding In C++
- Variations In Function Overriding In C++
- Function Overloading In C++
- Function Overloading Vs Function Overriding In C++
- Conclusion
- Frequently Asked Questions
- Errors In C++
- What Is Exception Handling In C++?
- Exception Handling In C++ Program Example
- C++ Exception Handling: Basic Keywords
- The Need For C++ Exception Handling
- C++ Standard Exceptions
- C++ Exception Classes
- User-Defined Exceptions In C++
- Advantages & Disadvantages Of C++ Exception Handling
- Conclusion
- Frequently Asked Questions
- What Are Templates In C++ & How Do They Work?
- Types Of Templates In C++
- What Are Function Templates In C++?
- C++ Template Functions With Multiple Parameters
- C++ Template Function Overloading
- What Are Class Templates In C++?
- Defining A Class Member Outside C++ Template Class
- C++ Template Class With Multiple Parameters
- What Is C++ Template Specialization?
- How To Specify Default Arguments For Templates In C++?
- Advantages Of C++ Templates
- Disadvantages Of C++ Templates
- Difference Between Function Overloading And Templates In C++
- Conclusion
- Frequently Asked Questions
- Structure
- Structure Declaration
- Initialization of Structure
- Copying and Comparing Structures
- Array of Structures
- Nested Structures
- Pointer to a Structure
- Structure as Function Argument
- Self Referential Structures
- Class
- Object Declaration
- Accessing Class Members
- Similarities between Structure and Class
- Which One Should You Choose?
- Key Difference Between a Structure and Class
- Summing Up
- Test Your Skills: Quiz Time
- What Is A Class And Object In C++?
- What Is An Object In C++?
- How To Create A Class & Object In C++? With Example
- Interview Spotlight: Classes & Objects In Adobe & Pixar Interviews
- Access Modifiers & Class/ Object In C++
- Member Functions Of A Class In C++
- How To Access Data Members And Member Functions?
- Significance Of Class & Object In C++
- Did You Know? The Concept of Classes & Object Powers Major Apps
- What Are Constructors In C++ & Its Types?
- What Is A Destructor Of Class In C++?
- An Array Of Objects In C++
- Object In C++ As Function Arguments
- The this (->) Pointer & Classes In C++
- The Need For Semicolons At The End Of A Class In C++
- Conclusion
- Frequently Asked Questions
- What Are Static Members In C++?
- Static Member Functions in C++
- Ways To Call Static Member Function In C++
- Properties Of Static Member Function In C++
- Need Of Static Member Functions In C++
- Regular Member Function Vs. Static Member Function In C++
- Limitations Of Static Member Functions In C++
- Conclusion
- Frequently Asked Questions
- What Is Constructor In C++?
- Characteristics Of A Constructor In C++
- Types Of Constructors In C++
- Default Constructor In C++
- Parameterized Constructor In C++
- Copy Constructor In C++
- Dynamic Constructor In C++
- Benefits Of Using Constructor In C++
- How Does Constructor In C++ Differ From Normal Member Function?
- Constructor Overloading In C++
- Constructor For Array Of Objects In C++
- Constructor In C++ With Default Arguments
- Initializer List For Constructor In C++
- Dynamic Initialization Using Constructor In C++
- Conclusion
- Frequently Asked Questions
- What Is A Constructor In C++?
- What Is Constructor Overloading In C++?
- Dеclaration Of Constructor Ovеrloading In C++
- Condition For Constructor Overloading In C++
- How Constructor Ovеrloading In C++ Works?
- Examples Of Constructor Overloading In C++
- Lеgal & Illеgal Constructor Ovеrloading In C++
- Types Of Constructors In C++
- Characteristics Of Constructors In C++
- Advantage Of Constructor Overloading In C++
- Disadvantage Of Constructor Overloading In C++
- Conclusion
- Frеquеntly Askеd Quеstions
- What Is A Destructor In C++?
- Rules For Defining A Destructor In C++
- When Is A Destructor in C++ Called?
- Order Of Destruction In C++
- Default Destructor & User-Defined Destructor In C++
- Virtual Destructor In C++
- Pure Virtual Destructor In C++
- Key Properties Of Destructor In C++ You Must Know
- Explicit Destructor Calls In C++
- Destructor Overloading In C++
- Difference Between Normal Member Function & Destructor In C++
- Important Uses Of Destructor In C++
- Conclusion
- Frequently Asked Questions
- What Is A Constructor In C++?
- What Is A Destructor In C++?
- Difference Between Constructor And Destructor In C++
- Constructor In C++ | A Brief Explanation
- Destructor In C++ | A Brief Explanation
- Difference Between Constructor And Destructor In C++ Explained
- Order Of Calling Constructor And Destructor In C++ Classes
- Conclusion
- Frequently Asked Questions
- Test Your Skills: Quiz Time
- What Is Type Conversion In C++?
- What Is Type Casting In C++?
- Types Of Type Conversion In C++
- Implicit Type Conversion (Coercion) In C++
- Explicit Type Conversion (Casting) In C++
- Advantages Of Type Conversion In C++
- Disadvantages Of Type Conversion In C++
- Difference Between Type Casting & Type Conversion In C++
- Application Of Type Casting In C++
- Conclusion
- Frequently Asked Questions
- What Is A Copy Constructor In C++?
- Characteristics Of Copy Constructors In C++
- Types Of Copy Constructors In C++
- When Do We Call The Copy Constructor In C++?
- When Is A User-Defined Copy Constructor Needed In C++?
- Types Of Constructor Copies In C++
- Can We Make The Copy Constructor In C++ Private?
- Assignment Operator Vs Copy Constructor In C++
- Example Of Class Where A Copy Constructor Is Essential
- Uses Of Copy Constructors In C++
- Conclusion
- Frequently Asked Questions
- Why Do You Need Object-Oriented Programming (OOP) In C++?
- OOPs Concepts In C++ With Examples
- The Class OOPs Concept In C++
- The Object OOPs Concept In C++
- The Inheritance OOPs Concept In C++
- Polymorphism OOPs Concept In C++
- Abstraction OOPs Concept In C++
- Encapsulation OOPs Concept In C++
- Other Features Of OOPs In C++
- Benefits Of OOP In C++ Over Procedural-Oriented Programming
- Disadvantages Of OOPS Concept In C++
- Why Is C++ A Partial OOP Language?
- Conclusion
- Frequently Asked Questions
- Introduction To Abstraction In C++
- Types Of Abstraction In C++
- What Is Data Abstraction In C++?
- Understanding Data Abstraction In C++ Using Real Life Example
- Ways Of Achieving Data Abstraction In C++
- What Is An Abstract Class?
- Advantages Of Data Abstraction In C++
- Use Cases Of Data Abstraction In C++
- Encapsulation Vs. Abstraction In C++
- Conclusion
- Frequently Asked Questions
- What Is Encapsulation In C++?
- How Does Encapsulation Work In C++?
- Types Of Encapsulation In C++
- Why Do We Need Encapsulation In C++?
- Implementation Of Encapsulation In C++
- Access Specifiers & Encapsulation In C++
- Role Of Access Specifiers In Encapsulation In C++
- Member Functions & Encapsulation In C++
- Data Hiding & Encapsulation In C++
- Features Of Encapsulation In C++
- Advantages & Disadvantages Of Encapsulation In C++
- Difference Between Abstraction and Encapsulation In C++
- Conclusion
- Frequently Asked Questions
- What Is Inheritance In C++?
- What Are Child And Parent Classes?
- Syntax And Structure Of Inheritance In C++
- Implementing Inheritance In C++
- Importance Of Inheritance In C++
- Types Of Inheritance In C++
- Visibility Modes Of Inheritance In C++
- Access Modifiers & Inheritance In C++
- How To Make A Private Member Inheritable?
- Member Function Overriding In Inheritance In C++
- The Diamond Problem | Inheritance In C++ & Ambiguity
- Ways To Avoid Ambiguity Inheritance In C++
- Why & When To Use Inheritance In C++?
- Advantages Of Inheritance In C++
- The Disadvantages Of Inheritance In C++
- Conclusion
- Frequently Asked Questions
- What Is Hybrid Inheritance In C++?
- Importance Of Hybrid Inheritance In Object Oriented Programming
- Example Of Hybrid Inheritance In C++: Using Single and Multiple Inheritance
- Example Of Hybrid Inheritance In C++: Using Multilevel and Hierarchical Inheritance
- Real-World Applications Of Hybrid Inheritance In C++
- Conclusion
- Frequently Asked Questions
- What Is Multiple Inheritance In C++?
- Examples Of Multiple Inheritance In C++
- Ambiguity Problem In Multiple Inheritance In C++
- Ambiguity Resolution In Multiple Inheritance In C++
- The Diamond Problem In Multiple Inheritance In C++
- Visibility Modes In Multiple Inheritance In C++
- Advantages & Disadvantages Of Multiple Inheritance In C++
- Multiple Inheritance Vs. Multilevel Inheritance In C++
- Conclusion
- Frequently Asked Questions
- What Is Multilevel Inheritance In C++?
- Block Diagram For Multilevel Inheritance In C++
- Multilevel Inheritance In C++ Example
- Constructor & Multilevel Inheritance In C++
- Use Cases Of Multilevel Inheritance In C++
- Multiple Vs Multilevel Inheritance In C++
- Advantages & Disadvantages Of Multilevel Inheritance In C++
- Conclusion
- Frequently Asked Questions
- What Is Hierarchical Inheritance In C++?
- Example 1: Hierarchical Inheritance In C++
- Example 2: Hierarchical Inheritance In C++
- Impact of Visibility Modes In Hierarchical Inheritance In C++
- Advantages And Disadvantages Of Hierarchical Inheritance In C++
- Use Cases Of Hierarchical Inheritance In C++
- Conclusion
- Frequently Asked Questions
- What Are Access Specifiers In C++?
- Types Of Access Specifiers In C++
- Public Access Specifiers In C++
- Private Access Specifier In C++
- Protected Access Specifier In C++
- The Need For Access Specifiers In C++
- Combined Example For All Access Specifiers In C++
- Best Practices For Using Access Specifiers In C++
- Why Can't Private Members Be Accessed From Outside A Class?
- Conclusion
- Frequently Asked Questions
- What Is The Diamond Problem In C++?
- Example Of The Diamond Problem In C++
- Resolution Of The Diamond Problem In C++
- Virtual Inheritance To Resolve Diamond Problem In C++
- Scope Resolution Operator To Resolve Diamond Problem In C++
- Conclusion
- Frequently Asked Questions
C++ 2D Array & Multi-Dimensional Arrays Explained (+Examples)
A 2D array in C++ allows us to arrange data into a matrix-like layout with more than two rows & columns. They are crucial for managing and manipulating structured data in programs. It is the simplest form of a multi-dimensional array.
The 2D array idea is an intriguing expansion of the popular array concept used in C++ programming. In contrast to their one-dimensional predecessors, two-dimensional arrays (or 2D arrays) arrange data into rows and columns in a matrix-like layout. This dynamic construct is a useful tool for efficiently handling structured data. In this post, we discuss the concept of 2D arrays in C++ language, comprehending their significance and how they help programmers approach complex problems systematically.
By the end of this article, you will be equipped with the knowledge and abilities to use 2D arrays in C++ programs effectively.
Syntax Of Two-Dimensional Array In C++
data_type array_name[row_size][column_size];
Here,
- data_type: This describes the kind of data/ elements that will be stored in the array, such as characters (char), floating-point numbers (float), integers (int), or user-defined types.
- array_name: You must give your array a name/ identifier. You may use it in your code as a label to refer to the array.
- row_size: This specifies how many rows there are in your 2D array. It resembles a grid's height.
- column_size: It specifies how many columns your 2D array has. It is comparable to a grid's width.
- The array's general form is determined by these sizes, resulting in a grid-like structure that may contain data.
Parameters:
- This declaration has no parameters. It simply sets up the two-dimensional array called myArray to contain integers in a 3x4 grid.
Return Value:
There is no standard return value for the given two-dimensional array. Instead, a multi-dimensional container is offered to hold pieces of the designated data type. These items may be accessed and changed via indexing, where each element is given a unique identification by its row and column indices inside the array.
In the sections ahead, we will discuss the use of two-dimensional arrays in C++ in a variety of ways, from initialization and memory layout to accessing specific items and carrying out basic operations.
How To Declare A 2D Array In C++?
When declaring a two-dimensional array in C++, the data type, size, and optional initialization of its entries must all be specified. There are two ways to declare a 2D array in C++. One without initialization, i.e., where we do not assign values to the array, and the second with initialization. Let’s explore these methods further with the help of examples.
Declaration Of 2D Array In C++ Without Initialization
Declaring an array in a programming environment without initializing it means you are defining an array variable without giving its components any initial values. As a result, depending on the programming language and data type, the array's components will have default values.
For instance, in C and C++, if you declare an integer array without initializing it, the contents of the array's components will likely be random and trash. If you wish to start with certain values or make sure that each element has a known initial state, you must initialize the array.
Syntax:
data_type array_name[row_size][column_size];
The syntax is the same as the one given above, with the same components. Now, let’s look at an example that showcases the implementation of the same.
Example:
CODE SNIPPET IS HEREI2luY2x1ZGUgPGlvc3RyZWFtPgoKaW50IG1haW4oKSB7CmludCBtYXRyaXhbM11bNF07CnJldHVybiAwOwp9
Output:
All we have done in the example above is declare a 2D array, i.e., there are no output statements in the code. Thus, when you execute this program, there won't be any output that can be seen.
Explanation:
In this example,
- A 2D array called matrix, with an int data type, is declared.
- There are 4 columns and 3 rows. The array's elements will, by default, have garbage values because it was not populated with any data.
Declaration & Initialization Of 2D Array In C++
Making an array variable and instantly giving each of its components a particular initial value is known as declaring an array with initialization. This enables you to begin with the array's preset and well-known values. In computer programming, you may accomplish this by declaring the array with a list of values contained in curly brackets. These values will be applied to the corresponding array entries.
Syntax:
data_type array_name[row_size][column_size] = { {val11, val12, ...}, {val21, val22, ...}, ... };
Here,
- The basic components like data_type, array_name, row_size, and column_size are the same as the one at the top.
- Curly brackets contain the values for the members of the 2D array. Here, val11 and val12 refer to the values that will go in the first row, with 1 and 2 representing the column numbers.
- Similarly, val21 and val22 refer to the values that will go in the 2nd row, columns 1 and 2, respectively.
Example:
CODE SNIPPET IS HEREI2luY2x1ZGUgPGlvc3RyZWFtPgoKaW50IG1haW4oKSB7CgppbnQgbWF0cml4WzJdWzNdID0geyB7MSwgMiwgM30sIHs0LCA1LCA2fSB9OwoKLy8gTG9vcCB0aHJvdWdoIHRoZSBtYXRyaXggYW5kIHByaW50IGVhY2ggZWxlbWVudApmb3IgKGludCBpID0gMDsgaSA8IDI7IGkrKykgewpmb3IgKGludCBqID0gMDsgaiA8IDM7IGorKykgewpzdGQ6OmNvdXQgPDwgbWF0cml4W2ldW2pdIDw8ICIgIjt9CnN0ZDo6Y291dCA8PCBzdGQ6OmVuZGw7fQoKcmV0dXJuIDA7Cn0=
Output:
Matrix elements:
1 2 3
4 5 6
Explanation:
In the C++ program above,
- We declare a 2D array called matrix with dimensions of 2 rows and 3 columns and initialize its elements.
- The inner braces represent the rows, and the comma-separated values represent their constituents (i.e., column elements). The array's items are written in a row-major sequence, i.e., starting with the first row, then the second row, and so on.
- As you can see, we have specified the data type, array name, and dimensions when declaring and initializing the two-dimensional array.
- Next, we initiate a nested for loop to access the elements of the array and then print them using std::cout.
Note- You can easily design and maintain a 2D array in C++ if you understand declarations and adapt them for different data formats and problem-solving scenarios.
C++ Multi-Dimensional Arrays
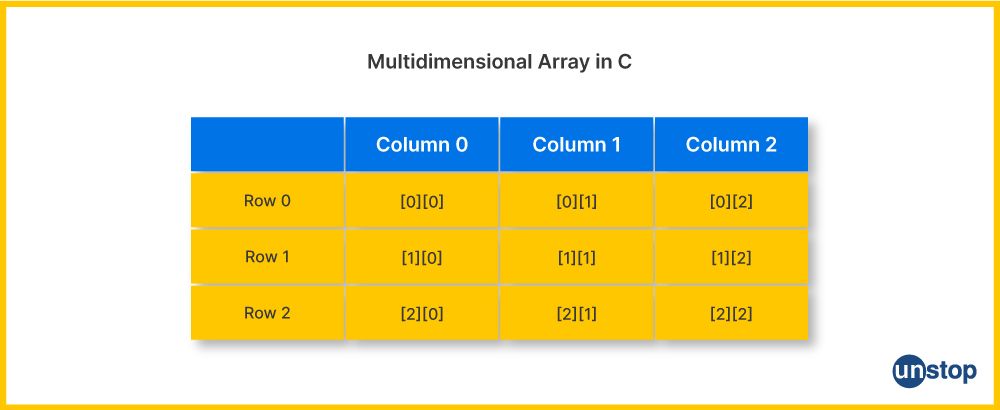
Data in several dimensions can be arranged using multi-dimensional arrays in C++ to produce an organized grid-like layout. Multi-dimensional arrays can contain numerous rows and columns (or dimensions) to represent more sophisticated data structures, such as matrices, tables, or grids, in contrast to one-dimensional arrays, which are linear and have a single row of items.
Understanding Multidimensional Arrays
In essence, a multi-dimensional array is an array of arrays. A three-dimensional array can be seen as a stack of grids, similar to how a two-dimensional array forms a grid, with each element living in a specific spot determined by its indices in the various dimensions.
This expansion can be extended further to include four, five, or more dimensions, each of which offers an additional level of data organization. The data type, array name, and dimensions for each level must all be specified when declaring a multidimensional array.
Syntax for defining a three-dimensional array:
data_type array_name[dim1_size][dim2_size]...[dimN_size];
Here,
- data_type: This identifies the data type (such as int, double, char, etc.) of the elements to be stored in the array whose name is represented here by array_name.
- The elements dim1_size, dim2_size,..., and dimN_size represent the arrays' size/ dimension. This depends on the requirements of the respective data structure you wish to create.
Example:
CODE SNIPPET IS HEREI2luY2x1ZGUgPGlvc3RyZWFtPgoKaW50IG1haW4oKSB7CgovLyBEZWNsYXJlIGFuZCBpbml0aWFsaXplIGEgMkQgaW50ZWdlciBhcnJheSB3aXRoIGRpbWVuc2lvbnMgM3gzCmludCBtYXRyaXhbM11bM10gPSB7CnsxLCAyLCAzfSwKezQsIDUsIDZ9LAp7NywgOCwgOX0KfTsKCi8vIEFjY2VzcyBhbmQgcHJpbnQgZWxlbWVudHMKc3RkOjpjb3V0IDw8ICJBY2Nlc3NpbmcgMkQgQXJyYXkgRWxlbWVudHM6IiA8PCBzdGQ6OmVuZGw7CmZvciAoaW50IGkgPSAwOyBpIDwgMzsgaSsrKSB7CmZvciAoaW50IGogPSAwOyBqIDwgMzsgaisrKSB7CnN0ZDo6Y291dCA8PCAibWF0cml4WyIgPDwgaSA8PCAiXVsiIDw8IGogPDwgIl0gPSAiIDw8IG1hdHJpeFtpXVtqXSA8PCBzdGQ6OmVuZGw7fQp9CgpyZXR1cm4gMDsKfQ==
Output:
Accessing 2D Array Elements:
matrix[0][0] = 1
matrix[0][1] = 2
matrix[0][2] = 3
matrix[1][0] = 4
matrix[1][1] = 5
matrix[1][2] = 6
matrix[2][0] = 7
matrix[2][1] = 8
matrix[2][2] = 9
Explanation:
We begin this example by including the iostream header file. Then-
- Inside the main() function, we declare and initialize a 2D integer array, called matrix, that is 3x3 in size, resembling a grid with 3 rows and 3 columns.
- We also populate this 2D array with integer values between 1 and 9, placing them in rows and columns to create the appearance of a straightforward 3x3 grid of numbers.
- Next, we use a nested for loop to cycle over each element of this 2D array. This loop along with the std::cout function, helps print each piece of the matrix independently.
- The output consists of a message with the row and column indices and the value kept in that position within the matrix array for each element it reads.
Note- This code generates a grid of numbers, examines each one, one at a time, and displays them together with their grid placements. You can see how the numbers are arranged in the 3x3 grid by looking at the output.
Complexity Analysis:
The time complexity of accessing elements in a multi-dimensional array is O(1) because you can directly access any element using its row and column indices. However, the complexity of executing operations on the full array depends on how many elements there are, and for an array with N total items, the complexity can be O(N).
Benefits Of Multi-Dimensional Arrays In C++
The benefits of using multidimensional arrays are as follows:
- It is more efficient to use multidimensional arrays since numerous indexes can be used to find a specific element.
- Computers used in science and mathematics frequently use multidimensional arrays, indicating they are frequently used in science and mathematics.
- using multidimensional arrays allows us to store and process 2D images, video in three dimensions, and spatiotemporal data in four dimensions more efficiently and with ease.
- Coding may be made simpler by using multidimensional arrays instead of intricate data structures or hierarchical collections.
- A variety of programming languages and libraries are made to function with multidimensional arrays more effectively. For instance, multidimensional arrays are primarily used by NumPy, a sophisticated Python tool for numerical operations.
- In comparison to other hierarchical data structures like lists, multidimensional arrays use less memory.
- Multidimensional arrays are also frequently used to fulfill tasks requiring data analysis and modification. For example, Python tools like the Pandas use multidimensional arrays (DataFrames) to execute different data operations swiftly.
- Multidimensional arrays are used in geospatial and GIS applications to represent data spatially and chronologically, allowing for quick analysis and presentation of geographic information.
- Since pictures and signals are frequently represented as 2D or 3D arrays for filtering, editing, and analysis, multidimensional arrays are crucial for imaging and signal processing applications.
- Multiple arrays offer a natural approach to represent and manage data for creating simulations or models with multiple or time-varying dimensions.
Moreover, they are an effective tool for many programming jobs since they can handle data in a variety of dimensions and are very reliable and flexible.
Check this out- Boosting Career Opportunities For Engineers Through E-School Competitions
C++ Multidimensional Array Example: Declaration & Initialization Together
The syntax to simultaneously define and initialize a multidimensional array in C++ in as follows:
data_type array_name[rows][columns] = {
{value_00, value_01, value_02, ...},
{value_10, value_11, value_12, ...},
// more rows
};
Here,
- The components data_type and array_name refer to the data type of elements to be stored in the array and the name of the said array, respectively.
- The array's dimensions are defined by [rows][columns], indicating the number of rows and columns. It typically starts with a two-dimensional array with a set of predetermined integer values.
- Elements value_00, value_01, value_02,..., and so on represent the values assigned to the array element at the time of initialization. Each inner set within curly brackets stands for a row, and inside these sets, we list values for each column. The placeholders, such as value_00, represent actual values of the chosen data type.
We can use the syntax given above to:
- Declare or define a multidimensional array with a given name and dimensions (rows and columns).
- To initialize the elements of the array in a single line of code.
Here is an illustration of the declaration and initialization of a 3D array in C++.:
Code Example:
CODE SNIPPET IS HEREI2luY2x1ZGUgPGlvc3RyZWFtPgoKaW50IG1haW4oKSB7CgovLyBEZWNsYXJlIGFuZCBpbml0aWFsaXplIGEgM0QgaW50ZWdlciBhcnJheQppbnQgbWF0cml4WzJdWzJdWzJdID0gewp7CnsxLCAyfSwKezQsIDV9LAp9LAp7Cns5LCAzfSwKezUsIDd9Cn0KfTsKCi8vIEFjY2VzcyBhbmQgcHJpbnQgZWxlbWVudHMgb2YgdGhlIGFycmF5CmZvciAoaW50IGkgPSAwOyBpIDwgMjsgKytpKSB7CmZvciAoaW50IGogPSAwOyBqIDwgMjsgKytqKSB7CmZvciAoaW50IGs9IDA7IGs8MjsgKytrKSB7CnN0ZDo6Y291dCA8PCAibWF0cml4WyIgPDwgaSA8PCAiXVsiIDw8IGogPDwgIl1bIiA8PCBrIDw8ICJdID0gIiA8PCBtYXRyaXhbaV1bal1ba10gPDwgc3RkOjplbmRsO30KfQp9CgpyZXR1cm4gMDsKfQ==
Output:
matrix[0][0][0] = 1
matrix[0][0][1] = 2
matrix[0][1][0] = 4
matrix[0][1][1] = 5
matrix[1][0][0] = 9
matrix[1][0][1] = 3
matrix[1][1][0] = 5
matrix[1][1][1] = 7
Explanation:
A 3D array named matrix is declared and initialized in this C++ program, after which its elements are accessed and printed.
- This C++ program begins by including the iostream library, allowing for input and output operations.
- Then, inside the main() function, we declare a three-dimensional integer array named matrix and initialize its elements. The array represents a structure with two sets of grids with two rows and two columns each.
- Then, we use a set of three nested for-loops to access and print each matrix member. Here-
- The outer loop (controlled by i) iterates through the first dimension, representing the rows within each grid.
- The middle loop (controlled by j) iterates through the second dimension, i.e., the columns within each grid.
- The innermost loop (controlled by k) iterates through the third dimension, i.e, the number of grids in the structure.
- Inside the loops, we use the std::cout operation to print the elements of the matrix along with the indices.
- We also use std::endl statement so that each element is printed in the next line.
- The program ends by returning 0 to show that it ran correctly.
In general, this program initializes a 3D array with certain values before traversing and printing each member of the array using nested loops.
Ways To Initialize A 2D Array In C++
The process of initialization of a 2D array in C++ is when we assign initial values to the elements of a two-dimensional array. A 2D array sometimes called a matrix, is a type of data structure that organizes its items into rows and columns to create a grid-like pattern. Each component of this grid is given a particular value when a 2D array is initialized. We have already discussed the standard method to initialize a 2D array above. In this section, we will revisit this method and also discuss other methods in C++ to initialize a 2D array. So let's get started.
Standard Method For 2D Array Initialization In C++
With this approach, a 2D array may be declared with its data type, name, dimensions (rows and columns), and starting state, all in a segment of code. When you know the values you want to give the elements, it's a straightforward approach to generate and populate arrays with data.
The syntax to initialize a 2D array in C++ is:
data_type array_name[rows][columns] = {
{value_00, value_01, value_02, ...},
{value_10, value_11, value_12, ...},
// more rows
};
Here,
- data_type: This describes the data type of each element that will be stored in the array. In other words, it specifies the kinds of values that the array can store. For instance, you may have a custom data type or an int for integers and a double for floating-point values.
- array_name: The 2D array's name is specified as array_name. In your code, it acts as a reference to the full array.
- [rows] and [columns]: These values represent the array's dimensions. The array will have the number of rows and columns indicated by the number in square brackets. An example of a 2D array with three rows and three columns is [3][3].
- The curly brackets {} contain the values which fill the array. The values for each row and column are specified using a hierarchical brace-enclosed list. You specify the values in each row, separated by commas, and each row is encased in curly brackets.
- For example, {value_00, value_01, value_02, ...} initializes the first row of the array with the specified values.
- {value_10, value_11, value_12, ...} initializes the second row.
- This section is repeated for as many rows as there are in your array.
Initialization of a 2D array is essential because it gives the elements of the array their initial values. This can be utilized for software for data purposes, configuration settings, etc. Also, not that the elements of the 2D array can be accessed and changed as required in your C++ code once it has been initialized.
Example:
CODE SNIPPET IS HEREI2luY2x1ZGUgPGlvc3RyZWFtPgoKaW50IG1haW4oKSB7CgovLyBEZWNsYXJlIGFuZCBpbml0aWFsaXplIGEgMkQgYXJyYXkgb2YgaW50ZWdlcnMgdXNpbmcgdGhlIHN0YW5kYXJkIG1ldGhvZAppbnQgbWF0cml4WzNdWzNdID0gewp7MSwgMiwgM30sCns0LCA1LCA2fSwKezcsIDgsIDl9Cn07CgovLyBBY2Nlc3MgYW5kIHByaW50IGFycmF5IGVsZW1lbnRzCmZvciAoaW50IGkgPSAwOyBpIDwgMzsgaSsrKSB7CmZvciAoaW50IGogPSAwOyBqIDwgMzsgaisrKSB7CnN0ZDo6Y291dCA8PCBtYXRyaXhbaV1bal0gPDwgIiAiO30Kc3RkOjpjb3V0IDw8IHN0ZDo6ZW5kbDt9CgpyZXR1cm4gMDsKfQ==
Output:
1 2 3
4 5 6
7 8 9
Explanation:
This C++ code illustrates how to initialize and output a 2D integer array using the conventional technique.
- First, we include the essential library, i.e., iostream for the standard input and output operations.
- Then, we define the int main() function, which is the entry point of the program.
- Inside the function, we declare and initialize a 2D array of numbers called matrix of size 3x3. This indicates that it has three columns and three rows.
- The elements of the 2D array are initialized with values (1 2 3), (4 5 6), and (7 8 9) representing the rows.
- Next, we initiate a set of nested for-loops to access/ iterate over the elements of the array and print them using the std::cout statement. Here-
- The outer loop (controlled by the variable i) repeatedly loops over rows 0 through 1.
- Columns (0, 1, and 2) are iterated over in the inner loop (controlled by variable j).
- The loops simulate the 3x3 matrix using std::cout and std::endl to proceed to the next line after printing each element in a row.
- The main function then returns 0 to show that the program ran correctly.
Complexity analysis:
- Time complexity: O (rows * columns) - This refers to the time required to initialize the table, which is proportional to the total number of elements.
- Space complexity: O (rows * columns) - This refers to the space required to store a 2D array in memory.
In the standard method, you provide separate values for each element, which makes it easy to initialize the 2D array with specific data. This method is simple and is usually used when you know the values in advance.
Using For Loops To Initialize 2D Array In C++
As mentioned in Cpp, a 2D array is a type of data structure that may hold elements in a matrix or grid with two dimensions. Basically, it is an array of arrays. For loops are used to iterate over each element of a 2D array and assign values to each element utilizing nested for loops. Given below is the syntax and an example for the same.
The syntax to initialize a 2D array with for loops is-
// Declaration and initialization of a 2D array
data_type array_name[row_size][column_size] = { { value1, value2, ... }, { value1, value2, ... }, ... };//opening a for loop
for(int i=0;i<row;i++){
for(int j=0;j<col;j++){
cin>>array_name[i][j];
}//closing the for loop
}
Here,
- The data_type refers to the type of data that the array contains (for example, int for integers) and the access name for the array is array_name.
- The array's dimensions are determined by row_size and column_size.
- The initialization list value1, value2,..., value1, value2,...,... specifies values for each element and is organized into rows and columns.
- The for keyword indicates the beginning of a for loop.
Code Example:
CODE SNIPPET IS HEREI2luY2x1ZGUgPGlvc3RyZWFtPgoKaW50IG1haW4oKSB7CgovLyBEZWNsYXJlIGFuZCBpbml0aWFsaXplIGEgMkQgYXJyYXkgd2l0aCAzIHJvd3MgYW5kIDQgY29sdW1ucwppbnQgYXJyWzNdWzRdOwoKLy8gSW5pdGlhbGl6ZSB0aGUgYXJyYXkgdXNpbmcgbmVzdGVkIGZvciBsb29wcwppbnQgdmFsdWUgPSAxOwpmb3IgKGludCBpID0gMDsgaSA8IDM7IGkrKykgewpmb3IgKGludCBqID0gMDsgaiA8IDQ7IGorKykgewphcnJbaV1bal0gPSB2YWx1ZTsKdmFsdWUrKzt9Cn0KCi8vIFByaW50IHRoZSBpbml0aWFsaXplZCBhcnJheQpmb3IgKGludCBpID0gMDsgaSA8IDM7IGkrKykgewpmb3IgKGludCBqID0gMDsgaiA8IDQ7IGorKykgewpzdGQ6OmNvdXQgPDwgYXJyW2ldW2pdIDw8ICIgIjt9CnN0ZDo6Y291dCA8PCBzdGQ6OmVuZGw7fQoKcmV0dXJuIDA7Cn0=
Output:
1 2 3 4
5 6 7 8
9 10 11 12
Explanation:
The code above includes the iostream header file to enable the standard input and output operations to be carried out by the application.
- Then, in the int main() function, we declare a two-dimensional array named arr with 3 rows and 4 columns. This array is similar to a grid with three rows and four columns. However, it is empty initially.
- We then employ two nested for-loops (i.e., one within the other) to add integers/ values to the arr array. Here-
- The value variable starts at 1, and the loops iterate over and enter the value into each cell of the 3x4 grid.
- The outer loop determines the element's row number, and the inner loop determines the element's column-wise position.
- The value is raised by 1 to the following number once each cell has been filled.
- Once the 2D array is initialized, we employ another set of nested for-loops with std::cout to print the values in the arr array.
- The numerals are printed with gaps between each row as std::endl adds a new line to begin a new row in the output after each row has been printed.
- The program then returns 0, indicating that it has properly completed its execution.
Complexity analysis:
Although each array member must be iterated through exactly once, the time complexity of initializing a 2D array in C++, using for loops, is O(rows * columns).
- In the above example, there are 3 rows and 4 columns, so you will need to make 3 * 4 = 12 assignments.
- Hence, the time complexity is O(3 * 4) = O(12), which may be reduced to O(1) if you treat it as a constant factor.
- Due to the large number of items stored in memory, the space complexity is O(rows * columns).
Using While Loops To Initialize A 2D Array In C++
While loops begin with a condition followed by a segment of code contained in curly brackets, which will keep on being executed till the condition is true, or the loop is terminated externally. In other words, the block of code inside curly brackets can be run any number of times, as the programmer desires. However, if the condition is false, the flow of the program moves to the next line in the code.
We can use a set of nested while loops to go through each member of the array and assign values to them in C++ while initializing a 2D array.
The syntax to initialize a 2D array in C++ with while loops is-
// Declaration of a 2D array
data_type array_name[row_size][column_size];// Initialize the array using while loops
int i = 0, j = 0;
while (i < row_size) {
j = 0;
while (j < column_size) {
// Assign a value to array_name[i][j]
// Increment j
}
// Increment i
}
Here,
- data_type: The type of data that will be stored in the 2D array, such as int for integers, char for characters, etc.
- The array_name is the placeholder for the name you want to give to the 2D array you declare. You will use this name to access and control the elements of the array throughout the program.
- The row_size and column_size are parameters that indicate the number of rows and columns the 2D array will contain.
- The while keyword indicates the beginning of a while loop. There are two stacked while loops here to complete the iteration process. The row index is controlled by the outer loop (while (i row_size)), while the column index is controlled by the inner loop (while (j column_size)).
Example:
CODE SNIPPET IS HEREI2luY2x1ZGUgPGlvc3RyZWFtPgoKaW50IG1haW4oKSB7CgovLyBEZWNsYXJlIGFuZCBpbml0aWFsaXplIGEgMkQgYXJyYXkgd2l0aCAzIHJvd3MgYW5kIDQgY29sdW1ucwppbnQgYXJyWzNdWzRdOwoKLy8gSW5pdGlhbGl6ZSB0aGUgYXJyYXkgdXNpbmcgd2hpbGUgbG9vcHMKaW50IHZhbHVlID0gMTsKaW50IGkgPSAwLCBqID0gMDsKd2hpbGUgKGkgPCAzKSB7CmogPSAwOwp3aGlsZSAoaiA8IDQpIHsKYXJyW2ldW2pdID0gdmFsdWU7CnZhbHVlKys7CmorKzsgLy8gSW5jcmVtZW50IHRoZSBjb2x1bW4gaW5kZXgKfQppKys7IC8vIEluY3JlbWVudCB0aGUgcm93IGluZGV4Cn0KLy8gUHJpbnQgdGhlIGluaXRpYWxpemVkIGFycmF5CmkgPSAwOwp3aGlsZSAoaSA8IDMpIHsKaiA9IDA7CndoaWxlIChqIDwgNCkgewpzdGQ6OmNvdXQgPDwgYXJyW2ldW2pdIDw8ICIgIjsKaisrO30Kc3RkOjpjb3V0IDw8IHN0ZDo6ZW5kbDsKaSsrO30KCnJldHVybiAwOwp9
Output:
1 2 3 4
5 6 7 8
9 10 11 12
Explanation:
In this code,
- We add the iostream library, which gives the application access to input and output functions.
- Then, we declare a two-dimensional array named arr inside the main() function. The dimensions for the array are [3][4], which depicts a grid with three rows and four columns, with no initial values.
- Next, we use two nested while loops to populate the arr array. The 3x4 grid's cells are iterated over sequentially by the loops while assigning initial values to the variables. Here-
- The outer loop determines the placement of the element in the row, while the inner loop determines the position in the column.
- To be ready for the next number, the loops first enter the current value into the cell and then raise the value by 1.
- After that, we use two more while loops with std::cout to print the values contained in the arr array. The numerals are printed with gaps between each row, as std::endl adds a new line to begin a new row in the output after printing each row.
- The program ends by returning 0, which shows that it was successful in running.
Complexity analysis:
As you go over each member of the array individually, initializing a 2D array with while loops take O(rows * columns) of time. Since the array's elements are stored in that much memory, the space complexity is O(rows * columns).
Using Do-While Loops To Initialize A 2D Array In C++
A do-while loop ensures that even if the condition set is false, the code block is executed at least once. In other words, it is a post-test/exit-controlled loop that runs the block of code at least once before continuing as long as a given condition is met. However, just like other loops, the code block will keep executing till the initial condition is true and terminate once it turns false.
We can use nested do-while loops for initializing a 2D array in C++, where each member of the array is given a value incrementally.
Syntax:
// Declaration of a 2D array
data_type array_name[row_size][column_size];// Initialize the array using do-while loops
int i = 0, j = 0;
do {
j = 0;
do {
// Assign a value to array_name[i][j]
// Increment j
} while (j < column_size);
// Increment i
} while (++i < row_size);
Here,
- The data_type and array_name indicate the type of data (i.e., integer, floating-point, character, etc.) that will be stored in the 2D array and the name of the array, respectively.
- The parameters, row_size, and column_size, indicate the number of rows and columns the 2D array will contain.
- The do-while keywords define the do-while loop used for iteration over the elements of the array.
- The inner loop manages the column index (do... while (j column_size);) whereas the outer loop manages the row index (do... while (++i row_size);).
Code Example:
Let's construct and initialize a 2D integer array using do-while loops.
CODE SNIPPET IS HEREI2luY2x1ZGUgPGlvc3RyZWFtPgoKaW50IG1haW4oKSB7CgovLyBEZWNsYXJlIGFuZCBpbml0aWFsaXplIGEgMkQgYXJyYXkgd2l0aCAzIHJvd3MgYW5kIDQgY29sdW1ucwppbnQgYXJyWzNdWzRdOwoKLy8gSW5pdGlhbGl6ZSB0aGUgYXJyYXkgdXNpbmcgZG8td2hpbGUgbG9vcHMKaW50IHZhbHVlID0gMTsKaW50IGkgPSAwLCBqID0gMDsKZG8gewpqID0gMDsKZG8gewphcnJbaV1bal0gPSB2YWx1ZTsKdmFsdWUrKzsKaisrOyAvLyBJbmNyZW1lbnQgdGhlIGNvbHVtbiBpbmRleAp9IHdoaWxlIChqIDwgNCk7IC8vIENvbnRpbnVlIGFzIGxvbmcgYXMgaiBpcyBsZXNzIHRoYW4gNAppKys7IC8vIEluY3JlbWVudCB0aGUgcm93IGluZGV4Cn0gd2hpbGUgKGkgPCAzKTsgLy8gQ29ycmVjdGVkIGNvbmRpdGlvbjogQ29udGludWUgYXMgbG9uZyBhcyBpIGlzIGxlc3MgdGhhbiAzCgovLyBQcmludCB0aGUgaW5pdGlhbGl6ZWQgYXJyYXkKaSA9IDA7CmRvIHsKaiA9IDA7CmRvIHsKc3RkOjpjb3V0IDw8IGFycltpXVtqXSA8PCAiICI7CmorKzsKfSB3aGlsZSAoaiA8IDQpOwpzdGQ6OmNvdXQgPDwgc3RkOjplbmRsOwppKys7Cn0gd2hpbGUgKGkgPCAzKTsgLy8gQ29ycmVjdGVkIGNvbmRpdGlvbjogQ29udGludWUgYXMgbG9uZyBhcyBpIGlzIGxlc3MgdGhhbiAzCgpyZXR1cm4gMDsKfQ==
Output:
1 2 3 4
5 6 7 8
9 10 11 12
Explanation:
We begin the C++ program above by including the iostream library to enable input and output operations to be carried out by the application.
- Then, in the main() function of the program, we declare a two-dimensional array named arr with size [3][4]. This array depicts a grid with three rows and four columns, but it's initially empty.
- We then use two nested do-while loops to add numbers to the arr. The loops iterate over the 3x4 grid's cells sequentially and keep adding values. Here-
- The outer loop deals with rows, while the inner loop concentrates on columns.
- The value variable's initial value is set to 1, which keeps getting incremented by 1, after every cell has been filled. This process repeats till all the elements are assigned values.
- The program, once again, employs two additional do-while loops with std::cout to print the values contained in the arr array when the array has been completely filled.
- The numerals are printed with gaps between each row with std::endl, adding a new line to begin a new row in the output after printing each row.
- The program ends by returning 0, which shows that it was successful in running.
In short, this code generates a 3x4 integer grid, populates it with values from 1 to 12, then prints the results.
Complexity analysis:
As you go over each member of the array individually, initializing a 2D array with do-while loops has an O(rows * columns) time complexity. Since the array's elements are stored in that amount of memory itself, the space complexity is O(rows * columns).
Initialization Of Three-Dimensional Array In C++
Declaring and assigning values to a three-dimensional data structure is required to initialize a three-dimensional array. It consists of a cubical arrangement of arrays inside arrays. Three indices are used by each element of this array to identify its location.
Basic Syntax:
// Declaration of a three-dimensional array
data_type array_name[dim1_size][dim2_size][dim3_size];// Initialize the array using nested loops
for (int i = 0; i < dim1_size; i++) {
for (int j = 0; j < dim2_size; j++) {
for (int k = 0; k < dim3_size; k++) {
// Assign a value to array_name[i][j][k]
}
}
}
Here,
- The data_type refers to the information about the three-dimensional array's elements' data types, such as int for integers.
- The three-dimensional array being declared is referred to with the name array_name here. Give any name you like, and you will use it to access and modify its elements.
- Parameters dim1_size, dim2_size, and dim3_size represent the size/ dimensions of the array, where they refer to axis-1, axis-2, and axis-3, respectively.
- The for keyword indicates the beginning of a for loop used to iterate over the elements of a respective axis.
- When using these nested for-loops, we define the number of items along each dimension. The first dimension is controlled by the outermost loop (i), the second dimension by the middle loop (j), and the third dimension by the innermost loop (k).
Let's create and initialize a three-dimensional integer array and demonstrate how to assign values to its elements.
Code Example:
CODE SNIPPET IS HEREI2luY2x1ZGUgPGlvc3RyZWFtPgoKaW50IG1haW4oKSB7CgovLyBEZWNsYXJlIGFuZCBpbml0aWFsaXplIGEgM0QgYXJyYXkgd2l0aCBkaW1lbnNpb25zIDJ4M3g0CmludCBhcnJbMl1bM11bNF07CgovLyBJbml0aWFsaXplIHRoZSBhcnJheSB1c2luZyBuZXN0ZWQgbG9vcHMKaW50IHZhbHVlID0gMTsKZm9yIChpbnQgaSA9IDA7IGkgPCAyOyBpKyspIHsKZm9yIChpbnQgaiA9IDA7IGogPCAzOyBqKyspIHsKZm9yIChpbnQgayA9IDA7IGsgPCA0OyBrKyspIHsKYXJyW2ldW2pdW2tdID0gdmFsdWU7CnZhbHVlKys7fQp9Cn0KLy8gUHJpbnQgdGhlIGluaXRpYWxpemVkIDNEIGFycmF5CmZvciAoaW50IGkgPSAwOyBpIDwgMjsgaSsrKSB7CmZvciAoaW50IGogPSAwOyBqIDwgMzsgaisrKSB7CmZvciAoaW50IGsgPSAwOyBrIDwgNDsgaysrKSB7CnN0ZDo6Y291dCA8PCBhcnJbaV1bal1ba10gPDwgIiAiO30Kc3RkOjpjb3V0IDw8IHN0ZDo6ZW5kbDt9CnN0ZDo6Y291dCA8PCBzdGQ6OmVuZGw7fQoKcmV0dXJuIDA7Cn0=
Output:
1 2 3 4
5 6 7 8
9 10 11 1213 14 15 16
17 18 19 20
21 22 23 24
Explanation:
In the example above:
- We first include a library named iostream, which offers input and output capability.
- Then, in the main() function, we declare a 3D array called arr, with dimensions 2*3*4. It will resemble a cube with two levels, three rows, and four columns on each layer.
- Next, we employ nested for-loops to initialize the 3D array's entries with a series of numbers beginning with 1. They set each element by moving through the layers, rows, and columns as follows:
- The outer loop sets the element of the first dimension, which has 2 elements whose position is represented by i.
- The middle loop sets the elements of the second dimension, i.e., 3 elements with positions represented by j.
- The innermost loop sets the elements of the third dimension, i.e., 4 elements with positions represented by k.
- Once the array has been initialized, we again use three nested for-loops with std::cout to print the contents of the 3D array. This produces a structured output by printing the values row by row, column by column, and layer by layer.
- The program then returns 0, signifying that it has run successfully.
In brief, this code builds an integer structure resembling a 3D cube, fills it with numbers between 1 and 24, and then outputs the cube's contents in a logical order.
Complexity analysis:
- Because you go over each member of the array once, initializing a three-dimensional array takes O(dim1_size * dim2_size * dim3_size) amount of time.
- Given that the array's elements are stored in that much memory (dim1_size * dim2_size * dim3_size), the space complexity is similarly O(dim1_size * dim2_size * dim3_size).
Also read- Array Of Objects In C++ | A Complete Guide To Creation (Using Examples)
Methods To Dynamically Allocate A 2D Array In C++
In C++, dynamic 2D arrays are memory-allocated arrays that have the flexibility to grow or shrink while a program runs. Another name for them is dynamically allocated 2D arrays. Dynamic 2D arrays in C++ let you allocate memory for a 2D array in accordance with the requirements of your program, as opposed to static 2D arrays, where the size is fixed at compile-time.
This flexibility of a dynamic 2D array is especially helpful when you need to manage memory effectively or when you don't know the array's size in advance. The main goal of these dynamic 2D arrays is to provide a method for working with data structured in rows and columns, such as matrices or tables, where the size may not be known until runtime. With this dynamic allocation, you can-
- Manage memory effectively by allotting only the necessary amount.
- Resize the array while the program is running, based on user input or other runtime circumstances.
- Static arrays can lead to memory waste by allocating more space than is required. Dynamic allocation eliminates this possibility.
Dynamic 2D arrays are frequently used in many diverse applications, such as image processing, data analysis, and simulations, where the data structure must adapt to varied conditions. There are two primary ways to allocate a dynamic 2D array in C++ use pointers. They are-
- Using a single pointer
- Using an array of pointers.
We will discuss both these methods in detail in the section ahead. Each approach has its benefits and is appropriate for varied use-case situations.
Single Pointer Method To Dynamically Allocate 2D Array In C++
With this approach, the complete 2D array is allocated a single block of memory, and each element of the array is accessed by a single pointer. This memory structure is just a flattened 2D array.
The syntax is as follows:
int rows = /* specify the number of rows */;
int columns = /* specify the number of columns */;// Allocate a single block of memory for the entire 2D array
data_type** arr = new data_type*[rows * columns];// Set up pointers to access elements
for (int i = 0; i < rows; i++) {
arr[i] = arr + i * columns;
}
Here:
- int rows: Define the number of rows in the 2D array.
- int columns: Define the number of columns in the 2D array.
- data_type** arr: Declare a pointer to a pointer of data_type, representing the 2D array.
- new data_type*[rows * columns]: Allocate a single contiguous block of memory for the entire 2D array using the new keyword. It creates an array of pointers to data_type, which will point to the elements of the array.
- for loop {}: Set up pointers to access elements within the single memory block. This ensures that you can access elements like a 2D array.
Here’s an example of the same:
CODE SNIPPET IS HEREI2luY2x1ZGUgPGlvc3RyZWFtPgoKaW50IG1haW4oKSB7CmludCByb3dzLCBjb2x1bW5zOwoKLy8gSW5wdXQgdGhlIG51bWJlciBvZiByb3dzIGFuZCBjb2x1bW5zCnN0ZDo6Y291dCA8PCAiRW50ZXIgdGhlIG51bWJlciBvZiByb3dzOiAiOwpzdGQ6OmNpbiA+PiByb3dzOwpzdGQ6OmNvdXQgPDwgIkVudGVyIHRoZSBudW1iZXIgb2YgY29sdW1uczogIjsKc3RkOjpjaW4gPj4gY29sdW1uczsKCi8vIER5bmFtaWNhbGx5IGFsbG9jYXRlIGEgMkQgYXJyYXkgdXNpbmcgdGhlIFNpbmdsZSBQb2ludGVyIE1ldGhvZAppbnQqIGFyciA9IG5ldyBpbnRbcm93cyAqIGNvbHVtbnNdOwoKLy8gSW5pdGlhbGl6ZSB0aGUgYXJyYXkgZWxlbWVudHMgKGZvciBkZW1vbnN0cmF0aW9uKQppbnQgY291bnRlciA9IDE7CmZvciAoaW50IGkgPSAwOyBpIDwgcm93czsgaSsrKSB7CmZvciAoaW50IGogPSAwOyBqIDwgY29sdW1uczsgaisrKSB7CmFycltpICogY29sdW1ucyArIGpdID0gY291bnRlcisrO30KfQoKLy8gRGlzcGxheSB0aGUgYXJyYXkgZWxlbWVudHMKc3RkOjpjb3V0IDw8ICIyRCBBcnJheSBFbGVtZW50czoiIDw8IHN0ZDo6ZW5kbDsKZm9yIChpbnQgaSA9IDA7IGkgPCByb3dzOyBpKyspIHsKZm9yIChpbnQgaiA9IDA7IGogPCBjb2x1bW5zOyBqKyspIHsKc3RkOjpjb3V0IDw8IGFycltpICogY29sdW1ucyArIGpdIDw8ICJcdCI7fQpzdGQ6OmNvdXQgPDwgc3RkOjplbmRsO30KCi8vIERlYWxsb2NhdGUgbWVtb3J5CmRlbGV0ZVtdIGFycjsKCnJldHVybiAwOwp9
Output:
Enter the number of rows: 3
Enter the number of columns: 42D Array Elements:
1 2 3 4
5 6 7 8
9 10 11 12
Explanation:
- We begin by integrating the iostream header file into our C++ program so that we can handle input and output.
- Next, inside the main() function, we define two variables (of type integer) called rows and columns to represent the number of rows and columns in a 2D array.
- Then, we prompt the user to enter the number of rows and columns, using std::cout to print a phrase. The respective inputted values are scanned/ read using std::cin.
- We then begin the process of dynamic allocation of a 2D array using the Single Pointer method. Here, we first declare a single pointer called arr, pointing to an integer int.
- This pointer will ultimately represent a dynamically allocated 2D array.
- The 2D array is created using the new operator, with the dimensions of the array being specified as rows * columns. This creates a 1D array of integers with the given size, which is used to simulate the 2D array.
- Note that the elements of the array are stored in a row-major pattern.
- We begin initializing the array with the value starting from 1, as we declare and initialize a counter variable for this.
- Then, we employ a set of nested for-loops where the outer loop takes care of the rows and the inner loop sets elements for the columns. Again, the elements are set in a row-major order.
- Inside the loops, pointer arr is treated as a 1D array, and the indices of each element are calculated using the notation- i * columns + j. The values keep increasing as the loops traverse the array, with i and j representing the number of rows and columns, respectively.
- After the initialization, we again use nested for-loops to access the elements and print them using std::cout and std::endl operations.
- Finally, we use the delete operator to deallocate the dynamically allocated memory to avoid memory leaks.
In this example, we have used the Single Pointer Method to dynamically allocate memory to arr, a 2D array. This implies that each reference will point to an array of integers (representing rows), and we build an array of pointers to int.
However, it is important to note that the single-pointer method is not a straightforward one and is less commonly used since it is complex, error-prone, and less efficient. This makes the array of pointer methods (that we will discuss further) a preferred option.
Using An Array Of Pointer Method To Dynamically Allocate 2D Array In C++
With this approach, memory is allocated for an array of pointers, each of which leads to a row that is dynamically constructed. Basically, it is an array of row references.
The following is the syntax:
int rows = /* specify the number of rows */;
int columns = /* specify the number of columns */;// Allocate an array of pointers for rows
data_type** arr = new data_type*[rows];// Allocate memory for each row
for (int i = 0; i < rows; i++) {
arr[i] = new data_type[columns];
}
Here:
- int rows: Defines the number of rows in the 2D array.
- int columns: Defines the number of columns in the 2D array.
- data_type** arr: Indicates the declaration of a pointer to a pointer of data_type, representing the 2D array.
- new data_type*[rows]: The new operator indicates the allocation of an array of pointers of type given by data_type. Each element in this array will represent a row in the 2D array.
- for loop (inside curly braces): Allocate memory for each row separately. This ensures that each row can have a different number of columns, making this method suitable for irregular or jagged 2D arrays.
Code Example:
CODE SNIPPET IS HEREI2luY2x1ZGUgPGlvc3RyZWFtPgoKaW50IG1haW4oKSB7CmludCByb3dzLCBjb2x1bW5zOwoKLy8gSW5wdXQgdGhlIG51bWJlciBvZiByb3dzIGFuZCBjb2x1bW5zCnN0ZDo6Y291dCA8PCAiRW50ZXIgdGhlIG51bWJlciBvZiByb3dzOiAiOwpzdGQ6OmNpbiA+PiByb3dzOwpzdGQ6OmNvdXQgPDwgIkVudGVyIHRoZSBudW1iZXIgb2YgY29sdW1uczogIjsKc3RkOjpjaW4gPj4gY29sdW1uczsKCi8vIER5bmFtaWNhbGx5IGFsbG9jYXRlIGEgMkQgYXJyYXkgdXNpbmcgYW4gQXJyYXkgb2YgUG9pbnRlcgppbnQqKiBhcnIgPSBuZXcgaW50Kltyb3dzXTsKZm9yIChpbnQgaSA9IDA7IGkgPCByb3dzOyBpKyspIHsKYXJyW2ldID0gbmV3IGludFtjb2x1bW5zXTt9CgovLyBJbml0aWFsaXplIHRoZSBhcnJheSBlbGVtZW50cyAoZm9yIGRlbW9uc3RyYXRpb24pCmludCBjb3VudGVyID0gMTsKZm9yIChpbnQgaSA9IDA7IGkgPCByb3dzOyBpKyspIHsKZm9yIChpbnQgaiA9IDA7IGogPCBjb2x1bW5zOyBqKyspIHsKYXJyW2ldW2pdID0gY291bnRlcisrO30KfQoKLy8gRGlzcGxheSB0aGUgYXJyYXkgZWxlbWVudHMKc3RkOjpjb3V0IDw8ICIyRCBBcnJheSBFbGVtZW50czoiIDw8IHN0ZDo6ZW5kbDsKZm9yIChpbnQgaSA9IDA7IGkgPCByb3dzOyBpKyspIHsKZm9yIChpbnQgaiA9IDA7IGogPCBjb2x1bW5zOyBqKyspIHsKc3RkOjpjb3V0IDw8IGFycltpXVtqXSA8PCAiXHQiO30Kc3RkOjpjb3V0IDw8IHN0ZDo6ZW5kbDt9CgovLyBEZWFsbG9jYXRlIG1lbW9yeQpmb3IgKGludCBpID0gMDsgaSA8IHJvd3M7IGkrKykgewpkZWxldGVbXSBhcnJbaV07fQpkZWxldGVbXSBhcnI7CnJldHVybiAwOwp9
Output:
Enter the number of rows: 3
Enter the number of columns: 42D Array Elements:
1 2 3 4
5 6 7 8
9 10 11 12
Explanation:
In the code above,
- First, we include the necessary header files and then start the main() function.
- Inside the main, we declare two integer variables called rows and columns to represent the number of rows and columns in the respective 2D array.
- We then use std::cout to print phrases prompting users to enter the number of columns and rows. These values are read using std::cin, the standard input operation.
- Then, we begin the process of dynamic allocation of a 2D array using the array of pointers technique. Here we-
- First, declare a pointer arr, which points to the pointer of an integer (i.e., int*[row]), and it (i.e., arr) represents a 2D array.
- We use the new operator to dynamically allocate an array of row (here, row is a number) pointers to integers/ integer pointers. This means that arr points to an array of pointers.
- Next, we initiate a for-loop to allocate memory by iterating over the array of pointer rows-1 time. This loop creates an array of int of size columns for each row.
- Here, the term arr[i] refers to the ith pointer, which points to a dynamically created row of integers.
- Next, we initialize the array's elements with values starting at 1 and growing successively using a set of nested for-loops.
- Once the array has been initialized, we again use nested loops and std::cout to print the element of the array, row by row.
- Finally, we deallocate the dynamically allocated array using the delete operator in order to stop memory leaks. For each row, we first delete the individual integer arrays and then delete the actual array of pointers.
The arr pointer and the indices [i][j] are used to access the items of the dynamic 2D array that is created using this technique. Note that once you are done utilizing the array, you must deallocate the memory to prevent memory leaks.
Accessing/ Referencing Two-Dimensional Array Elements
Using row and column indices to find and interact with certain items inside a two-dimensional (2D) array is necessary for accessing or referencing elements in the array. When working with 2D arrays, this is a basic operation, and there is often just one accepted syntax for accessing items. In this section, we will discuss the syntax of the typical way to access items in a 2D array, a code sample, the result, and an explanation of the code.
Syntax:
element = array[row_index][column_index];
Here,
- The terms row_index and column_index represent the number of the row and column (respectively) in which the element lies.
- The name of the array whose elements we are trying to access is given by array.
- The value of the element at the designated row and column will be stored in the element variable.
Code Example:
CODE SNIPPET IS HEREI2luY2x1ZGUgPGlvc3RyZWFtPgoKaW50IG1haW4oKSB7Ci8vIENyZWF0ZSBhIDJEIGFycmF5IChtYXRyaXgpCmludCBtYXRyaXhbM11bM10gPSB7CnsxLCAyLCAzfSwKezQsIDUsIDZ9LAp7NywgOCwgOX0KfTsKCi8vIEFjY2VzcyBhbmQgcHJpbnQgZWxlbWVudHMKc3RkOjpjb3V0IDw8ICJBY2Nlc3NpbmcgMkQgQXJyYXkgRWxlbWVudHM6IiA8PCBzdGQ6OmVuZGw7CmZvciAoaW50IGkgPSAwOyBpIDwgMzsgaSsrKSB7CmZvciAoaW50IGogPSAwOyBqIDwgMzsgaisrKSB7CnN0ZDo6Y291dCA8PCAibWF0cml4WyIgPDwgaSA8PCAiXVsiIDw8IGogPDwgIl0gPSAiIDw8IG1hdHJpeFtpXVtqXSA8PCBzdGQ6OmVuZGw7fQp9CgpyZXR1cm4gMDsKfQ==
Output:
Accessing 2D Array Elements:
matrix[0][0] = 1
matrix[0][1] = 2
matrix[0][2] = 3
matrix[1][0] = 4
matrix[1][1] = 5
matrix[1][2] = 6
matrix[2][0] = 7
matrix[2][1] = 8
matrix[2][2] = 9
Explanation:
- The code includes the necessary header for input and output operations in C++ and then defines the main() function as the entry point of the program.
- Then, we declare a 2D integer array named matrix and initialize its values. This array has 3 rows and 3 columns, forming a 3x3 matrix.
- Next, we use the std::cout statement to print an introductory message (for accessing the elements) to the console.
- We then use nested for-loops to iterate through the elements of the 2D array.
- The outer loop (controlled by the variable i) iterates through the rows. It ranges from 0 to 2, representing the row index.
- The inner loop (controlled by the variable j) iterates through the columns. It also ranges from 0 to 2, representing the column index.
- Within the nested loops, the program prints the element at the current row (i) and column (j) in the matrix array. It displays the value stored at that location along with the row and column indices.
- Finally, the program returns 0 to indicate successful execution to the operating system.
How To Initialize A Two-Dimensional Integer Array In C++?
When a two-dimensional integer array is declared, each element of the array must have a value assigned to it. As a result, you can specify starting values for each element of the 2D array as it is being created. Given below is the syntax used to initialize a two-dimensional integer array in C++, along with a code sample.
Initialization of a Two-Dimensional Integer Array Syntax:
data_type array_name[rows][columns] = {
{initial_values_row_1},
{initial_values_row_2},
// ...
};
Here,
- data_type: The data type of the array's elements, such as int for integers.
- array_name:The name of the 2D array being created.
- [rows][columns]: These give the dimensions of the array'.
- initial_values_row_i: This presents the values for the array's first row. Each row can have a varied number of beginning values, and you can specify as many rows as you need.
Code Example:
CODE SNIPPET IS HEREI2luY2x1ZGUgPGlvc3RyZWFtPgoKaW50IG1haW4oKSB7Ci8vIEluaXRpYWxpemUgYSAyRCBpbnRlZ2VyIGFycmF5IHdpdGggaW5pdGlhbCB2YWx1ZXMKaW50IG1hdHJpeFszXVszXSA9IHsKezEsIDIsIDN9LAp7NCwgNSwgNn0sCns3LCA4LCA5fQp9OwoKLy8gQWNjZXNzIGFuZCBwcmludCBlbGVtZW50cwpzdGQ6OmNvdXQgPDwgIkluaXRpYWxpemVkIDJEIEFycmF5IEVsZW1lbnRzOiIgPDwgc3RkOjplbmRsOwpmb3IgKGludCBpID0gMDsgaSA8IDM7IGkrKykgewpmb3IgKGludCBqID0gMDsgaiA8IDM7IGorKykgewpzdGQ6OmNvdXQgPDwgIm1hdHJpeFsiIDw8IGkgPDwgIl1bIiA8PCBqIDw8ICJdID0gIiA8PCBtYXRyaXhbaV1bal0gPDwgc3RkOjplbmRsO30KfQoKcmV0dXJuIDA7Cn0=
Output:
Initialized 2D Array Elements:
matrix[0][0] = 1
matrix[0][1] = 2
matrix[0][2] = 3
matrix[1][0] = 4
matrix[1][1] = 5
matrix[1][2] = 6
matrix[2][0] = 7
matrix[2][1] = 8
matrix[2][2] = 9
Explanation:
We begin the code sample above by including the necessary header file.
- Then, we define the main() function and create a 2D array of whole numbers (integers), called matrix.
- The matrix array has dimensions [3][3], i.e., it will be a table with three columns and three rows. We initialize the elements of the array by entering the numbers from 1 to 9, with 1 being in the top-left corner and 9 in the bottom-right.
- Next, we use nested for-loops to go over each row and column of the table one at a time and access the elements.
- These elements are printed to the console using the std::cout statement. Each element (number) in the table is printed with its value and location. For instance, matrix[0][0] = 1 denotes that the first row and first column of the table are occupied by the number 1.
- Finally, the program returns 0, indicating that there were no errors, when we have completed examining the table.
In simple terms, this code generates a table of numbers, displays the contents to us, and then declares that it is finished. It's comparable to compiling an item list and then reviewing it to see what's on it. This program shows how to report the initialized elements to the console and initialize a 2D integer array with starting values. To meet your unique needs, you can adjust the array's starting values and dimensions.
How To Initialize A Two-Dimensional Character Array?
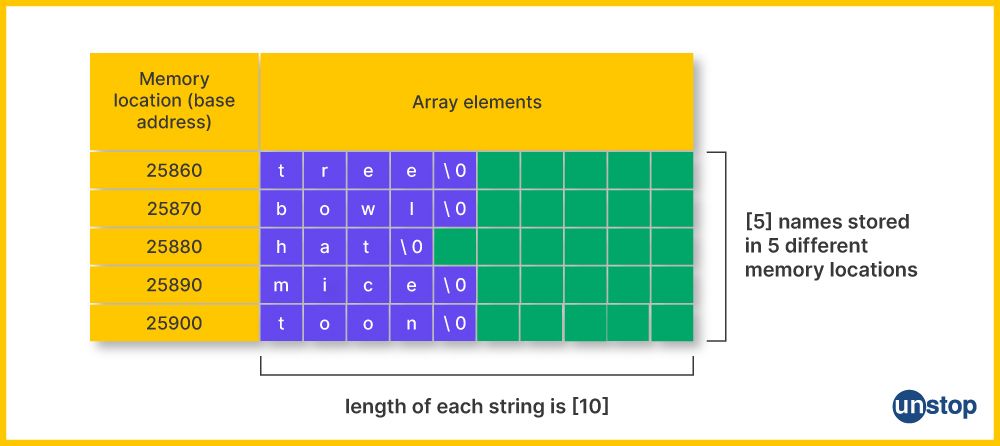
When a two-dimensional character array is declared, each member of the array must have a character value assigned to it. The members of the array are given starting values by this operation, enabling you to operate with character data right away. In this section, we will review the standard syntax for initializing a two-dimensional character array and also look at a code sample to better understand the same.
The Syntax for Initializing a Two-Dimensional Character Array:
char array_name[rows][columns] = {
"row1_values",
"row2_values",
// ...
};
Here,
- The char keyword indicates that the data type of the elements in the array is a character type.
- The name of the 2D character array is array_name.
- Rows and columns represent the dimension of the array being created.
- The character values for each row are represented by the strings "row1_values," "row2_values," etc.
Code Example:
CODE SNIPPET IS HEREI2luY2x1ZGUgPGlvc3RyZWFtPgoKaW50IG1haW4oKSB7Ci8vIEluaXRpYWxpemUgYSAyRCBjaGFyYWN0ZXIgYXJyYXkgd2l0aCBpbml0aWFsIHZhbHVlcwpjaGFyIGdyaWRbM11bNF0gPSB7CiJBQkMiLAoiREVGIiwKIkdISSIKfTsKCi8vIEFjY2VzcyBhbmQgcHJpbnQgZWxlbWVudHMKc3RkOjpjb3V0IDw8ICJJbml0aWFsaXplZCAyRCBDaGFyYWN0ZXIgQXJyYXkgRWxlbWVudHM6IiA8PCBzdGQ6OmVuZGw7CmZvciAoaW50IGkgPSAwOyBpIDwgMzsgaSsrKSB7CmZvciAoaW50IGogPSAwOyBqIDwgNDsgaisrKSB7CnN0ZDo6Y291dCA8PCAiZ3JpZFsiIDw8IGkgPDwgIl1bIiA8PCBqIDw8ICJdID0gIiA8PCBncmlkW2ldW2pdIDw8IHN0ZDo6ZW5kbDt9Cn0KCnJldHVybiAwOwp9
Output:
Initialized 2D Character Array Elements:
grid[0][0] = A
grid[0][1] = B
grid[0][2] = C
grid[0][3] =
grid[1][0] = D
grid[1][1] = E
grid[1][2] = F
grid[1][3] =
grid[2][0] = G
grid[2][1] = H
grid[2][2] = I
grid[2][3] =
Explanation:
In the example above-
- Inside the main() function, we declare a 2D character array called grid and initialize it with three string character values. The array has 3 rows and 4 columns.
- We print an introductory message to the console using the std::cout operation.
- Next, we use nested loops to iterate through the elements of the 2D array and print their values along with their row and column indices.
- The program returns 0 to indicate successful execution to the operating system.
How To Enter Data In Two-Dimensional Array In C++?
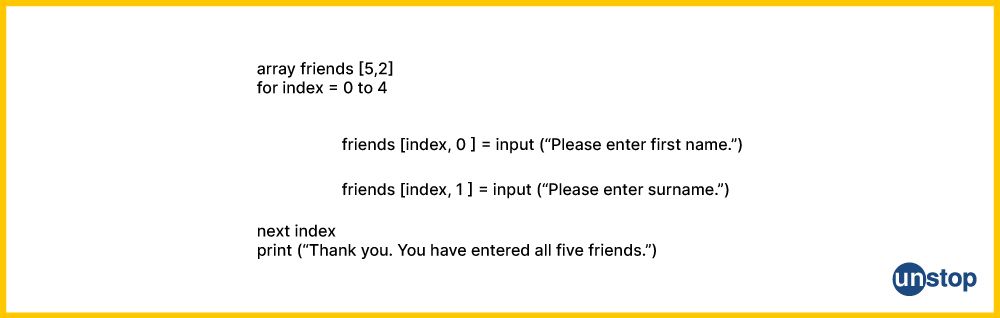
Accepting input values from the user or from another data source and storing them in particular array elements constitutes the process of entering data into a two-dimensional array. The way to get this done is pretty straightforward. In this section, we will discuss the syntax for this operation and showcase the same using a code example.
Data Entry Syntax for a Two-Dimensional Array:
array_name[row_index][column_index] = value;
Here,
- The 2D array's name is array_name.
- The terms row_index and column_index refer to the index of the respective row and column in which you wish to insert/ add the element.
- Value refers to the information you wish to place in the array's designated element.
Code Example:
CODE SNIPPET IS HEREI2luY2x1ZGUgPGlvc3RyZWFtPgoKaW50IG1haW4oKSB7CmNvbnN0IGludCByb3dzID0gMzsKY29uc3QgaW50IGNvbHVtbnMgPSAzOwppbnQgbWF0cml4W3Jvd3NdW2NvbHVtbnNdOwoKLy8gSW5wdXQgZGF0YSBpbnRvIHRoZSAyRCBpbnRlZ2VyIGFycmF5CnN0ZDo6Y291dCA8PCAiRW50ZXIgIiA8PCByb3dzICogY29sdW1ucyA8PCAiIGludGVnZXIgdmFsdWVzOiIgPDwgc3RkOjplbmRsOwpmb3IgKGludCBpID0gMDsgaSA8IHJvd3M7IGkrKykgewpmb3IgKGludCBqID0gMDsgaiA8IGNvbHVtbnM7IGorKykgewpzdGQ6OmNvdXQgPDwgIkVudGVyIHZhbHVlIGZvciBtYXRyaXhbIiA8PCBpIDw8ICJdWyIgPDwgaiA8PCAiXTogIjsKc3RkOjpjaW4gPj4gbWF0cml4W2ldW2pdO30KfQoKLy8gRGlzcGxheSB0aGUgZW50ZXJlZCBkYXRhCnN0ZDo6Y291dCA8PCAiRW50ZXJlZCAyRCBBcnJheSBFbGVtZW50czoiIDw8IHN0ZDo6ZW5kbDsKZm9yIChpbnQgaSA9IDA7IGkgPCByb3dzOyBpKyspIHsKZm9yIChpbnQgaiA9IDA7IGogPCBjb2x1bW5zOyBqKyspIHsKc3RkOjpjb3V0IDw8ICJtYXRyaXhbIiA8PCBpIDw8ICJdWyIgPDwgaiA8PCAiXSA9ICIgPDwgbWF0cml4W2ldW2pdIDw8IHN0ZDo6ZW5kbDt9Cn0KCnJldHVybiAwOwp9
Output:
Enter 9 integer values:
Enter value for matrix[0][0]: 1
Enter value for matrix[0][1]: 2
Enter value for matrix[0][2]: 3
Enter value for matrix[1][0]: 4
Enter value for matrix[1][1]: 5
Enter value for matrix[1][2]: 6
Enter value for matrix[2][0]: 7
Enter value for matrix[2][1]: 8
Enter value for matrix[2][2]: 9Entered 2D Array Elements:
matrix[0][0] = 1
matrix[0][1] = 2
matrix[0][2] = 3
matrix[1][0] = 4
matrix[1][1] = 5
matrix[1][2] = 6
matrix[2][0] = 7
matrix[2][1] = 8
matrix[2][2] = 9
Explanation:
This C++ program shows the values that the user enters into a 3x3 integer matrix (three rows by three columns). In the code-
- We begin by adding the iostream file, which enables input and output operations for the application.
- Then, inside the main() function, we declare two constant integer variables called rows and columns and initialize them to the value 3.
- Then, we declare a 2D array called matrix. The variables declared above act as the dimensions of the 2D array we will declare in the program, making it a 3x3 grid with 3 rows and 3 columns.
- We then employ nested for-loops to fill the integer array with data. Here-
- First, the user is prompted to input 9 integer numbers sequentially (3 rows by 3 columns) using std::cout.
- The given value is read with the std::cin operation, and the loops store them in the appropriate position.
- The outer loop controls the row index (i), and the inner loop controls the column index (j).
- Once the user provides all the values, another set of nested for-loops and the std::cout operation is used to print the input data placed into each cell of the 3x3 grid.
- This makes it easier for the user to verify if the software appropriately recorded the data.
- The program then returns 0, indicating that it has properly completed its execution.
In summary, this code generates a 3x3 integer matrix, enables the user to enter values into each cell, and then shows the entered values to the user to show them the information that is held in the matrix.
Conclusion
Multi-dimensional arrays, primarily a 2D array in C++, are effective tools for the organization and manipulation of grid-like data. The 2D arrays are especially useful when developing matrices, tables, and information grids. A 2D array in C++ facilitates storing and accessing values in rows and columns with ease.
We can either declare and initialize a 2D array in one go or do this separately, i.e., first declare the array and initialize its elements later. In other words, initialization of 2D arrays can be done using the standard method or by using loops like for-loop, while-loop, and do-while loop. The allocation of a 2D array can also be done dynamically with either the single-pointer method or the array of pointers methods. Besides knowing how to declare and initialize arrays, one must also know how to navigate them and access the elements to effectively handle structured data in C++ applications.
Also read- 51 C++ Interview Questions For Freshers & Experienced (With Answers)
Frequently Asked Questions
Q. Can you dynamically allocate a 2D array in C++?
Yes, we can allocate a dynamic 2D array in C++ by using pointers. This is frequently done when you don't know the array's dimensions in advance, or you need to efficiently manage memory. Dynamic allocation lets you construct a 2D array whose size is chosen at runtime.
Here is an example of how to allocate a 2D array dynamically in C++:
CODE SNIPPET IS HEREI2luY2x1ZGUgPGlvc3RyZWFtPgoKaW50IG1haW4oKSB7CmludCByb3dzLCBjb2x1bW5zOwoKLy8gUHJvbXB0IGZvciB0aGUgbnVtYmVyIG9mIHJvd3MgYW5kIGNvbHVtbnMKc3RkOjpjb3V0IDw8ICJFbnRlciB0aGUgbnVtYmVyIG9mIHJvd3M6ICI7CnN0ZDo6Y2luID4+IHJvd3M7CnN0ZDo6Y291dCA8PCAiRW50ZXIgdGhlIG51bWJlciBvZiBjb2x1bW5zOiAiOwpzdGQ6OmNpbiA+PiBjb2x1bW5zOwoKLy8gRHluYW1pY2FsbHkgYWxsb2NhdGUgYSAyRCBhcnJheQppbnQqKiBhcnIgPSBuZXcgaW50Kltyb3dzXTsgLy8gQWxsb2NhdGUgYW4gYXJyYXkgb2YgaW50IHBvaW50ZXJzCmZvciAoaW50IGkgPSAwOyBpIDwgcm93czsgaSsrKSB7CmFycltpXSA9IG5ldyBpbnRbY29sdW1uc107IC8vIEFsbG9jYXRlIG1lbW9yeSBmb3IgZWFjaCByb3cKfQoKLy8gSW5pdGlhbGl6ZSBhbmQgYWNjZXNzIHRoZSBlbGVtZW50cwppbnQgdmFsdWUgPSAxOwpmb3IgKGludCBpID0gMDsgaSA8IHJvd3M7IGkrKykgewpmb3IgKGludCBqID0gMDsgaiA8IGNvbHVtbnM7IGorKykgewphcnJbaV1bal0gPSB2YWx1ZSsrO30KfQoKLy8gUHJpbnQgdGhlIGVsZW1lbnRzCnN0ZDo6Y291dCA8PCAiMkQgQXJyYXkgRWxlbWVudHM6IiA8PCBzdGQ6OmVuZGw7CmZvciAoaW50IGkgPSAwOyBpIDwgcm93czsgaSsrKSB7CmZvciAoaW50IGogPSAwOyBqIDwgY29sdW1uczsgaisrKSB7CnN0ZDo6Y291dCA8PCBhcnJbaV1bal0gPDwgIiAiO30Kc3RkOjpjb3V0IDw8IHN0ZDo6ZW5kbDt9CgovLyBEZWFsbG9jYXRlIHRoZSBtZW1vcnkKZm9yIChpbnQgaSA9IDA7IGkgPCByb3dzOyBpKyspIHsKZGVsZXRlW10gYXJyW2ldOyAvLyBEZWxldGUgZWFjaCByb3cKfQpkZWxldGVbXSBhcnI7IC8vIERlbGV0ZSB0aGUgYXJyYXkgb2YgcG9pbnRlcnMKCnJldHVybiAwOwp9
Output:
Enter the number of rows: 3
Enter the number of columns: 3
2D Array Elements:
1 2 3
4 5 6
7 8 9
Explanation:
- The user is prompted to enter the number of rows and columns for the 2D array.
- A 2D array is dynamically allocated using pointers. Here int** arr is an array of integer pointers, and memory is allocated for each row and column using nested for loops.
- Elements in the 2D array are initialized and accessed again using a set of nested for-loops. The elements are printed to the console using std::cout.
- Finally, memory is deallocated in reverse order (i.e., first the rows, then the array of pointers) to prevent memory leaks.
Q. How do you allocate memory for a dynamic 2D array in C++?
In C++, you may use single pointers and the new operator to dynamically allocate memory for an array. For this, you must choose the appropriate size for the dynamic array you wish to generate. This data can be gathered from user input or calculated using the logic of your software. Once you have decided on the size, use the new operator to allot memory for the array. The syntax for this is as follows:
data_type* array_name = new data_type[size];
Here,
- data_type: The data type of each element that will be stored in the array (for example, int, double, char, etc.).
- The name you wish to give the pointer that points to the dynamically created array is array_name.
- size: This represents the number of elements you wish to have in the array. This could be a variable or a constant.
- You can access and control the array's elements using the pointer exactly like you would with a conventional array after dynamically creating it.
This approach is called the Single Pointer Method for dynamic allocation of a 2D array in C++. The technique is comparatively complex and error-prone, which is why you must use it judiciously. An alternative approach to this method is the Array of Pointer method.
Q. Does C++ allow an array of dynamic sizes?
Yes, C++ allows you to create arrays of dynamic sizes using pointers and dynamic memory allocation techniques, such as the new operator and the malloc() function. These dynamic arrays are not restricted to fixed sizes at compile time and can be resized during program execution.
A compile-time constant in standard C++ means that the size of an array must be known at the time of compilation and cannot be modified dynamically while the program is running. This implies that you are unable to build an array whose size is defined by a variable at runtime.
However, C++ has tools for dynamic memory allocation, including pointers and the new operator, to build arrays with dynamically determined sizes. Although they can simulate the behavior of arrays with dynamic sizes, these dynamically created arrays are not real C++ arrays. They are often implemented as pointers to RAM that is dynamically allocated.
Here is an illustration of how to build an array-like structure with a changeable size using dynamic memory allocation:
CODE SNIPPET IS HEREI2luY2x1ZGUgPGlvc3RyZWFtPgoKaW50IG1haW4oKSB7CmludCBzaXplOwovLyBHZXQgdGhlIHNpemUgZnJvbSB1c2VyIGlucHV0IChkZXRlcm1pbmVkIGF0IHJ1bnRpbWUpCnN0ZDo6Y291dCA8PCAiRW50ZXIgdGhlIHNpemUgb2YgdGhlIGFycmF5OiAiOwpzdGQ6OmNpbiA+PiBzaXplOwoKLy8gRHluYW1pY2FsbHkgYWxsb2NhdGUgYW4gaW50ZWdlciBhcnJheS1saWtlIHN0cnVjdHVyZQppbnQqIGR5bmFtaWNBcnJheSA9IG5ldyBpbnRbc2l6ZV07Ci8vIEluaXRpYWxpemUgYW5kIHVzZSB0aGUgZHluYW1pY2FsbHkgYWxsb2NhdGVkICJhcnJheSIKZm9yIChpbnQgaSA9IDA7IGkgPCBzaXplOyBpKyspIHsKZHluYW1pY0FycmF5W2ldID0gaSAqIDI7fQoKLy8gQWNjZXNzIGFuZCBwcmludCB0aGUgZWxlbWVudHMKc3RkOjpjb3V0IDw8ICJEeW5hbWljYWxseSBDcmVhdGVkIEFycmF5LUxpa2UgU3RydWN0dXJlOiIgPDwgc3RkOjplbmRsOwpmb3IgKGludCBpID0gMDsgaSA8IHNpemU7IGkrKykgewpzdGQ6OmNvdXQgPDwgZHluYW1pY0FycmF5W2ldIDw8ICIgIjt9CnN0ZDo6Y291dCA8PCBzdGQ6OmVuZGw7CgovLyBEZWFsbG9jYXRlIHRoZSBkeW5hbWljYWxseSBhbGxvY2F0ZWQgbWVtb3J5CmRlbGV0ZVtdIGR5bmFtaWNBcnJheTsKcmV0dXJuIDA7Cn0=
Output:
Enter the size of the array: 5
Dynamically Created Array-Like Structure:
0 2 4 6 8
Explanation:
- In this illustration, the size is added at runtime, and the application allots RAM appropriately.
- Despite the fact that this method enables you to deal with dynamically sized data structures, it's critical to realize that these are not actual C++ arrays but rather dynamically allocated memory areas that are accessed by pointers.
Q. How do you handle irregular or jagged 2D arrays in C++?
We call an array irregular, uneven, or jagged when it has a varied number of rows and columns, i.e., it does not form a square grid-like structure. Maintaining such an array could be a little tricky, but it is possible. Below are the steps you can follow to manage splintered 2D arrays:
- Define an Array of Pointers: The first step is to define an array of pointers to represent each row of the jagged array rather than a conventional 2D array. Each pointer directs the user to an array of that row's items.
int* jaggedArray[rowCount];
- Allocate Memory for Each Row: To hold the items, you must dynamically allocate memory for each row. To allocate memory to each row separately, use a loop. Each row can be different lengths.
for (int i = 0; i < rowCount; i++) {
jaggedArray[i] = new int[columnCount[i]];}The number of columns in the i-th row is shown here as columnCount[i].
- Initialize and Access Elements: The jagged array's elements can then be initialized and accessed as necessary. Since each row is its own dynamically created array, you may read and write data using standard array indexing.
jaggedArray[0][0] = 1; // Access and modify elements
int value = jaggedArray[1][2]; // Access an element
- Deallocation of Memory: To avoid memory leaks, be sure to deallocate the memory after finishing the jagged array. Delete the array of pointers after using a loop to release the memory for each row.
for (int i = 0; i < rowCount; i++) {
delete[] jaggedArray[i];}
- Finally, delete the array of pointers using the delete operator or other methods of deallocation.
delete[] jaggedArray;
As each row's size might vary, managing jagged 2D arrays in C++ needs careful memory management. Pointers and dynamic memory allocation allow you to build adaptable arrays that can handle different row lengths.
Q. What are common pitfalls and errors when working with 2D arrays?
There are a number of frequent hazards and faults that programmers may run into while dealing with 2D arrays in C++. You can build more dependable code if you are aware of these problems. When using 2D arrays, the following typical dangers and faults should be avoided:
- Index Out of Bounds for an Array: Accessing or changing items beyond the 2D array's valid range may result in unexpected behavior or crashes.
- Inconsistent Array Sizes: Unexpected outcomes and mistakes might emerge from accidentally utilizing different row or column widths for various areas of your code.
- Memory Gaps: Memory leaks can occur if you forget to deallocate memory for dynamically generated 2D arrays, which will cause your software to use more and more memory over time.
- Row-Column Indexing Is Confusing: Data manipulation and erroneous element access can result from combining row and column indices.
- Values Not Initialized: When reading uninitialized elements, specifically, failing to initialize array items might provide surprising results.
- Magic Numbers in Use: Your code may become less understandable and maintainable if you hardcode row and column widths instead of utilizing constants or variables.
- Looping inefficiently: Loop structures that are inefficient might cause your software to lag. Performance can be affected by using nested loops when a single loop would do or by not optimizing loop limits.
- Copies of arrays: It can be slow and error-prone to copy 2D arrays element by element using nested loops. Better methods for copying arrays are available in C++, such as std::memcpy.
- Not checking memory allocation: If memory is not available while dynamically creating memory for a 2D array, failing to verify that the allocation was successful may cause crashes.
- Combining dynamic and fixed-size arrays: When managing and accessing memory, combining fixed-size and dynamically created arrays can cause confusion and mistakes.
- Not Taking Memory Alignment into Account: Performance may suffer if memory alignment and padding are not taken into account, especially when processing large amounts of data quickly.
- Forgetting to Free Memory: Memory leaks can occur if dynamically allocated 2D arrays in C++ are not properly freed up, which can eventually have a negative impact on the system's performance.
Quiz Time!!!
Here are a few other topics that you must know:
- Typedef In C++ | Syntax, Application & How To Use It (With Examples)
- 2D Vector In C++ | Declare, Initialize & Operations (+ Examples)
- How To Sort Array In C++ | 9 Methods Explained With Examples
- OOPs Concept In C++ | A Detailed Guide With Codes & Explanations
- String Array In C++| 8 Ways To Create & Access Element (+Examples)
Login to continue reading
And access exclusive content, personalized recommendations, and career-boosting opportunities.
Don't have an account? Sign up
Never miss an
Update

Featured Opportunities
Top-Rated Practice by Students


Subscribe
to our newsletter


Comments
Add comment