
Asian Paints Alchemy 2026
C++ Programming Language
- A Brief Intro To C++ & Its History
- The Detailed History & Timeline Of C++ (With Infographic)
- Importance Of C++
- Versions Of C++ Language
- Structure Of A C++ Program
- Comparison With Other Popular Programming Languages
- Conclusion
- Frequently Asked Questions
- Test Your Skills: Quiz Time
- What Are Variables In C++?
- Declaration & Definition Of Variables In C++
- Variable Initialization In C++
- Rules & Regulations For Naming Variables In C++ Language
- Different Types Of Variables In C++
- Different Types of Variable Initialization In C++
- Conclusion
- Frequently Asked Questions
- Test Your Skills: Quiz Time
- What Are Primitive Data Types In C++?
- Derived Data Types In C++
- User-Defined Data Types In C++
- Abstract Data Types In C++
- Data Type Modifiers In C++
- Declaring Variables With Auto Keyword
- Conclusion
- Frequently Asked Questions
- Test Your Skills: Quiz Time
- Structure Of C++ Program: Components
- Segment 1: Documentation Section Of Structure Of C++ Program (With Example)
- Segment 2: Preprocessing & Namespace (Linking) Section Of CPP Program
- Segment 3: Definition Section In Structure of a C++ Program (With Examples)
- Segment 4: Main Function In Structure Of A C++ Program (With Example)
- Compilation & Execution Of C++ Programs | Step-by-Step Explanation
- Explaining Structure Of C++ Program With Suitable Example
- Conclusion
- Frequently Asked Questions
- Test Your Skills: Quiz Time
- What is Typedef in C++?
- The Role & Applications of Typedef in C++
- Basic Syntax for typedef in C++
- How Does typedef Work in C++?
- How to Use Typedef in C++ With Examples? (Multiple Data Types)
- The Difference Between #define & Typedef in C++
- Conclusion
- Frequently Asked Questions
- Test Your Skills: Quiz Time
- What Are Strings In C++?
- Types Of Strings In C++
- How To Declare & Initialize C-Style Strings In C++ Programs?
- How To Declare & Initialize Strings In C++ Using String Keyword?
- List Of String Functions In C++
- Operations On Strings Using String Functions In C++
- Concatenation Of Strings In C++
- How To Convert Int To Strings In C++
- Conclusion
- Frequently Asked Questions
- Test Your Skills: Quiz Time
- What Is String Concatenation In C++?
- How To Concatenate Two Strings In C++ Using The ‘+' Operator?
- String Concatenation Using The strcat( ) Function
- Concatenation Of Two Strings In C++ Using Loops
- String Concatenation Using The append() Function
- C++ String Concatenation Using The Inheritance Of Class
- Concatenate Two Strings In C++ With The Friend and strcat() Functions
- Why Do We Need To Concatenate Two Strings?
- How To Reverse Concatenation Of Strings In C++?
- Conclusion
- Frequently Asked Questions
- Test Your Skills: Quiz Time
- What Is Find In String C++?
- What Is A Substring?
- How To Find A Substring In A String In C++?
- How To Find A Character In String C++?
- Find All Substrings From A Given String In C++
- Index Substring In String In C++ From A Specific Start To A Specific Length
- Conclusion
- Frequently Asked Questions
- Test Your Skills: Quiz Time
- What Are Pointers In C++?
- Pointer Declaration In C++
- How To Initialize And Use Pointers In C++?
- Different Types Of Pointers In C++
- References & Pointers In C++
- Arrays And Pointers In C++
- String Literals & Pointers In C++
- Pointers To Pointers In C++ (Double Pointers)
- Arithmetic Operation On Pointers In C++
- Advantages Of Pointers In C++
- Some Common Mistakes To Avoid With Pointers In Cpp
- Conclusion
- Frequently Asked Questions
- Test Your Skills: Quiz Time
- Understanding Pointers In C++
- What Is Pointer To Object In C++?
- Declaration And Use Of Object Pointers In C++
- Advantages Of Pointer To Object In C++
- Pointer To Objects In C++ With Arrow Operator
- An Array Of Objects Using Pointers In C++
- Base Class Pointer For Derived Class Object In C++
- Conclusion
- Frequently Asked Questions
- Test Your Skills: Quiz Time
- What Is 'This' Pointer In C++?
- Defining ‘this’ Pointer In C++
- Example Of 'this' Pointer In C++
- Describing The Constness Of 'this' Pointer In C++
- Important Uses Of 'this' Pointer In C++
- Method Chaining Using 'this' Pointer In C++
- C++ Programs To Show Application Of 'This' Pointer
- How To Delete The ‘this’ Pointer In C++?
- Conclusion
- Frequently Asked Questions
- Test Your Skills: Quiz Time
- What is Reference?
- What is Pointer?
- Comparison Table Of C++ Pointer Vs. Reference
- Differences Between Reference And Pointer: A Detailed Explanation
- Why Are References Less Powerful Than Pointers?
- Conclusion
- Frequently Asked Questions
- Test Your Skills: Quiz Time
- How To Declare A 2D Array In C++?
- C++ Multi-Dimensional Arrays
- Ways To Initialize A 2D Array In C++
- Methods To Dynamically Allocate A 2D Array In C++
- Accessing/ Referencing Two-Dimensional Array Elements
- How To Initialize A Two-Dimensional Integer Array In C++?
- How To Initialize A Two-Dimensional Character Array?
- How To Enter Data In Two-Dimensional Array In C++?
- Conclusion
- Frequently Asked Questions
- What Are Arrays Of Strings In C++?
- Different Ways To Create String Arrays In C++
- How To Access The Elements Of A String Array In C++?
- How To Convert Char Array To String?
- Conclusion
- Frequently Asked Questions
- What is Memory Allocation in C++ & Why Do We Need It?
- How Does Dynamic Memory Allocation Work?
- The new Operator in C++
- The delete Operator in C++
- Dynamic Memory Allocation in C++ | Arrays
- Did You Know: Companies That Ask About Dynamic Memory Allocation
- Dynamic Memory Allocation in C++ | Objects
- Deallocation of Dynamic Memory in C++
- malloc(), calloc(), and free() Functions in C/C++
- Applications of Dynamic Memory Allocation in C++
- Conclusion
- Frequently Asked Questions
- Test Your Skills: Quiz Time
- What Is A Substring In C++ (Substr C++)?
- Example for substr() in C++ | Finding Substring Using Positive and Negative Indices
- Understanding substr() Basics with Examples
- Use Cases/ Examples of substr() in C++
- How to Get a Substring Before a Character Using substr() in C++?
- Use substr() in C++ to Print all Substrings of a Given String
- Print Sum of all Substrings of a String Representing a Number
- Minimum Value of all Substrings of a String Representing a Number
- Maximum Value of all Substrings of a String Representing a Number
- Points To Remember For Substr In C++
- Conclusion
- Frequently Asked Questions
- Test Your Skills: Quiz Time
- What Is Operator In C++?
- Types Of Operators In C++ With Examples
- What Are Arithmetic Operators In C++?
- What Are Assignment Operators In C++?
- What Are Relational Operators In C++?
- What Are Logical Operators In C++?
- What Are Bitwise Operators In C++?
- What Is Ternary/ Conditional Operator In C++?
- Miscellaneous Operators In C++
- Precedence & Associativity Of Operators In C++
- Conclusion
- Frequently Asked Questions
- Test Your Skills: Quiz Time
- What Is The New Operator In C++?
- Example To Understand New Operator In C++
- The Grammar Elements Of The New Operator In C++
- Storage Space Allocation
- How Does The C++ New Operator Works?
- What Happens When Enough Memory In The Program Is Not Available?
- Initializing Objects Allocated With New Operator In C++
- Lifetime Of Objects Allocated With The New Operator In C++
- What Is The Delete Operator In C++?
- Difference Between New And Delete Operator In C++
- Conclusion
- Frequently Asked Questions
- Test Your Skills: Quiz Time
- Types Of Overloading In C++
- What Is Operator Overloading In C++?
- How To Overload An Operator In C++?
- Overloadable & Non-overloadable Operators In C++
- Unary Operator Overloading In C++
- Binary Operator Overloading In C++
- Special Operator Overloading In C++
- Rules For Operator Overloading In C++
- Advantages And Disadvantages Of Operator Overloading In C++
- Function Overloading In C++
- What Is the Difference Between Operator Functions and Normal Functions?
- Conclusion
- Frequently Asked Questions
- Test Your Skills: Quiz Time
- What Are Operators In C++?
- Introduction To Logical Operators In C++
- Types Of Logical Operators In C++ With Example Program
- Logical AND (&&) Operator In C++
- Logical NOT(!) Operator In C++
- Logical Operator Precedence And Associativity In C++
- Relation Between Conditional Statements And Logical Operators In C++
- C++ Relational Operators
- Conclusion
- Frequently Asked Important Interview Questions:
- Test Your Skills: Quiz Time
- Different Type Of C++ Bitwise Operators
- C++ Bitwise AND Operator
- C++ Bitwise OR Operator
- C++ Bitwise XOR Operator
- Bitwise Left Shift Operator In C++
- Bitwise Right Shift Operator In C++
- Bitwise NOT Operator
- What Is The Meaning Of Set Bit In C++?
- What Does Clear Bit Mean?
- Conclusion
- Frequently Asked Questions
- Test Your Skills: Quiz Time
- Types of Comments in C++
- Single Line Comment In C++
- Multi-Line Comment In C++
- How Do Compilers Process Comments In C++?
- C- Style Comments In C++
- How To Use Comment In C++ For Debugging Purposes?
- When To Use Comments While Writing Codes?
- Why Do We Use Comments In Codes?
- Conclusion
- Frequently Asked Questions
- Test Your Skills: Quiz Time
- What Are Storage Classes In Cpp?
- What Is The Scope Of Variables?
- What Are Lifetime And Visibility Of Variables In C++?
- Types of Storage Classes in C++
- Automatic Storage Class In C++
- Register Storage Class In C++
- Static Storage Class In C++
- External Storage Class In C++
- Mutable Storage Class In C++
- Conclusion
- Frequently Asked Questions
- Test Your Skills: Quiz Time
- Decision Making Statements In C++
- Types Of Conditional Statements In C++
- If-Else Statement In C++
- If-Else-If Ladder Statement In C++
- Nested If Statements In C++
- Alternatives To Conditional If-Else In C++
- Switch Case Statement In C++
- Jump Statements & If-Else In C++
- Conclusion
- Frequently Asked Questions
- Test Your Skills: Quiz Time
- What Is A Switch Statement/ Switch Case In C++?
- Rules Of Switch Case In C++
- How Does Switch Case In C++ Work?
- The break Keyword In Switch Case C++
- The default Keyword In C++ Switch Case
- Switch Case Without Break And Default
- Advantages & Disadvantages of C++ Switch Case
- Conclusion
- Frequently Asked Questions
- Test Your Skills: Quiz Time
- What Is A For Loop In C++?
- Syntax Of For Loop In C++
- How Does A For Loop In C++ Work?
- Examples Of For Loop Program In C++
- Ranged Based For Loop In C++
- Nested For Loop In C++
- Infinite For Loop In C++
- Conclusion
- Frequently Asked Questions
- Test Your Skills: Quiz Time
- What Is A While Loop In C++?
- Parts Of The While Loop In C++
- C++ While Loop Program Example
- How Does A While Loop In C++ Work?
- What Is Pre-checking Process Or Entry-controlled Loop?
- When Are While Loops In C++ Useful?
- Example C++ While Loop Program
- What Are Nested While Loops In C++?
- Infinite While Loop In C++
- Alternatives To While Loop In C++
- Conclusion
- Frequently Asked Questions
- Test Your Skills: Quiz Time
- What Are Loops & Its Types In C++?
- What Is A Do-While Loop In C++?
- Do-While Loop Example In C++ To Print Numbers
- How Does A Do-While Loop In C++ Work?
- Various Components Of The Do-While Loop In C++
- Example 2: Adding User-Input Positive Numbers With Do-While Loop
- C++ Nested Do-While Loop
- C++ Infinitive Do-while Loop
- What is the Difference Between While Loop and Do While Loop in C++?
- When To Use A Do-While Loop?
- Conclusion
- Frequently Asked Questions
- Test Your Skills: Quiz Time
- What are 2D Vectors in C++?
- How to Declare 2D Vectors in C++
- How to Initialize a 2D Vector in C++?
- Creating a 2D Vector in C++ with User Input for Column & Row Size
- Methods for Traversing 2D Vectors in C++
- Interview Spotlight: 2D Vectors in FAANG Interviews
- Printing 2D Vector in C++ Using Nested Loops
- Example C++ Programs for Creating 2D Vectors
- How to Access & Modify 2D Vector Elements in C++?
- Adding Elements to 2D Vector Using push_back() Function
- Removing Elements from Vector in C++ Using pop_back() Function
- Did You Know? Real-World Outage: Crash Cause Linked to 2D Vector Usage
- Advantages of 2D Vectors Over Traditional Arrays
- Conclusion
- Frequently Asked Questions
- Test Your Skills: Quiz Time
- How To Print A Vector In C++ By Overloading Left Shift (<<) Operator?
- How To Print Vector In C++ Using Range-Based For-Loop?
- Print Vector In C++ With Comma Separator
- Printing Vector In C++ Using Indices (Square Brackets/ Double Brackets & at() Function)
- How To Print A Vector In C++ Using std::copy?
- How To Print A Vector In C++ Using for_each() Function?
- Printing C++ Vector Using The Lambda Function
- How To Print Vector In C++ Using Iterators?
- Conclusion
- Frequently Asked Questions
- Definition Of C++ Find In Vector
- Using The std::find() Function
- How Does find() In Vector C++ Function Work?
- Finding An Element By Custom Comparator Using std::find_if() Function
- Use std::find_if() With std::distance()
- Element Find In Vector C++ Using For Loop
- Using The find_if_not Function
- Find Elements With The Linear Search Approach
- Conclusion
- Frequently Asked Questions
- What Is Sort() Function In C++?
- Sort() Function In C++ From Standard Template Library
- Exceptions Of Sort() Function/ Algorithm In C++
- The Stable Sort() Function In C++
- Partial Sort() Function In C++
- Sorting In Ascending Order With Sort() Function In C++
- Sorting In Descending Order With Sort Function In C++
- Sorting In Desired Order With Custom Comparator Function & Sort Function In C++
- Sorting Elements In Desired Order Using Lambda Expression & Sort Function In C++
- Types of Sorting Algorithms In C++
- Advanced Sorting Algorithms In C++
- How Does the Sort() Function Algorithm Work In C++?
- Conclusion
- Frequently Asked Questions
- What Is Function Overloading In C++?
- Ways Of Function Overloading In C++
- Function Overloading In C++ Using Different Types Of Parameters
- Function Overloading In C++ With Different Number Of Parameters
- Function Overloading In C++ Using Different Sequence Of Parameters
- How Does Function Overloading In C++ Work?
- Rules Of Function Overloading In C++
- Why Is Function Overloading Used?
- Types Of Function Overloading Based On Time Of Resolution
- Causes Of Function Overloading In C++
- Ambiguity & Function Overloading In C++
- Advantages Of Function Overloading In C++
- Disadvantages Of Function Overloading In C++
- Operator Overloading In C++
- Function Overriding In C++
- Difference Between Function Overriding & Function Overloading In C++
- Conclusion
- Frequently Asked Questions
- What Is An Inline Function In C++?
- How To Define The Inline Function In C++?
- How Does Inline Function In C++ Work?
- The Need For An Inline Function In C++
- Can The Compiler Ignore/ Reject Inline Function In C++ Programs?
- Normal Function Vs. Inline Function In C++
- Classes & Inline Function In C++
- Understanding Inline, __inline, And __forceinline Functions In C++
- When To Use An Inline Function In C++?
- Advantages Of Inline Function In C++
- Disadvantages Of Inline Function In C++
- Why Not Use Macros Instead Of An Inline Function In C++?
- Conclusion
- Frequently Asked Questions
- Test Your Skills: Quiz Time
- What Is Static Data Member In C++?
- How To Declare Static Data Members In C++?
- How To Initialize/ Define Static Data Member In C++?
- Ways To Access A Static Data Member In C++
- What Are Static Member Functions In C++?
- Example Of Member Function & Static Data Member In C++
- Practical Applications Of Static Data Member In C++
- Conclusion
- Frequently Asked Questions
- What Is A Constant In C++?
- Ways To Define Constant In C++
- What Are Literals In C++?
- Pointer To A Constant In C++
- Constant Function Arguments In C++
- Constant Member Function Of Class In C++
- Constant Data Members In C++
- Object Constant In C++
- Conclusion
- Frequently Asked Questions(FAQ)
- What is the Friend Function in C++?
- Declaration of Friend Function in C++ with Example
- Characteristics of Friend Function in C++
- Types/ Ways to Implement Friend Function in C++
- Global Friend Function in C++ (Global Function as Friend Function )
- Member Function of Another Class as a Friend Function in C++
- Function Overloading Using Friend Function in C++
- Advantages & Disadvantages of Friend Function in C++
- Interview Spotlight: Friend Functions in Cognizant Interview
- What is a C++ Friend Class?
- A Function Friendly to Multiple Classes
- C++ Friend Class vs. Friend Function in C++
- Some Important Points About Friend Functions and Classes in C++
- Conclusion
- Frequently Asked Questions
- What Is Function Overriding In C++?
- The Working Mechanism Of Function Overriding In C++
- Real-Life Example Of Function Overriding In C++
- Accessing Overriding Function In C++
- Accessing Overridden Function In C++
- Function Call Binding With Class Objects | Function Overriding In C++
- Function Call Binding With Base Class Pointers | Function Overriding In C++
- Advantages Of Function Overriding In C++
- Variations In Function Overriding In C++
- Function Overloading In C++
- Function Overloading Vs Function Overriding In C++
- Conclusion
- Frequently Asked Questions
- Errors In C++
- What Is Exception Handling In C++?
- Exception Handling In C++ Program Example
- C++ Exception Handling: Basic Keywords
- The Need For C++ Exception Handling
- C++ Standard Exceptions
- C++ Exception Classes
- User-Defined Exceptions In C++
- Advantages & Disadvantages Of C++ Exception Handling
- Conclusion
- Frequently Asked Questions
- What Are Templates In C++ & How Do They Work?
- Types Of Templates In C++
- What Are Function Templates In C++?
- C++ Template Functions With Multiple Parameters
- C++ Template Function Overloading
- What Are Class Templates In C++?
- Defining A Class Member Outside C++ Template Class
- C++ Template Class With Multiple Parameters
- What Is C++ Template Specialization?
- How To Specify Default Arguments For Templates In C++?
- Advantages Of C++ Templates
- Disadvantages Of C++ Templates
- Difference Between Function Overloading And Templates In C++
- Conclusion
- Frequently Asked Questions
- Structure
- Structure Declaration
- Initialization of Structure
- Copying and Comparing Structures
- Array of Structures
- Nested Structures
- Pointer to a Structure
- Structure as Function Argument
- Self Referential Structures
- Class
- Object Declaration
- Accessing Class Members
- Similarities between Structure and Class
- Which One Should You Choose?
- Key Difference Between a Structure and Class
- Summing Up
- Test Your Skills: Quiz Time
- What Is A Class And Object In C++?
- What Is An Object In C++?
- How To Create A Class & Object In C++? With Example
- Interview Spotlight: Classes & Objects In Adobe & Pixar Interviews
- Access Modifiers & Class/ Object In C++
- Member Functions Of A Class In C++
- How To Access Data Members And Member Functions?
- Significance Of Class & Object In C++
- Did You Know? The Concept of Classes & Object Powers Major Apps
- What Are Constructors In C++ & Its Types?
- What Is A Destructor Of Class In C++?
- An Array Of Objects In C++
- Object In C++ As Function Arguments
- The this (->) Pointer & Classes In C++
- The Need For Semicolons At The End Of A Class In C++
- Conclusion
- Frequently Asked Questions
- What Are Static Members In C++?
- Static Member Functions in C++
- Ways To Call Static Member Function In C++
- Properties Of Static Member Function In C++
- Need Of Static Member Functions In C++
- Regular Member Function Vs. Static Member Function In C++
- Limitations Of Static Member Functions In C++
- Conclusion
- Frequently Asked Questions
- What Is Constructor In C++?
- Characteristics Of A Constructor In C++
- Types Of Constructors In C++
- Default Constructor In C++
- Parameterized Constructor In C++
- Copy Constructor In C++
- Dynamic Constructor In C++
- Benefits Of Using Constructor In C++
- How Does Constructor In C++ Differ From Normal Member Function?
- Constructor Overloading In C++
- Constructor For Array Of Objects In C++
- Constructor In C++ With Default Arguments
- Initializer List For Constructor In C++
- Dynamic Initialization Using Constructor In C++
- Conclusion
- Frequently Asked Questions
- What Is A Constructor In C++?
- What Is Constructor Overloading In C++?
- Dеclaration Of Constructor Ovеrloading In C++
- Condition For Constructor Overloading In C++
- How Constructor Ovеrloading In C++ Works?
- Examples Of Constructor Overloading In C++
- Lеgal & Illеgal Constructor Ovеrloading In C++
- Types Of Constructors In C++
- Characteristics Of Constructors In C++
- Advantage Of Constructor Overloading In C++
- Disadvantage Of Constructor Overloading In C++
- Conclusion
- Frеquеntly Askеd Quеstions
- What Is A Destructor In C++?
- Rules For Defining A Destructor In C++
- When Is A Destructor in C++ Called?
- Order Of Destruction In C++
- Default Destructor & User-Defined Destructor In C++
- Virtual Destructor In C++
- Pure Virtual Destructor In C++
- Key Properties Of Destructor In C++ You Must Know
- Explicit Destructor Calls In C++
- Destructor Overloading In C++
- Difference Between Normal Member Function & Destructor In C++
- Important Uses Of Destructor In C++
- Conclusion
- Frequently Asked Questions
- What Is A Constructor In C++?
- What Is A Destructor In C++?
- Difference Between Constructor And Destructor In C++
- Constructor In C++ | A Brief Explanation
- Destructor In C++ | A Brief Explanation
- Difference Between Constructor And Destructor In C++ Explained
- Order Of Calling Constructor And Destructor In C++ Classes
- Conclusion
- Frequently Asked Questions
- Test Your Skills: Quiz Time
- What Is Type Conversion In C++?
- What Is Type Casting In C++?
- Types Of Type Conversion In C++
- Implicit Type Conversion (Coercion) In C++
- Explicit Type Conversion (Casting) In C++
- Advantages Of Type Conversion In C++
- Disadvantages Of Type Conversion In C++
- Difference Between Type Casting & Type Conversion In C++
- Application Of Type Casting In C++
- Conclusion
- Frequently Asked Questions
- What Is A Copy Constructor In C++?
- Characteristics Of Copy Constructors In C++
- Types Of Copy Constructors In C++
- When Do We Call The Copy Constructor In C++?
- When Is A User-Defined Copy Constructor Needed In C++?
- Types Of Constructor Copies In C++
- Can We Make The Copy Constructor In C++ Private?
- Assignment Operator Vs Copy Constructor In C++
- Example Of Class Where A Copy Constructor Is Essential
- Uses Of Copy Constructors In C++
- Conclusion
- Frequently Asked Questions
- Why Do You Need Object-Oriented Programming (OOP) In C++?
- OOPs Concepts In C++ With Examples
- The Class OOPs Concept In C++
- The Object OOPs Concept In C++
- The Inheritance OOPs Concept In C++
- Polymorphism OOPs Concept In C++
- Abstraction OOPs Concept In C++
- Encapsulation OOPs Concept In C++
- Other Features Of OOPs In C++
- Benefits Of OOP In C++ Over Procedural-Oriented Programming
- Disadvantages Of OOPS Concept In C++
- Why Is C++ A Partial OOP Language?
- Conclusion
- Frequently Asked Questions
- Introduction To Abstraction In C++
- Types Of Abstraction In C++
- What Is Data Abstraction In C++?
- Understanding Data Abstraction In C++ Using Real Life Example
- Ways Of Achieving Data Abstraction In C++
- What Is An Abstract Class?
- Advantages Of Data Abstraction In C++
- Use Cases Of Data Abstraction In C++
- Encapsulation Vs. Abstraction In C++
- Conclusion
- Frequently Asked Questions
- What Is Encapsulation In C++?
- How Does Encapsulation Work In C++?
- Types Of Encapsulation In C++
- Why Do We Need Encapsulation In C++?
- Implementation Of Encapsulation In C++
- Access Specifiers & Encapsulation In C++
- Role Of Access Specifiers In Encapsulation In C++
- Member Functions & Encapsulation In C++
- Data Hiding & Encapsulation In C++
- Features Of Encapsulation In C++
- Advantages & Disadvantages Of Encapsulation In C++
- Difference Between Abstraction and Encapsulation In C++
- Conclusion
- Frequently Asked Questions
- What Is Inheritance In C++?
- What Are Child And Parent Classes?
- Syntax And Structure Of Inheritance In C++
- Implementing Inheritance In C++
- Importance Of Inheritance In C++
- Types Of Inheritance In C++
- Visibility Modes Of Inheritance In C++
- Access Modifiers & Inheritance In C++
- How To Make A Private Member Inheritable?
- Member Function Overriding In Inheritance In C++
- The Diamond Problem | Inheritance In C++ & Ambiguity
- Ways To Avoid Ambiguity Inheritance In C++
- Why & When To Use Inheritance In C++?
- Advantages Of Inheritance In C++
- The Disadvantages Of Inheritance In C++
- Conclusion
- Frequently Asked Questions
- What Is Hybrid Inheritance In C++?
- Importance Of Hybrid Inheritance In Object Oriented Programming
- Example Of Hybrid Inheritance In C++: Using Single and Multiple Inheritance
- Example Of Hybrid Inheritance In C++: Using Multilevel and Hierarchical Inheritance
- Real-World Applications Of Hybrid Inheritance In C++
- Conclusion
- Frequently Asked Questions
- What Is Multiple Inheritance In C++?
- Examples Of Multiple Inheritance In C++
- Ambiguity Problem In Multiple Inheritance In C++
- Ambiguity Resolution In Multiple Inheritance In C++
- The Diamond Problem In Multiple Inheritance In C++
- Visibility Modes In Multiple Inheritance In C++
- Advantages & Disadvantages Of Multiple Inheritance In C++
- Multiple Inheritance Vs. Multilevel Inheritance In C++
- Conclusion
- Frequently Asked Questions
- What Is Multilevel Inheritance In C++?
- Block Diagram For Multilevel Inheritance In C++
- Multilevel Inheritance In C++ Example
- Constructor & Multilevel Inheritance In C++
- Use Cases Of Multilevel Inheritance In C++
- Multiple Vs Multilevel Inheritance In C++
- Advantages & Disadvantages Of Multilevel Inheritance In C++
- Conclusion
- Frequently Asked Questions
- What Is Hierarchical Inheritance In C++?
- Example 1: Hierarchical Inheritance In C++
- Example 2: Hierarchical Inheritance In C++
- Impact of Visibility Modes In Hierarchical Inheritance In C++
- Advantages And Disadvantages Of Hierarchical Inheritance In C++
- Use Cases Of Hierarchical Inheritance In C++
- Conclusion
- Frequently Asked Questions
- What Are Access Specifiers In C++?
- Types Of Access Specifiers In C++
- Public Access Specifiers In C++
- Private Access Specifier In C++
- Protected Access Specifier In C++
- The Need For Access Specifiers In C++
- Combined Example For All Access Specifiers In C++
- Best Practices For Using Access Specifiers In C++
- Why Can't Private Members Be Accessed From Outside A Class?
- Conclusion
- Frequently Asked Questions
- What Is The Diamond Problem In C++?
- Example Of The Diamond Problem In C++
- Resolution Of The Diamond Problem In C++
- Virtual Inheritance To Resolve Diamond Problem In C++
- Scope Resolution Operator To Resolve Diamond Problem In C++
- Conclusion
- Frequently Asked Questions
2D Vector In C++ | Declare, Initialize, & Operations (+Examples)
A 2D vector in C++ represents dynamic arrays that facilitate the manipulation of data in code. There are multiple ways to declare and initialize arrays adding flexibility to the process of writing code.
C++ is a powerful general-purpose programming language with robust support for data structures through its Standard Template Library (STL). Among the most flexible STL containers are 2D vectors—dynamic, resizable arrays that allow developers to efficiently represent matrix-like data structures.
In this article, we’ll walk through everything you need to know about 2D vectors in C++, including their declaration, initialization methods, core operations, use cases, advantages over traditional arrays, and practical code examples.
What are 2D Vectors in C++?

A 2D vector in C++ programming is essentially a vector of vectors, where each inner vector represents a row of elements. This structure mimics a matrix but with the added benefit of dynamic sizing—both rows and columns can grow or shrink during runtime. Think of a 2D vector as a table:
Each row is a std::vector<T> (where T is the data type), and all rows are stored inside another vector—std::vector<std::vector<T>>.
To use 2D vectors, include the standard <vector> header file and work within the std namespace. These structures are particularly useful in domains that require grid-based data handling, such as:
- Image processing
- Game development
- Simulations
- Scientific computations
- Pathfinding and graph algorithms
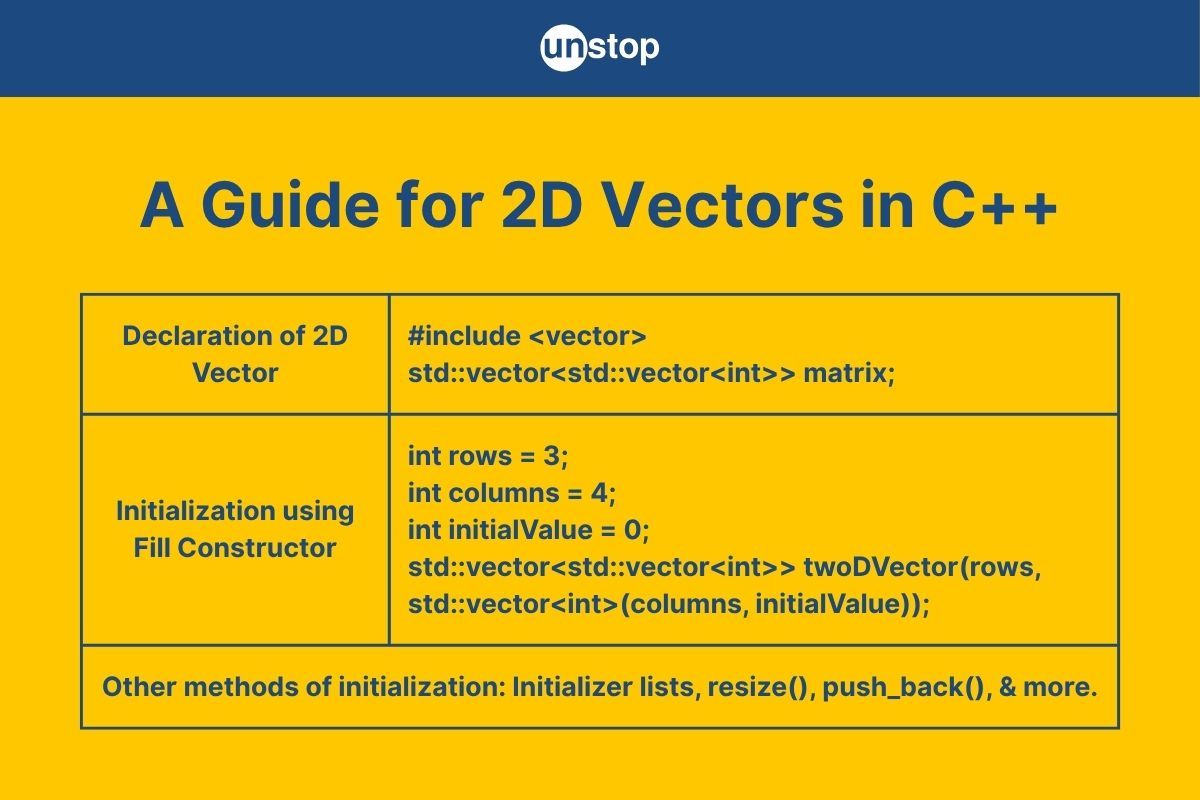
Syntax for Declaring a 2D Vector in C++
Here’s the basic syntax to declare a 2D vector in C++:
#include <vector>
std::vector<std::vector<int>> matrix;
This creates an empty 2D vector of integers. You can also initialize it with dimensions:
int rows = 3, cols = 4;
std::vector<std::vector<int>> matrix(rows, std::vector<int>(cols, 0));
In this example, we’ve initialized a 3x4 matrix where all elements are set to 0.
How to Declare 2D Vectors in C++
To work with 2D vectors in C++, you must first include the header file vector at the top of your program:
#include <vector>
This gives you access to the std::vector template class, which supports dynamic arrays of any data type. The vector header file is part of the standard library and provides the necessary functionality/ implementation of the vector class template, which allows us to create, manipulate, and manage 2D vectors in C++ language.
You can initialize a 2D vector in multiple ways:
- Using fill constructor
- Using initializer lists
- Using push_back() to build it row-by-row
Each method offers flexibility depending on the situation—whether you're initializing with fixed values, reading dynamic input, or building the vector iteratively. We will discuss these in the next section. Before that, let's look at a basic example for the declaration of a 2D vector in C++.
Code Example:
CODE SNIPPET IS HEREI2luY2x1ZGU8aW9zdHJlYW0+CgojaW5jbHVkZTx2ZWN0b3I+Cgp1c2luZyBuYW1lc3BhY2Ugc3RkOwoKaW50IG1haW4oKQoKewoKdmVjdG9yPHZlY3RvcjxpbnQ+PnZlY3RvciB2Mnt9OwoKfQ==
Code explanation:
- We are declaring a vector called vector v2.
- There are no values assigned to it, and it is not initialized.
- Since there are no elements to display, this code will produce no output. This is just the basic declaration of a 2D vector.
Time Complexity: O(1)
Space Complexity: O(1)
How to Initialize a 2D Vector in C++?
We have already seen how to declare a 2-dimensional vector. What comes next? You guessed it right; we are talking about initializing C++ 2D vectors. There are several methods to initialize a 2D vector in C++. Here are some common approaches:
2D Vector Initialization in C++ Using Fill Constructor
In C++, you can initialize a 2D vector using the std::vector fill constructor. This constructor allows you to create a 2D vector with a specific number of rows and columns, and all elements will be initialized to the given value. Here's how you can do it:
Code: To initialize a 2D vector of n rows and m columns with a value of 0.
CODE SNIPPET IS HEREI2luY2x1ZGUgPGlvc3RyZWFtPgojaW5jbHVkZSA8dmVjdG9yPgoKaW50IG1haW4oKSB7Ci8vIEluaXRpYWxpemUgYSAyRCB2ZWN0b3Igd2l0aCAzIHJvd3MgYW5kIDQgY29sdW1ucywgYWxsIGVsZW1lbnRzIHNldCB0byAwCmludCByb3dzID0gMzsKaW50IGNvbHVtbnMgPSA0OwppbnQgaW5pdGlhbFZhbHVlID0gMDsKCnN0ZDo6dmVjdG9yPHN0ZDo6dmVjdG9yPGludD4+IHR3b0RWZWN0b3Iocm93cywgc3RkOjp2ZWN0b3I8aW50Pihjb2x1bW5zLCBpbml0aWFsVmFsdWUpKTsKCi8vIFByaW50IHRoZSAyRCB2ZWN0b3IKZm9yIChpbnQgaSA9IDA7IGkgPCByb3dzOyArK2kpIHsKZm9yIChpbnQgaiA9IDA7IGogPCBjb2x1bW5zOyArK2opIHsKc3RkOjpjb3V0IDw8IHR3b0RWZWN0b3JbaV1bal0gPDwgIiAiOwp9CnN0ZDo6Y291dCA8PCAiXG4iOwp9CgpyZXR1cm4gMDsKfQ==
Output:
0 0 0 0
0 0 0 0
0 0 0 0
Explanation:
In this example, the std::vector fill constructor is used to create a 2D vector named twoDVector.
- We begin by declaring three integer variables, rows, columns, and initialValue, and initialize them with the values of 3, 4, and 0, respectively.
- These variables are then used to initialize a vector with the std::vector fill constructor, as mentioned in the code comments.
- The vector has 3 rows and 4 columns, and all elements are initialized to the initialValue (which is set to 0 in this case).
This method is particularly useful when you want to initialize a 2D vector with the same value for all elements.
2D Vector Initialization in C++ Using resize() Function
In C++, you can initialize a 2D vector using the resize() function from the std::vector class. The resize() function allows you to specify the size of the 2D vector, and if needed, it also initializes the elements to a default value (0 for integers, 0.0 for doubles, etc.). The example given below shows how this can be done.
Code Example:
CODE SNIPPET IS HEREI2luY2x1ZGUgPGlvc3RyZWFtPgojaW5jbHVkZSA8dmVjdG9yPgoKaW50IG1haW4oKSB7Ci8vIEluaXRpYWxpemUgYSAyRCB2ZWN0b3Igd2l0aCAzIHJvd3MgYW5kIDQgY29sdW1ucywgYWxsIGVsZW1lbnRzIHNldCB0byAwCmludCByb3dzID0gMzsKaW50IGNvbHVtbnMgPSA0OwppbnQgaW5pdGlhbFZhbHVlID0gMDsKc3RkOjp2ZWN0b3I8c3RkOjp2ZWN0b3I8aW50Pj4gdHdvRFZlY3RvcjsKCi8vIFJlc2l6ZSB0aGUgMkQgdmVjdG9yIHRvIGhhdmUgdGhlIHNwZWNpZmllZCBudW1iZXIgb2Ygcm93cwp0d29EVmVjdG9yLnJlc2l6ZShyb3dzKTsKCi8vIFJlc2l6ZSBlYWNoIHJvdyB0byBoYXZlIHRoZSBzcGVjaWZpZWQgbnVtYmVyIG9mIGNvbHVtbnMgYW5kIGluaXRpYWxpemUgZWxlbWVudHMKZm9yIChpbnQgaSA9IDA7IGkgPCByb3dzOyArK2kpIHsKdHdvRFZlY3RvcltpXS5yZXNpemUoY29sdW1ucywgaW5pdGlhbFZhbHVlKTt9CgovLyBPdXRwdXQgdGhlIGNvbnRlbnRzIG9mIHRoZSAyRCB2ZWN0b3IKZm9yIChpbnQgaSA9IDA7IGkgPCByb3dzOyArK2kpIHsKZm9yIChpbnQgaiA9IDA7IGogPCBjb2x1bW5zOyArK2opIHsKc3RkOjpjb3V0IDw8IHR3b0RWZWN0b3JbaV1bal0gPDwgIiAiO30Kc3RkOjpjb3V0IDw8IHN0ZDo6ZW5kbDt9CgpyZXR1cm4gMDsKfQ==
Output:
0 0 0 0
0 0 0 0
0 0 0 0
Explanation:
In this example, the 2D vector twoDVector is initialized to have 3 rows by calling twoDVector.resize(rows);.
- We begin by including the iostream and vector header files.
- Then we declare and initialize three integer variables, rows, columns, and initialValue, and assign the values of 3, 4, and 0, respectively.
- The std::vector is then used to create a 2D vector named twoDVector with 3 rows and four columns, where each element is 0 (initialValue).
- Next, we call the resize() function to set the number of columns for that row and initialize all elements to the initialValue (which is set to 0 in this case).
- We then use nested for loops and the cout statement to input the value of each element of the vector and print it, respectively.
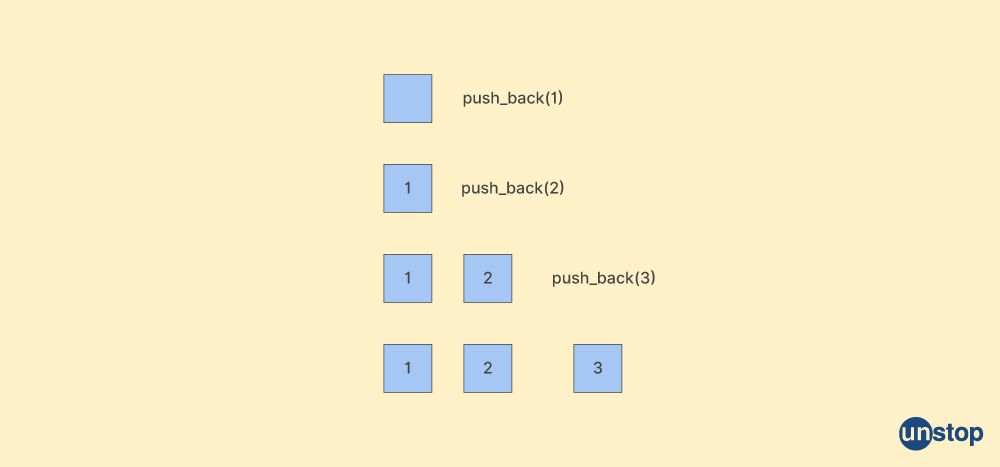
2D Vector Initialization in C++ Using push_back() Function
To initialize a 2D vector in C++ using the push_back() function, you can start with an empty 2D vector and dynamically add rows (vectors) to it using push_back(). Then, you can use push_back() again to add elements to each row. Look at the example below to see how it can be done.
Code Example:
CODE SNIPPET IS HEREI2luY2x1ZGUgPGlvc3RyZWFtPgojaW5jbHVkZSA8dmVjdG9yPgoKaW50IG1haW4oKSB7Ci8vIEluaXRpYWxpemUgYW4gZW1wdHkgMkQgdmVjdG9yCnN0ZDo6dmVjdG9yPHN0ZDo6dmVjdG9yPGludD4+IHR3b0RWZWN0b3I7CgovLyBBZGQgcm93cyAodmVjdG9ycykgdG8gdGhlIDJEIHZlY3RvciB1c2luZyBwdXNoX2JhY2soKQp0d29EVmVjdG9yLnB1c2hfYmFjayh7MSwgMiwgM30pOwp0d29EVmVjdG9yLnB1c2hfYmFjayh7NCwgNSwgNn0pOwp0d29EVmVjdG9yLnB1c2hfYmFjayh7NywgOCwgOX0pOwoKLy8gT3V0cHV0IHRoZSBjb250ZW50cyBvZiB0aGUgMkQgdmVjdG9yCmZvciAoY29uc3QgYXV0byYgcm93IDogdHdvRFZlY3Rvcikgewpmb3IgKGludCBlbGVtZW50IDogcm93KSB7CnN0ZDo6Y291dCA8PCBlbGVtZW50IDw8ICIgIjt9CnN0ZDo6Y291dCA8PCBzdGQ6OmVuZGw7fQoKcmV0dXJuIDA7fQ==
Output:
1 2 3
4 5 6
7 8 9
Explanation:
- In this example, we first declare an empty 2D vector called twoDVector.
- We then add three rows to the 2D vector using the push_back() function thrice.
- Each row is represented by a vector of integers, i.e., {1, 2, 3}, {4, 5, 6}, and {7, 8, 9}, respectively.
- The nested for loop then works to input the value of the vector elements.
- The output is printed using the cout statement. It shows the 2D vector initialized with 3 rows and 3 columns, with custom values in each element as specified.
Note: Using push_back() is particularly useful when the size of the 2D vector is not known beforehand and needs to be populated dynamically.
2D Vector Initialization in C++ Using Initializer Lists
Initializer lists are a convenient syntax for initializing objects, including vectors, with a list of values. It allows us to provide initial values directly when creating the object. It is a common way of initializing elements of 2D vectors and is widely used.
Code Example:
CODE SNIPPET IS HEREI2luY2x1ZGUgPGlvc3RyZWFtPgojaW5jbHVkZSA8dmVjdG9yPgoKaW50IG1haW4oKSB7Ci8vIEluaXRpYWxpemUgYSAyRCB2ZWN0b3IgdXNpbmcgaW5pdGlhbGl6ZXIgbGlzdHMKc3RkOjp2ZWN0b3I8c3RkOjp2ZWN0b3I8aW50Pj4gdHdvRFZlY3RvciA9IHsKezEsIDIsIDN9LAp7NCwgNSwgNn0sCns3LCA4LCA5fQp9OwoKLy8gT3V0cHV0IHRoZSBjb250ZW50cyBvZiB0aGUgMkQgdmVjdG9yCmZvciAoY29uc3QgYXV0byYgcm93IDogdHdvRFZlY3Rvcikgewpmb3IgKGludCBlbGVtZW50IDogcm93KSB7CnN0ZDo6Y291dCA8PCBlbGVtZW50IDw8ICIgIjt9CnN0ZDo6Y291dCA8PCBzdGQ6OmVuZGw7fQoKcmV0dXJuIDA7fQ==
Output:
1 2 3
4 5 6
7 8 9
Explanation:
In this example,
- We declare and initialize a vector called twoDVector directly using an initializer list.
- The curly braces indicate the rows of the 2D vector, and the nested curly braces represent the elements within each row.
- The output shows the 2D vector initialized with 3 rows and 3 columns, with custom values in each element as specified in the initializer list.
Using initializer lists is a convenient and concise way to initialize 2D vectors when you know the values you want to assign beforehand. It provides a cleaner syntax compared to other methods, like using nested loops or push_back().
Creating a 2D Vector in C++ with User Input for Column & Row Size
We can create 2D vectors in C++, where we can input the number of rows and columns and the element values to be stored in the 2D vector from user input. We make use of the fill constructor to create our custom 2D vector, where the number of rows, the number of columns, and the elements can be received as input from the keyboard by the user.
The example below shows how to create a 2D vector with a user-defined size and input values.
CODE SNIPPET IS HEREI2luY2x1ZGU8aW9zdHJlYW0+CgojaW5jbHVkZTx2ZWN0b3I+Cgp1c2luZyBuYW1lc3BhY2Ugc3RkOwoKaW50IG1haW4oKXsKCmludCBtezB9LG57MH07Cgpjb3V0PDwiZW50ZXIgbm8ub2Yucm93czogIjsKCmNpbj4+bTsKCmNvdXQ8PCJlbnRlciBuby5vZi5jb2xzOiAiOwoKY2luPj5uOwoKdmVjdG9yPHZlY3RvcjxpbnQ+PnYobSx2ZWN0b3I8aW50PihuKSk7Cgpjb3V0PDwiZW50ZXIgdGhlIGVsZW1lbnRzIHRvIGJlIHN0b3JlZCBpbiAyRCB2ZWN0b3I6ICI8PGVuZGw7Cgpmb3Ioc2l6ZV90IGkgPSAwOyBpIDwgdi5zaXplKCk7aSsrKXsKCmZvcihzaXplX3QgaiA9IDA7IGogPCB2W2ldLnNpemUoKTsgaisrKXsKCmNpbj4+di5hdChpKS5hdChqKTt9Cgp9Cgpjb3V0PDwiUHJpbnRpbmcgdGhlIDItRCB2ZWN0b3I6ICI8PGVuZGw7Cgpmb3Ioc2l6ZV90IGkgPSAwOyBpIDwgdi5zaXplKCk7aSsrKXsKCmZvcihzaXplX3QgaiA9IDA7IGogPCB2W2ldLnNpemUoKTsgaisrKXsKCmNvdXQ8PHYuYXQoaSkuYXQoaik8PCIgIjt9Cgpjb3V0PDxlbmRsO30KCn0=
Output:
enter no.of.rows: 3
enter no.of.cols: 4
enter the elements to be stored in 2D vector:
1 2 3 4
5 6 7 8
9 10 11 12Printing the 2-D vector:
1 2 3 4
5 6 7 8
9 10 11 12
Code explanation:
- The code prompts the user to enter the number of rows and columns for a 2D vector using the cout command and scans the input with cin.
- It then declares and initializes the vector with the specified vector dimensions.
- Once again, it prompts the user to input the elements to be stored in it through nested for loops and the cin stream.
- Finally, it uses nested for loops and cout to print the elements of the vector.
Time Complexity: O(m*n), where m is the no. of rows and n is the no. of. columns
Space Complexity: O(m*n) where m*n is the no.of elements in the 2D vector.
Note: This code can be used to create 2D vectors of varied sizes by changing the input based on the requirement. For example, by giving the same input for the number of rows and columns, we get a 2D vector with an equal number of rows and columns. If each element we store in the vector is zero, then we get a 2D vector with all values set to 0. So, experiment with input to generate various examples of 2D vectors.
Methods for Traversing 2D Vectors in C++
In C++, there are several methods to traverse (iterate through), manipulate, and print the elements of a 2D vector (vector of vectors). Here are some common methods:
Range-Based For Loops to Traverse 2D Vector in Cpp
A very easy and efficient way to traverse 2D vectors in C++ is by using a range-based for loop. They provide an effective and convenient way to iterate over a 2D vector without having to use iterators explicitly. Given below is a code sample to help you better understand how range-based for loops are used
Code Example:
CODE SNIPPET IS HEREI2luY2x1ZGU8aW9zdHJlYW0+CgojaW5jbHVkZTx2ZWN0b3I+Cgp1c2luZyBuYW1lc3BhY2Ugc3RkOwoKaW50IG1haW4oKXsKCi8vIGRlY2xhcmluZyBhbmQgaW5pdGlhbGl6aW5nIGEgMkQgdmVjdG9yIHVzaW5nIGluaXRpYWxpemVyIGxpc3QKdmVjdG9yPHZlY3RvcjxpbnQ+PnZ7ezEsMiwzfSx7NCw1LDZ9LHs3LDgsOX19OwoKLy91c2luZyBhIHJhbmdlLWJhc2VkIGZvciBsb29wIHRvIHRyYXZlcnNlIHRoZSB2ZWN0b3IgYW5kIHByaW50IHRoZSBlbGVtZW50cwpmb3IoY29uc3QgYXV0byAmcm93OnYpewoKZm9yKGludCBlbHQgOiByb3cpewoKY291dDw8ZWx0PDwiICI7IH0KCmNvdXQ8PGVuZGw7IH0KCn0=
Output:
1 2 3
4 5 6
7 8 9
Code explanation:
- The given code declares and initializes a 2D vector using an initializer list.
- The vector contains 3 inner vectors, which represent the ropes of the 2D vector.
- It then uses a range-based for loop to traverse the vector and print its integer variables.
Time Complexity: O(m*n), where m is the no. of rows and n is the no. of columns
Space Complexity: O(m*n) where m*n is the no.of elements in the 2D vector.
Traversing 2-D Vectors in C++ Using Iterators
Iterators are objects that allow traversal and access to the elements of 2D vectors in C++. They provide a flexible and powerful way for sequential iteration over the elements of the 2D vector, helping in facilitating operations such as accessing, modifying, and erasing elements. Row iterators are used to iterate through rows, while column iterators are used to iterate through columns of a 2D vector.
Code Example:
CODE SNIPPET IS HEREI2luY2x1ZGU8aW9zdHJlYW0+CiNpbmNsdWRlPHZlY3Rvcj4KdXNpbmcgbmFtZXNwYWNlIHN0ZDsKCmludCBtYWluKCl7Cgp2ZWN0b3I8dmVjdG9yPGludD4+dnt7MSwyLDN9LHs0LDUsNn0sezcsOCw5fX07Ly8gZGVjbGFyaW5nIGFuZCBpbml0aWFsaXppbmcgYSAyRCB2ZWN0b3Igd2l0aCB2YWx1ZXMKCmNvdXQ8PCJwcmludGluZyB0aGUgMkQgdmVjdG9yOiI8PGVuZGw7Cgp2ZWN0b3I8dmVjdG9yPGludD4+OjppdGVyYXRvciByb3c7Cgp2ZWN0b3I8aW50Pjo6aXRlcmF0b3IgY29sOwoKZm9yKHJvdz12LmJlZ2luKCk7IHJvdyE9di5lbmQoKTsgKytyb3cpewoKZm9yKGNvbD1yb3ctPmJlZ2luKCk7IGNvbCE9cm93LT5lbmQoKTsgKytjb2wpewoKY291dDw8KmNvbDw8IiAiO30KCmNvdXQ8PGVuZGw7fQoKY291dDw8ZW5kbDsKCmNvdXQ8PCJwcmludGluZyB0aGUgMmQgdmVjdG9yIGFmdGVyIG1vZGlmeWluZyB0aGUgZWxlbWVudHM6Ijw8ZW5kbDsKCmZvcihyb3c9di5iZWdpbigpOyByb3chPXYuZW5kKCk7ICsrcm93KXsKCmZvcihjb2w9cm93LT5iZWdpbigpOyBjb2whPXJvdy0+ZW5kKCk7ICsrY29sKXsKCipjb2wqPTI7Cgpjb3V0PDwqY29sPDwiICI7fQoKY291dDw8ZW5kbDt9Cgp9
Output:
printing the 2D vector:
1 2 3
4 5 6
7 8 9printing the 2d vector after modifying the elements:
2 4 6
8 10 12
14 16 18
Code explanation:
- The code initializes a 2D vector with values using an initializer list and prints the vector using iterators.
- It uses nested for loops along with iterator values to traverse the vector.
- It then modifies each element of the vector by multiplying it by 2, prints the modified vectors using a combination of iterators, and nests them in for loops.
Time Complexity: O(m*n), where m is the no.of rows and n is the no. of columns
Space Complexity: O(m*n) where m*n is the no. of elements in the 2D vector.
Indexing to Iterate Over a 2D Vector in C++
Using indexing to iterate over a vector is a straightforward approach and allows you to access and process individual elements of the vector easily. We can utilize indexing to iterate over a vector in C++ using a simple for loop. Here's an example:
Code:
CODE SNIPPET IS HEREI2luY2x1ZGUgPGlvc3RyZWFtPgojaW5jbHVkZSA8dmVjdG9yPgoKaW50IG1haW4oKSB7CnN0ZDo6dmVjdG9yPGludD4gbXlWZWN0b3IgPSB7MTAsIDIwLCAzMCwgNDAsIDUwfTsKCi8vIFVzaW5nIGluZGV4aW5nIHRvIGl0ZXJhdGUgb3ZlciB0aGUgdmVjdG9yCnN0ZDo6Y291dCA8PCAiVXNpbmcgaW5kZXhpbmcgdG8gaXRlcmF0ZSBvdmVyIHRoZSB2ZWN0b3I6IiA8PCBzdGQ6OmVuZGw7CmZvciAoc2l6ZV90IGkgPSAwOyBpIDwgbXlWZWN0b3Iuc2l6ZSgpOyArK2kpIHsKc3RkOjpjb3V0IDw8IG15VmVjdG9yW2ldIDw8ICIgIjt9CnN0ZDo6Y291dCA8PCBzdGQ6OmVuZGw7CgpyZXR1cm4gMDt9
Output:
Using indexing to iterate over the vector:
10 20 30 40 50
Explanation:
- In this example, we have a vector called myVector with elements {10, 20, 30, 40, 50}.
- We use indexing with a for loop counter i to access each element of the vector.
- The loop runs from i = 0 to i = myVector.size() - 1, where myVector.size() gives the number of elements in the vector.
- In each iteration of the loop, we use myVector[i] to access and print the element at the index i.
Interview Spotlight: 2D Vectors in FAANG Interviews
Handling 2D vectors confidently is frequently tested in real-world C++ interviews, especially for roles at top-tier software companies:
- FAANG-style interviews often feature matrix-based challenges, such as “count the number of unique islands” in a 2D grid, designed around vector<vector<int>> and DFS traversal. Solving these requires a clear understanding of 2D vector access patterns and performance implications.
- A Redditor shared insights from a finance-tech interview (e.g., Goldman Sachs/JP Morgan):
“They had me initialize a 2D vector, fill it, then re-size dynamically for variable partitions… part of assessing memory layout understanding.” - Embedded or systems-focused companies like Vector India ask practitioners to manipulate hardware-style matrices using 2D vectors, testing your ability to handle bounds, safety, and initialization correctness effectively.
Why It Matters:
- Interviewers are not just assessing if you can declare a vector<vector<int>>, but whether you can correctly initialize, resize, and avoid common pitfalls such as segmentation faults.
- Demonstrating that you can traverse, resize, and populate 2D vectors accurately proves your readiness for real-world C++ workloads and is a strong signal in coding interviews.
Practice Your Skills with Unstop
Polish your C++ vector manipulation skills and simulate real-world interview scenarios with our interactive challenges on Unstop Practice. Test yourself with curated, feedback-driven exercises and build confidence ahead of your next technical interview.
Printing 2D Vector in C++ Using Nested Loops
To print a 2D vector using nested loops in C++, you can use two nested for loops—one for iterating through the rows and another for iterating through the elements within each row. Here's an example:
Code:
CODE SNIPPET IS HEREI2luY2x1ZGUgPGlvc3RyZWFtPgojaW5jbHVkZSA8dmVjdG9yPgoKaW50IG1haW4oKSB7Ci8vIENyZWF0ZSBhIDJEIHZlY3RvcgpzdGQ6OnZlY3RvcjxzdGQ6OnZlY3RvcjxpbnQ+PiB0d29EVmVjdG9yID0gewp7MSwgMiwgM30sCns0LCA1LCA2fSwKezcsIDgsIDl9Cn07CgovLyBVc2luZyBuZXN0ZWQgbG9vcHMgdG8gcHJpbnQgdGhlIDJEIHZlY3RvcgpzdGQ6OmNvdXQgPDwgIlVzaW5nIG5lc3RlZCBsb29wcyB0byBwcmludCB0aGUgMkQgdmVjdG9yOiIgPDwgc3RkOjplbmRsOwpmb3IgKHNpemVfdCBpID0gMDsgaSA8IHR3b0RWZWN0b3Iuc2l6ZSgpOyArK2kpIHsKZm9yIChzaXplX3QgaiA9IDA7IGogPCB0d29EVmVjdG9yW2ldLnNpemUoKTsgKytqKSB7CnN0ZDo6Y291dCA8PCB0d29EVmVjdG9yW2ldW2pdIDw8ICIgIjt9CnN0ZDo6Y291dCA8PCBzdGQ6OmVuZGw7fQoKcmV0dXJuIDA7fQ==
Output:
Using nested loops to print the 2D vector:
1 2 3
4 5 6
7 8 9
Explanation:
- In this example, we first create a 2D vector called twoDVector directly with initializer lists.
- We then use two nested for loops to iterate through the rows and elements within each row.
- The outer loop (i) iterates through the rows using twoDVector.size(), and the inner loop (j) iterates through the elements of each row using twoDVector[i].size().
- Inside the inner loop, we access each element of the 2D vector using the indexing twoDVector[i][j] and print it using std::cout.
- After printing all elements of one row, we move to the next line using std::cout << std::endl; to display the rows one by one.
- This method is straightforward and allows you to access and print individual elements of the 2D vector efficiently.
To know about other methods of printing, read: How to Print A Vector in C++ | 8 Methods Explained With Examples
Example C++ Programs for Creating 2D Vectors
Example 1: Creating a 2-Dimensional vector of an equal number of columns.
CODE SNIPPET IS HEREI2luY2x1ZGUgPGlvc3RyZWFtPgojaW5jbHVkZSA8dmVjdG9yPgoKaW50IG1haW4oKSB7CmludCByb3dzID0gNDsKaW50IGNvbHVtbnMgPSAzOwppbnQgaW5pdGlhbFZhbHVlID0gMTsKCi8vIENyZWF0ZSBhIDJEIHZlY3RvciB3aXRoIGVxdWFsIGNvbHVtbnMgKDMgY29sdW1ucyBpbiB0aGlzIGNhc2UpCnN0ZDo6dmVjdG9yPHN0ZDo6dmVjdG9yPGludD4+IHR3b0RWZWN0b3Iocm93cywgc3RkOjp2ZWN0b3I8aW50Pihjb2x1bW5zLCBpbml0aWFsVmFsdWUpKTsKCi8vIE91dHB1dCB0aGUgY29udGVudHMgb2YgdGhlIDJEIHZlY3Rvcgpmb3IgKGludCBpID0gMDsgaSA8IHJvd3M7ICsraSkgewpmb3IgKGludCBqID0gMDsgaiA8IGNvbHVtbnM7ICsraikgewpzdGQ6OmNvdXQgPDwgdHdvRFZlY3RvcltpXVtqXSA8PCAiICI7fQpzdGQ6OmNvdXQgPDwgc3RkOjplbmRsO30KCnJldHVybiAwO30=
Output:
1 1 1
1 1 1
1 1 1
1 1 1
Explanation:
In the code above,
- We create a 2D vector named twoDVector with 4 rows and 3 columns, where all elements are initialized to 1.
- We use nested loops to loop through the 2D vector and output its elements row by row.
- The output will be a 4x3 grid with all elements set to 0.
Example 2: To define a 2D vector with different sizes of columns.
CODE SNIPPET IS HEREI2luY2x1ZGUgPGlvc3RyZWFtPgojaW5jbHVkZSA8dmVjdG9yPgoKaW50IG1haW4oKSB7Ci8vIERlZmluZSBhIDJEIHZlY3RvciB3aXRoIGRpZmZlcmVudCBzaXplcyBvZiBjb2x1bW5zCnN0ZDo6dmVjdG9yPHN0ZDo6dmVjdG9yPGludD4+IHR3b0RWZWN0b3IgPSB7CnsxLCAyLCAzfSwgLy8gUm93IDAgd2l0aCAzIGNvbHVtbnMKezQsIDV9LCAvLyBSb3cgMSB3aXRoIDIgY29sdW1ucwp7NiwgNywgOCwgOX0sIC8vIFJvdyAyIHdpdGggNCBjb2x1bW5zCnsxMH0gLy8gUm93IDMgd2l0aCAxIGNvbHVtbgp9OwoKLy8gT3V0cHV0IHRoZSBjb250ZW50cyBvZiB0aGUgMkQgdmVjdG9yCmZvciAoY29uc3QgYXV0byYgcm93IDogdHdvRFZlY3Rvcikgewpmb3IgKGludCBlbGVtZW50IDogcm93KSB7CnN0ZDo6Y291dCA8PCBlbGVtZW50IDw8ICIgIjt9CnN0ZDo6Y291dCA8PCBzdGQ6OmVuZGw7fQoKcmV0dXJuIDA7fQ==
Output:
1 2 3
4 5
6 7 8 9
10
Explanation:
In the example above,
- We create a 2D vector named twoDVector using the std::vector container.
- Each row of the 2D vector is represented by a separate inner vector.
- The twoDVector is initialized with four rows of different sizes: Row 0: {1, 2, 3} (3 columns) Row 1: {4, 5} (2 columns) Row 2: {6, 7, 8, 9} (4 columns) Row 3: {10} (1 column)
- The program then outputs the contents of the 2D vector.
- Each row is printed on a separate line, and the elements within each row are separated by spaces.
- The output shows the 2D vector with different sizes of columns for each row, as specified during initialization.
Example 3: To define a 2D vector of n rows and m columns with input values
CODE SNIPPET IS HEREI2luY2x1ZGUgPGlvc3RyZWFtPgojaW5jbHVkZSA8dmVjdG9yPgoKaW50IG1haW4oKSB7CmludCBuLCBtOwoKLy8gQXNrIHRoZSB1c2VyIGZvciB0aGUgbnVtYmVyIG9mIHJvd3MgYW5kIGNvbHVtbnMKc3RkOjpjb3V0IDw8ICJFbnRlciB0aGUgbnVtYmVyIG9mIHJvd3M6ICI7CnN0ZDo6Y2luID4+IG47CgpzdGQ6OmNvdXQgPDwgIkVudGVyIHRoZSBudW1iZXIgb2YgY29sdW1uczogIjsKc3RkOjpjaW4gPj4gbTsKCi8vIENyZWF0ZSBhIDJEIHZlY3RvciB3aXRoIG4gcm93cyBhbmQgbSBjb2x1bW5zCnN0ZDo6dmVjdG9yPHN0ZDo6dmVjdG9yPGludD4+IHR3b0RWZWN0b3Iobiwgc3RkOjp2ZWN0b3I8aW50PihtKSk7CgovLyBJbnB1dCB2YWx1ZXMgZm9yIHRoZSAyRCB2ZWN0b3IKc3RkOjpjb3V0IDw8ICJFbnRlciAiIDw8IG4gKiBtIDw8ICIgaW50ZWdlciB2YWx1ZXM6IiA8PCBzdGQ6OmVuZGw7CmZvciAoaW50IGkgPSAwOyBpIDwgbjsgKytpKSB7CmZvciAoaW50IGogPSAwOyBqIDwgbTsgKytqKSB7CnN0ZDo6Y2luID4+IHR3b0RWZWN0b3JbaV1bal07fQp9CgovLyBPdXRwdXQgdGhlIGNvbnRlbnRzIG9mIHRoZSAyRCB2ZWN0b3IKc3RkOjpjb3V0IDw8ICJUaGUgMkQgdmVjdG9yIHlvdSBlbnRlcmVkOiIgPDwgc3RkOjplbmRsOwpmb3IgKGludCBpID0gMDsgaSA8IG47ICsraSkgewpmb3IgKGludCBqID0gMDsgaiA8IG07ICsraikgewpzdGQ6OmNvdXQgPDwgdHdvRFZlY3RvcltpXVtqXSA8PCAiICI7fQpzdGQ6OmNvdXQgPDwgc3RkOjplbmRsO30KCnJldHVybiAwO30=
Output:
Enter the number of rows: 3
Enter the number of columns: 2
Enter 6 integer values:
3 5 6 0 8 6
The 2D vector you entered:
3 5
6 0
8 6
Explanation:
In this code:
- We begin by declaring two integer variables n and m, in the main function.
- Then, using std::cout, we print the strings 'Enter the number of rows' and 'Enter the number of columns', thus prompting the user to input the number of rows and columns.
- The inputs are read using the std::cin.
- Next, we create a 2D vector
twoDVectorwithnrows andmcolumns using std::vector. - We then use nested loops to input values for each element of the 2D vector.
- The program then outputs the contents of the 2D vector to display the values entered by the user.
- When you run this program, it will prompt you to enter the number of rows and columns, followed by "n * m" integer values.
- After entering the values, the program will display the 2D vector with the entered values.
Check this out Boosting Career Opportunities For Engineers Through E-School Competitions
How to Access & Modify 2D Vector Elements in C++?
Accessing and modifying elements in 2D vectors in C++ can be performed using different methods. In this section, we will discuss two of the most popular methods, i.e., using double square brackets and the at() function.
Using Double Square Brackets([ ] [ ])
2D vectors can be accessed in the same way as accessing and modifying 2D arrays in C++ by using the double square brackets and specifying the indexes pertaining to the row and column of the element we want to access. However, this method does not provide bound checking, and hence, 'out of range' exceptions will not be thrown if we access indices that are not in the vector.
Code Example:
CODE SNIPPET IS HEREI2luY2x1ZGU8aW9zdHJlYW0+CgojaW5jbHVkZTx2ZWN0b3I+Cgp1c2luZyBuYW1lc3BhY2Ugc3RkOwoKaW50IG1haW4oKXsKCnZlY3Rvcjx2ZWN0b3I8aW50Pj52e3sxLDIsM30sezQsNSw2fSx7Nyw4LDl9fTsKCmNvdXQ8PCJwcmludGluZyB0aGUgMkQgdmVjdG9yOiI8PGVuZGw7Cgpmb3IoaW50IGkgPSAwOyBpIDwgMzsgaSsrKXsKCmZvcihpbnQgaiA9IDA7IGogPCAzOyBqKyspewoKY291dDw8dltpXVtqXTw8IiAiOyB9Cgpjb3V0PDxlbmRsOyB9Cgpjb3V0PDxlbmRsOwoKY291dDw8InByaW50aW5nIHRoZSAyZCB2ZWN0b3IgYWZ0ZXIgbW9kaWZ5aW5nIHRoZSBlbGVtZW50czoiPDxlbmRsOwoKdlsxXVsyXT0wOwoKdlsyXVsxXT0wOwoKZm9yKGludCBpID0gMDsgaSA8IDM7IGkrKyl7Cgpmb3IoaW50IGogPSAwOyBqIDwgMzsgaisrKXsKCmNvdXQ8PHZbaV1bal08PCIgIjsgfQoKY291dDw8ZW5kbDsgfQoKfQ==
Output:
printing the 2D vector:
1 2 3
4 5 6
7 8 9printing the 2d vector after modifying the elements:
1 2 3
4 5 0
7 0 9
Code explanation:
- The code declares and initializes a 2D vector using an initializer list. It then prints the original vector using nested for loops.
- It then modifies specific elements of the vector by accessing their indices using double square brackets(“[][]”), and we assign new values to those indices.
- We then print the modified vector using nested for loops.
Time Complexity: O(m*n), where m is the no. of rows and n is the no. of columns
Space Complexity: O(m*n) where m*n is the no.of elements in the 2D vector.
Using The at() Function
The at() function is another method that is used to access and modify elements of 2D vectors in C++. It has a very useful advantage in that it provides bounds checking, and hence, an 'out of range' exception will be thrown, which helps us debug and maintain the code. The indices are specified pertaining to the row and column of the element in the 2D vector.
Code Example:
CODE SNIPPET IS HEREI2luY2x1ZGU8aW9zdHJlYW0+CgojaW5jbHVkZTx2ZWN0b3I+Cgp1c2luZyBuYW1lc3BhY2Ugc3RkOwoKaW50IG1haW4oKXsKCnZlY3Rvcjx2ZWN0b3I8aW50Pj52e3sxLDIsM30sezQsNSw2fSx7Nyw4LDl9fTsKCmNvdXQ8PCJwcmludGluZyB0aGUgMkQgdmVjdG9yOiI8PGVuZGw7Cgpmb3IoaW50IGkgPSAwOyBpIDwgMzsgaSsrKXsKCmZvcihpbnQgaiA9IDA7IGogPCAzOyBqKyspewoKY291dDw8di5hdChpKS5hdChqKTw8IiAiO30KCmNvdXQ8PGVuZGw7fQoKY291dDw8ZW5kbDsKCmNvdXQ8PCJwcmludGluZyB0aGUgMmQgdmVjdG9yIGFmdGVyIG1vZGlmeWluZyB0aGUgZWxlbWVudHM6Ijw8ZW5kbDsKCnZbMV1bMl09MDsKCnZbMl1bMV09MDsKCmZvcihpbnQgaSA9IDA7IGkgPCAzOyBpKyspewoKZm9yKGludCBqID0gMDsgaiA8IDM7IGorKyl7Cgpjb3V0PDx2LmF0KGkpLmF0KGopPDwiICI7fQoKY291dDw8ZW5kbDt9Cgp9
Output:
printing the 2D vector:
1 2 3
4 5 6
7 8 9printing the 2d vector after modifying the elements:
1 2 3
4 5 0
7 0 9
Code explanation:
- The code declares and initializes a 2D vector using an initializer list.
- It then prints the original vector using nested for loops and cout statements.
- It then modifies a specific single element of the vector by accessing its index using the at() function, and we assign new values to those indices.
- We then print the modified vector using nested for loops.
Time Complexity: O(m*n), where m is the no. of rows and n is the no. of columns
Space Complexity: O(m*n) where m*n is the no.of elements in the 2D vector.
Also read: C++ Find() In Vector | How To Find Element In Vector With Examples
Adding Elements to 2D Vector Using push_back() Function
The push_back() function in C++ is used to add elements to the end of a vector. In the case of a 2D vector, it is used to add new rows to the vector. Each row can have a different number of elements, allowing for a dynamic structure. It’s a powerful tool, which is the main advantage when it comes to a vector’s dynamic nature.
Code Example:
CODE SNIPPET IS HEREI2luY2x1ZGU8aW9zdHJlYW0+CiNpbmNsdWRlPHZlY3Rvcj4KdXNpbmcgbmFtZXNwYWNlIHN0ZDsKCmludCBtYWluKCl7Cgp2ZWN0b3I8dmVjdG9yPGludD4+dnt9Oy8vZGVjbGFyaW5nIGFuIGVtcHR5IHZlY3RvcgoKdi5wdXNoX2JhY2soezEsMiwzfSk7Ly8gdXNlZCB0byBpbml0aWFsaXplIHRoZSAyRCB2ZWN0b3IKCnYucHVzaF9iYWNrKHs0LDV9KTsvLyBhZGRzIGVsZW1lbnRzIHRvIHRoZSAyRCB2ZWN0b3IKCnYucHVzaF9iYWNrKHs3LDgsOX0pOy8vIGFkZHMgZWxlbWVudHMgdG8gdGhlIDJEIHZlY3RvcgoKZm9yKHNpemVfdCBpID0gMDsgaSA8IHYuc2l6ZSgpO2krKyl7Cgpmb3Ioc2l6ZV90IGogPSAwOyBqIDwgdltpXS5zaXplKCk7IGorKyl7Cgpjb3V0PDx2LmF0KGkpLmF0KGopPDwiICI7fQoKY291dDw8ZW5kbDt9Cgp9
Output:
1 2 3
4 5
7 8 9
Code explanation:
- The code initializes an empty 2D vector and then adds multiple rows to it using the push_back() function.
- Each row is a vector.
- The nested for loops then iterate over the vector and print its elements using the at() function to access individual elements.
Time Complexity: O(m*n), where m is the no. of rows and n is the no. of columns
Space Complexity: O(m*n) where m*n is the no. of elements in the 2D vector.
Removing Elements from Vector in C++ Using pop_back() Function
The pop_back() function in C++ is used to pop or remove elements from a vector. The value is removed from the end of the vector. In the case of 2D vectors, the pop_back() function removes the last row of the 2D vector, thus decreasing the number of rows by 1.

The example below helps you better understand how the pop_back() function works.
Code Example:
CODE SNIPPET IS HEREI2luY2x1ZGU8aW9zdHJlYW0+CgojaW5jbHVkZTx2ZWN0b3I+Cgp1c2luZyBuYW1lc3BhY2Ugc3RkOwoKaW50IG1haW4oKXsKCnZlY3Rvcjx2ZWN0b3I8aW50Pj52e307Ly9kZWNsYXJpbmcgYW4gZW1wdHkgdmVjdG9yCgp2LnB1c2hfYmFjayh7MSwyLDN9KTsKCnYucHVzaF9iYWNrKHs0LDV9KTsKCnYucHVzaF9iYWNrKHs3LDgsOX0pOwoKY291dDw8ImJlZm9yZSBwb3BfYmFjaygpOiAiPDxlbmRsOwoKZm9yKHNpemVfdCBpID0gMDsgaSA8IHYuc2l6ZSgpO2krKyl7Cgpmb3Ioc2l6ZV90IGogPSAwOyBqIDwgdltpXS5zaXplKCk7IGorKyl7Cgpjb3V0PDx2LmF0KGkpLmF0KGopPDwiICI7fQoKY291dDw8ZW5kbDt9Cgp2LnBvcF9iYWNrKCk7Cgpjb3V0PDwiYWZ0ZXIgcG9wX2JhY2soKTogIjw8ZW5kbDsKCmZvcihzaXplX3QgaSA9IDA7IGkgPCB2LnNpemUoKTtpKyspewoKZm9yKHNpemVfdCBqID0gMDsgaiA8IHZbaV0uc2l6ZSgpOyBqKyspewoKY291dDw8di5hdChpKS5hdChqKTw8IiAiO30KCmNvdXQ8PGVuZGw7fQoKfQ==
Output:
before pop_back():
1 2 3
4 5
7 8 9after pop_back():
1 2 3
4 5
Code explanation:
- The code declares an empty 2D vector and adds multiple rows to it by using the push_back() function.
- It then prints the vector by using nested for loops and cout statements.
- It then calls the pop_back() function to remove the last row of the vector.
- The program again uses the cout statement to print the modified vector using a nested for loop.
Time Complexity: O(m*n), where m is the no. of rows and n is the no. of columns
Space Complexity: O(m*n) where m*n is the no.of elements in the 2D vector.
Did You Know? Real-World Outage: Crash Cause Linked to 2D Vector Usage
In one notable case, a game engine (based on Unreal Engine) crashed repeatedly due to an incorrect 2D std::vector setup:
- A developer attempted to create a grid of actor pointers using a 2D vector without setting the correct sizes for both dimensions.
- Accessing elements beyond the allocated rows or columns led to segmentation faults during runtime.
- The root cause was missing resize() calls before insertion, which caused invalid memory access when the engine iterated over expected elements.
Lesson learned:
- Always initialize both dimensions of a 2D vector before using nested indexing.
- A missing resize() call might compile fine but crash at runtime with tough-to-debug errors.
- Proper initialization and bounds checking are essential for safety, especially in performance-critical or memory-sensitive applications.
Advantages of 2D Vectors Over Traditional Arrays
2D vectors in C++ offer several advantages over traditional arrays when it comes to representing and manipulating two-dimensional data. Let's explore some of the key advantages:
- Dynamic Size: One of the significant advantages of 2D vectors is that they allow dynamic sizing. Unlike traditional arrays, which require a fixed container size specified at compile time, 2D vectors can be resized at runtime using functions like
resize()orpush_back(). This flexibility enables you to adapt the size of the 2D vector based on the actual data requirements, making it more convenient for real-world applications where data size may vary. - Memory Management: 2D vectors handle memory allocation and deallocation automatically. In other words, they manage memory dynamically, meaning that memory is allocated when elements are added to the vector. It is deallocated when elements are removed or when vector items are destroyed. This eliminates the need for manual memory management, which is often error-prone and can lead to memory leaks or buffer overflows in traditional arrays.
- Ease of Initialization: Initializing a 2D vector is more straightforward and flexible compared to traditional arrays. You can initialize a 2D vector using the fill constructor, the resize() function, the push_back() method, or even with initializer lists, allowing for concise and readable code. In contrast, initializing traditional arrays typically involves nested loops or cumbersome syntax.
- Dynamic Row Sizes: 2D vectors can have rows of different sizes ( such as single-row vectors or multiple-row vectors), allowing the representation of irregular or jagged matrices. Traditional arrays require all rows to have the same size, which may lead to wasted memory if the data is irregularly structured.
- Range-based For Loop: With 2D vectors, you can use a range-based for loop to iterate through different types of vector elements more conveniently. This syntax simplifies the vector code and avoids potential off-by-one errors that can occur when using traditional loops with array indices.
- Standard Library Functions: 2D vectors are part of the C++ Standard Template Library (
std::vector), which means they come with numerous kinds of useful member functions and algorithms likesize(),empty(),begin(),end(), andinsert(). These functions make working with different forms of vectors more efficient and expressive. - Copy and Assignment: Copying or assigning 2D vectors is straightforward and safe. You can use the default copy constructor and assignment operator without worrying about deep copying or memory issues. Traditional arrays do not have a built-in copy or assignment functionality, and their manual copying can lead to bugs if not done correctly.
- Passing as Function Arguments: 2D vectors can be easily passed as function or positional arguments and returned from functions. They maintain their size and data, making it easier to work with functions that operate on multi-dimensional data.
Conclusion
In the above article, we have discussed, in detail, the concept of 2D vectors in C++ and some of its dynamic features, as well as the theory behind vector implementation. We now know that-
- 2D vectors are a powerful data structure in C++, providing a dynamic and efficient way to work with two-dimensional arrays.
- Their flexibility, ease of use, and built-in memory management make them a preferred choice for various applications.
- Understanding how to create, initialize, and traverse 2D vectors is essential for handling multi-dimensional data in C++ programs effectively.
- By mastering 2D vectors, you open up a world of possibilities in handling complex data structures and algorithms.
Also read- 51 C++ Interview Questions For Freshers & Experienced (With Answers)
Frequently Asked Questions
Q. Are there 2D vectors in C++?
Yes, just like a one-dimensional vector(1D vector), also known as a single-dimensional vector, there are two-dimensional vectors present in C++. A 2D vector is essentially a vector of vectors. Each element of the vector represents a row, and each row is a vector in itself that holds the individual elements of the row.
The basic syntax of a 2D Vector:
#include <vector>
std::vector<std::vector<DataType>> twoDVector;
Also read- Data Types In C++ | A Detailed Explanation With Examples
Q. What is a 2D vector called?
A 2D vector is essentially a vector with vectors. Each element of the vector represents a row, and each row is a vector in itself that holds the individual elements of the row. They are also commonly referred to as grids or matrices.
Q. How to initialize 2D vectors in C++ with a value?
Initializer lists are a convenient syntax for initializing objects, including vectors, with a list of values. It allows us to provide initial values directly when creating the vector object. It is a common way of initializing elements of two-dimensional vectors and is widely used.
Q. What is a fill constructor?
The fill constructor is a constructor that is available for vectors. It is used to initialize the vector with a specified number of elements, all set to the same given value. It allows for quick creation with a specified vector size and initializes all the items in the vector to a specified value.
Q. How is push_back() used for 2D vectors in C++?
The push_back() function in C++ is used to add elements to the end of a vector. In the case of a two-dimensional vector, a new row is added to the vector. Each row can have a different number of elements, allowing for a dynamic structure.
Q. How is pop_back() used for 2D vectors in C++?
The pop_back() function in C++ is used to pop or remove elements from a vector from the back of the vector. The value is removed from the end of the vector. In the case of 2D vectors, the pop_back() function removes the last row of the two-dimensional vector, thus decreasing the number of rows by 1.
Q. What is the resize() function for 2D vectors in C++?
The resize() function in C++ is another powerful method that makes normal vectors dynamic in nature and adds to the flexible nature of vectors. It allows us to add and remove rows or elements within the rows.
Q. How to create 2D vectors in C++ with user input?
We can create 2D vectors in C++, where we can input the number of rows and columns and the elements to be stored in the two-dimensional vector from user input. We can make use of the fill constructor to create our custom normal vector, where the number of rows, the number of columns, and the vector elements can be received as input from the keyboard by the user.
Q. Can 2D vectors in C++ be accessed in the same way as 2D arrays?
2D vectors can be accessed in the same way as accessing and modifying 2D arrays in C++ by using the double square brackets and specifying the indexes pertaining to the row and column of the element we want to access.
Q. What is the advantage of the at() function over indexing([][])?
The at() function is another method that is used to access and modify vector elements of 2D vectors in C++. It has a very useful advantage in that it provides bounds checking. This way, an 'out of range' exception will be thrown, which helps us debug and maintain the code. The indices are specified pertaining to the row and column of the element in the 2D vector in C++.
Test Your Skills: Quiz Time
You might also be interested in reading the following:
- Storage Classes In C++ & Its Types Explained (With Examples)
- Pointers in C++ | A Roadmap To All Types Of Pointers With Examples
- Typedef In C++ | Syntax, Application & How To Use It (With Examples)
- Guide To Switch Case In C++ & Important Keywords (With Examples)
- C++ If-Else & Other Decision-Making Statements (+Examples)
Login to continue reading
And access exclusive content, personalized recommendations, and career-boosting opportunities.
Don't have an account? Sign up
Never miss an
Update

Featured Opportunities
Top-Rated Practice by Students


Subscribe
to our newsletter


Comments
Add comment