
Asian Paints Alchemy 2026
Git, GitHub & Version Control
- What Is GitHub?
- Git And GitHub- A Comparison
- How To Use GitHub?
- Components Of GitHub
- GitHub For Developers
- Tips To Create Your GitHub Portfolio
- Who Uses GitHub?
- Conclusion
- Frequently Asked Questions
- How Well Do You Know GitHub? Take A Quiz!
- What Is Git? Basics
- How Git Works?
- The Git Lifecycle
- About The Git Architecture
- The Different Types Of Git Workflows
- Common Functions Of Git
- Conclusion
- Frequently Asked Questions
- Think You Understand Git? Prove It!
- What Is Git?
- What Is GitHub?
- Git Vs. GitHub (Difference Comparison Table)
- Git vs.GitHub: Differences Explained
- Git Vs. GitHub: The Similarities
- How To Integrate Git & GitHub?
- Common Git Commands to Know
- Conclusion
- Frequently Asked Questions
- Git vs. GitHub Quiz – Let’s See What You Know!
- What Is Git?
- Git Commands: Working With Local Repositories
- Git Commands: Working With Remote Repositories
- Branch- Git Commands
- Git Checkout Commands
- Merge- Git Commands
- Clone- Git Commands
- Commit- Git Commands
- Config- Git Commands
- Pull- Git Commands
- Push- Git Commands
- Rebase- Git Commands
- Stash- Git Commands
- Remote- Git Commands
- Some Advanced Git Commands
- Conclusion
- Frequently Asked Questions (FAQs)
- Know Your Git Commands? Let’s Test That!
- What Are Git Submodules?
- How Git Submodules Work?
- How To Add Git Submodule?
- How To Remove Git Submodule?
- Pulling In Upstream Changes From The Submodule Remote
- Git Submodule Commands
- Uses Of Git Submodules
- Mastered Git Submodules? Test Yourself!
- What Is Branch In Git?
- Why Are Git Branches Essential?
- How To Create A New Git Branch?
- Managing Git Branches
- Merging Git Branches
- How To Delete A Git Branch?
- Git Branch: Commands
- Git Branching Quiz – Test Yourself!
- Prerequisites For Git Create Branch Process
- How To Create A New Branch In Git?
- Branch Naming Conventions | Git Create Branch
- Different Ways Of Creating New Git Branch
- Git Create Branch In Visual Studio
- How To Delete A Git Branch?
- Conclusion
- Git Create Branch Quiz– How Well Do You Know It?
- Frequently Asked Questions
- How To Switch A Branch In Git? | Solutions To Git Problems
- Switching Branches In Git Using Git Checkout Commands
- What Is The Detached HEAD State?
- Switching Branches In Git Using The Git Switch Commands
- Switching Branches In Git Using GitKraken
- Difference Between Git Checkout & Git Reset
- Difference Between Git Checkout & Git Restore
- Difference Between Git Checkout & Git Clone
- Conclusion
- Frequently Asked Questions
- How Well Do You Switch Git Branches? Take A Quiz
- What Is A Git Repository?
- What Are Git Branches?
- Naming Convention For Git Branches
- Why Is Name Important?
- How To Rename A Branch In Git?
- How To Rename Local Git Branch?
- How To Rename Remote Git Branch?
- How To Rename A Git Branch Locally In Command Line?
- How To Rename A Branch In Github?
- Conclusion
- Frequently Asked Questions
- Git Branch Renaming Quiz– Ready for the Challenge?
- What Branches Are In Git?
- Git Delete Branch: The Fundamentals
- When To Delete Branches?
- What Happens When A Git Branch Is Deleted?
- Git Command For Creating A New Branch
- How To Git Delete A Local Branch?
- How To Git Delete A Remote Branch?
- How To Delete A Branch On GitHub?
- Remove Vs. Local Git Branch Delete
- Git Push & Delete Remote Branch
- What Are Tracking Branches And How To Delete Them?
- Can I Recover A Deleted Branch in Git?
- Conclusion
- Frequently Asked Questions
- Ready To Test Your Git Branch Skills? Take A Quiz
- What is Git Rebase?
- How Git Rebase Works?
- Git Rebase Configuration
- Git Rebase Options
- Merge Strategies In Git Rebase
- Git Rebase Example
- Types of Git Rebase
- Git Rebase Commands
- Setting Up Branches for Rebase Workflows
- Splitting Commits In Git Rebase
- Labelling Conflicts Markers
- Rebasing Commits Against A Branch
- How To Recover From Upstream Git Rebase?
- Git Rebase Vs. Git Merge
- Best Practices For Using Git Rebase
- Git Rebase Quiz – Ready to Test Yourself?
- What Is Merge In Git?
- How Git Merge Works?
- Essential Commands To Perform Merge In Git
- Steps To Merge A Branch In Git
- Git Merge Conflict
- Types Of Git Merge Conflicts
- How To Resolve Merge Conflicts?
- Git Commands To Resolve Conflicts
- Conclusion
- Caught Up On The Basics? Let’s Test Your Skills!
- Frequently Asked Questions
- What Is Git Rebase?
- What Is Git Merge?
- The Working Of Git Rebase Vs. Git Merge
- Git Rebase Vs. Git Merge | The Differences
- Git Merge Vs. Rebase | Differences Explained
- Git Rebase & Git Merge Similarities
- Advantages & Disadvantages Of Git Merge
- Advantages & Disadvantages Of Git Rebase
- How Do You Use Git Rebase & Git Merge Together?
- Git Rebase vs. Merge. Which Is Better & When to Use?
- Conclusion
- Frequently Asked Questions
- Git Rebase vs Merge Quiz – Can You Choose Right?
- Introduction To Git stash
- Importance Of Git Stash
- How To Use Git Stash Command?
- Git Stash Commands
- Git Stash Options
- Git Stash vs. Git Commit
- Git Stash vs. Git Reset
- Git Stash vs. Git Stage
- Best Uses/ Practices Of Git Stash
- Conclusion
- Frequently Asked Questions
- Git Stash Quiz – Are You Ready?
- What Is Git Cherry Pick?
- When To Use Git Cherry Pick Command?
- How To Use Git Cherry Pick?
- Git Cherry Pick For Multiple Commits
- Undo Changes & Restore Lost Commits With Git Cherry Pick
- Git Cherry Pick Example (Command Line)
- What Happens When We Cherry Pick A Git Commit?
- Sequencer Subcommands In Git Cherry-Pick
- Does Git Cherry Pick Create A New Commit?
- Git Cherry Pick Conflict
- Git Cherry Pick vs. Git Rebase
- Is Git Cherry Pick The Same As Merge?
- Advantages and Disadvantages Of Git Cherry Pick
- Hidden Git Cherry Pick Commit
- Conclusion
- Frequently Asked Questions
- Think You’ve Mastered Cherry-Picking? Take A Quiz!
- When To Use Git Tags?
- Creating A Git Tag
- Types Of Git Tags
- Listing Git Tags
- Tagging Old Commits
- ReTagging Or Replacing Old Git Tags
- Sharing: Pushing Git Tags To Remote
- Deleting Git Tags
- Checking Out Git Tags
- Git Tags: Manage & Add Versions To Project History
- Git Tags & History of Commits
- Conclusion
- Common Git Tags Questions/FAQs
- Git Tag Quiz – Ready to Test Yourself?
- What Are Git Hooks?
- How To Create GIT Hooks?
- Scripting Languages In Git Hooks
- Scope Of Git Hooks
- Types Of Git Hooks
- Difference Between Client-Side & Server-Side Hooks
- Local Git Hooks & Workflow
- Types Of Server-Side Hooks & Their Functions
- How To Use Different Git Hook Scripts?
- Application Of Git Hooks With Examples
- How To Find and Fix Trailing Whitespace In Commits?
- Tips For Writing Effective Git Hooks
- Conclusion
- Frequently Asked Questions
- Git Hooks Quiz – How Well Do You Know Them?
Git Rebase | Strategies, Commands, Best Practices, Examples & More
Git rebase is a command that allows programmers to commit changes from one branch to another, subsequently. Users can commit & merge changes, split commits, recover upstream rebase, and much more.

Git rebase is a powerful and frequently used Git command that enables developers to modify the commit history of a branch. By applying changes from one branch onto another, it creates a linear and more comprehensible project history. This streamlined history simplifies code reviews and debugging. However, for those new to Git, rebase can be complex and sometimes confusing. In this article, we'll delve into what Git rebase is, how it functions, rebase strategies, options, best practices to use it effectively, and more.
What is Git Rebase?
In Git, the rebase command allows you to transfer the changes from one branch to another by reapplying commits. In other words, the Git rebase command allows developers to change the order and structure of commits in a branch. This process effectively shifts the base of your branch to a new starting point, resulting in a linear commit history.
For example, the image given below illustrates how we can shift the base of a branch from one node to another. This, in practice, is done using the Git rebase command.
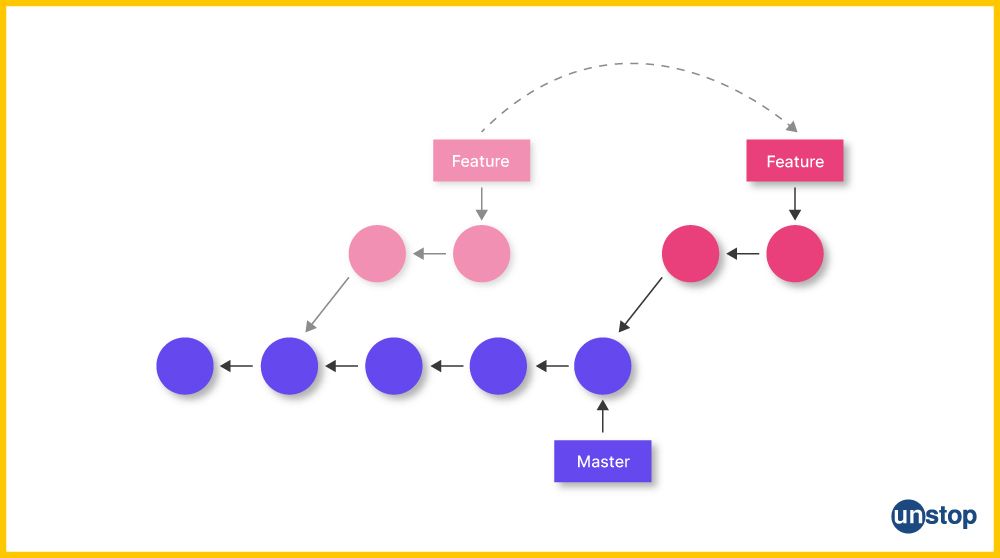
Here, if you've branched off the main to work on a feature and later want to incorporate the latest changes from the main into your feature branch, rebasing replays your feature commits on top of the updated main branch. This approach avoids unnecessary merge commits, keeping the history clean and linear.
Rebasing is particularly beneficial in collaborative environments where multiple developers contribute to the same codebase. It helps in integrating changes seamlessly while maintaining an organized commit history.
However, caution is advised: since rebase rewrites commit history, using it on branches that are shared or have been pushed to a remote repository can lead to conflicts and complications.
How Git Rebase Works?
To grasp how git rebase operates, it's essential to understand Git's commit structure, i.e., how Git tracks changes in a codebase.
- Git records change as a series of commits, forming a tree-like history.
- Each commit represents a snapshot of the project at a specific point in time.
- The commit tree looks like a series of interconnected branches, with each branch representing a different version of the codebase.
When you perform a rebase, Git identifies the common ancestor between the source and target branches. It then takes the commits from your current branch and reapplies them onto the target branch, one by one. It then performs a three-way merge between the two latest branch commits. This process can be visualized as moving the base of your branch to the tip of the target branch, hence the term "rebase."
Here's a step-by-step overview:
- Checkout the target branch: You start by checking out the master branch you want to apply changes to.
git checkout feature-branch
- Initiate the rebase: You then use the git rebase command to specify the public branch that contains the changes you want to apply.
git rebase main
- Resolve any conflicts: If conflicts arise, Git will pause the rebase process, allowing you to resolve them manually. After fixing the conflicts:
git add
git rebase --continue
- Complete the rebase: Once all conflicts are resolved and commits are reapplied, the rebase is complete.
This results in a linear commit history, making it easier to navigate and understand the project's evolution.
Git Rebase Configuration
Git rebase offers several configuration options that can be set using the git config command or by editing the .gitconfig file. These configurations can streamline your workflow and help manage rebasing behavior:
- rebase.autostash: Automatically stashes any local changes before starting a rebase operation and reapplies them after the rebase is complete. This helps avoid conflicts during the rebase process.git config --global rebase.autostash true
- rebase.autosquash: Automatically squashes or fixes up commits during a rebase operation based on their commit messages. This is particularly useful for cleaning up commit history.
git config --global rebase.autosquash true - rebase.instructionFormat: Specifies the format of the interactive rebase instruction sheet. The default value is pick %s, which lists each commit with the pick command. Other options include reword, edit, squash, fixup, and exec.
- merge.conflictstyle: Determines the style of diff output when resolving conflicts during a rebase. Options include merge (default) and diff3.
- rebase.backend: Sets the backend used for rebasing. Possible choices are to apply or merge. This setting may become obsolete in the future as the merge backend gains more capabilities.
To view your current Git rebase configuration:
git config --list | grep rebase
To set a configuration option:
git config --global <option> <value>
For example, to set the rebase.squash option to true, and run:
git config --global rebase.autosquash true
Git Rebase Options
Here are some of the common options/flags that can be used with the Git rebase command:
- --onto: The onto option specifies a new base commit for the branch being rebased. It allows you to move the branch's commits to a new starting point in the commit history.
- -i or --interactive: Starts an interactive rebase, which allows you to modify the commit history by selecting which commits to apply, editing commit messages, and squashing or splitting commits.
- --continue: Resumes the rebase after resolving conflicts or making changes in an interactive rebase.
- --skip: The skip configuration option skips a commit that cannot be applied during the rebase due to conflicts or other errors.
- -e or --edit: The -e option is the edit option in Git rebase opens up an editor and allows you to edit the list of commits that will be applied during the rebase. When you run git rebase -i <base>, where <base> is the branch or commit where you want to apply the changes, Git opens up an interactive rebase editor with the list of commits that will be applied. With the -e option by default, you can edit this list of commits before continuing with the rebase.
- --abort: Aborts the current rebase operation and returns the branch to its original state before the rebase starts.
- ours: The ours option in Git rebase is a merge strategy that discards all changes from the upstream branch and applies only the changes from the current branch. This strategy is useful when you want to completely overwrite changes in the upstream branch. For a binary file, all contents are taken from our side.
- -p or --preserve-merges: Preserves merge conflicts during a rebase. By default, merge commits are flattened into a series of single-line commits.
- --quiet or -q: Suppresses output during the rebase process, making the process less verbose.
- --autosquash: Automatically reorders and squashes commits based on original commit messages. This is useful for cleaning up a branch before merging it into another branch.
- --fork-point: Specifies the point at which the branch being rebased diverged from the upstream branch. This is useful at the time of rebasing a branch that has been merged into the upstream branch, and you want to exclude the merged commits from the rebase.
- quit option: Abort the rebase operation, but HEAD is not reset back to the original branch. As a result, the index and working tree are also left unchanged. If a temporary stash entry was created using --autostash, it will be saved to the stash list.
- --exec: Allows you to run arbitrary shell commands against a commit during the rebase process.
- --no-rerere-autoupdate: Prevents Git from automatically updating the index with the result of conflict resolution during a rebase. This is useful for double-checking what rerere did and catching potential mismerges before committing the result to the index.
Note:
- Configuration refers to settings that define Git's behavior across sessions. These are persistent settings stored in Git's configuration files and can be set at different levels.
- Options are flags or parameters provided directly in the command line to modify the behavior of a specific Git command during its execution.
Merge Strategies In Git Rebase
During a rebase, Git may encounter conflicts when trying to apply commits from one branch onto another. To resolve these conflicts, Git uses merge strategies — rules that determine how changes from different branches should be combined. Here are the main merge strategies available in Git rebase:
- Git rebase recursive (default):
This is Git’s default strategy. It re-applies each commit on top of the new base one by one, attempting to automatically resolve any conflicts as they occur. This strategy is suitable for most rebasing needs and supports three-way merging and rename detection. - Git rebase resolve strategy:
Similar to recursive, this strategy tries to auto-resolve simple conflicts. If it fails to do so, the rebase stops, and manual resolution is required. It does not support as many complex cases as recursive. - Git rebase ours startegy:
Discards changes from the upstream (base) branch and keeps only the changes from the current branch. Useful when you want your current branch to completely override the base branch. - Git rebase theirs strategy:
Opposite of ours. Discards local changes and applies only those from the upstream branch. Use this when the changes from the base branch should take full priority.
These are the 4 main strategies you can use in Git rebase. To specify a merge strategy during a Git rebase operation, add the -s <strategy> flag followed by the desired merge strategy name. For example, to use the resolve merge strategy, you must run the command:
git rebase -s resolve <base>
Note:
- Git merge and git pull also support the -s option to set merge strategies. Some strategies support extra tuning via the -X<option> flag (e.g., -Xignore-space-change).
- Internally, Git uses a 3-way merge algorithm, comparing the two branch tips and their common ancestor.
- If multiple common ancestors exist, Git merges them first to create a synthetic base tree.
- This recursive merge approach helps reduce conflicts and is used by default when rebasing or merging a single branch.
Fun fact: The name "recursive" is actually a recursive acronym ("Ostensibly Recursive’s Twin") — a nod to the fact that it replaced Git’s earlier default merge strategy.
Git Rebase Example
Let's walk through an example of using git rebase to understand the rebase properties better. The Git example below, we will have two branches: the main branch and the feature branch.
Step 1: Create and commit on the feature branch
git checkout -b feature
echo "This is some text" >> file.txt
git add file.txt
git commit -m "Add file.txt"
Step 2: Make a separate commit on the main branch
git checkout main
echo "This is some more text" >> file.txt
git add file.txt
git commit -m "Add more text to file.txt"
Now, the main and feature branches have diverged. You want to rebase the feature branch onto main to incorporate the latest changes cleanly.
Step 3: Rebase the feature branch
git checkout feature
git rebase main
Git will "rewind" the feature branch and reapply its commits on top of the updated main. You’ll see output like:
First, rewinding head to replay your work on top of it...
Applying: Add file.txt
If no conflicts occur, the rebase completes smoothly.
Step 4: Verify with Git log
git log --oneline
You’ll now see a linear history with feature's commit appearing above main's:
1234567 Add file.txt
8901234 Add more text to file.txt
As you can see, the changes made in the feature branch have been applied to the "main" branch, resulting in a linear feature branch history. This clean, chronological structure is one of the key benefits of using git rebase — it simplifies the commit history, making it easier for teams to trace changes.
Types of Git Rebase
Git supports different types of rebase operations depending on how much control you want over the commit history. The three main types are:
1. Interactive Rebase (git rebase -i)
Interactive rebase gives you complete control over each commit in a branch. It allows you to:
- Reorder commits
- Edit commit messages
- Squash multiple commits into one
- Drop unwanted commits
- Fixup small changes into previous commits
It’s typically used during cleanup before merging to maintain a clean and readable commit history. Interactive rebase opens up an editor with a list of commits and instructions on how to modify them.
Use when: You want to curate or tidy up your commit history before merging or sharing with others.
2. Non-Interactive Rebase (git rebase)
This is the default rebase mode. Git automatically re-applies commits from the current branch onto the new base without prompting you for input—unless a conflict occurs.
It’s straightforward and commonly used to update a feature branch with the latest commits from main or master, creating a linear project history.
Use when: You’re syncing your branch with the latest changes and don’t need to modify individual commits.
3. Auto-Merge Rebase
In auto-merge rebase, Git tries to automatically resolve conflicts using built-in merge strategies like recursive or resolve. This is less commonly used explicitly but underlies how Git handles merges during rebase operations.
It kicks in especially when you rebase across branches that touch the same files but don’t conflict severely.
Use when: You’re rebasing and prefer Git to handle conflict resolution without manual intervention (though it may still stop for complex conflicts).
Git Rebase Commands
Here are some essential Git rebase commands—both basic and interactive—that help manage and rewrite commit history:
- git rebase <branch>
Applies changes from the current branch on top of the specified <branch>. Commonly used to rebase feature branches onto updated base branches like main or master. - git rebase -i <commit>
Starts an interactive rebase. Lets you modify, reorder, squash, or delete commits manually. Useful for cleaning up commit history before pushing. - git rebase --abort
Aborts an ongoing rebase and returns the branch to its original state. - git rebase --continue
Continues the rebase process after resolving a conflict. - git rebase --skip
Skips the current conflicting commit and moves to the next one. Use with caution—skipped changes may be lost. - git rebase master
Rebases the current branch onto the latest master branch. Common in workflows where master contains production-ready code. - git rebase --onto <newbase> <oldbase> <branch>
Rebases <branch> by removing commits made on <oldbase> and applying them on <newbase>. Useful for splitting branches or transplanting work elsewhere. - git rebase --root
Rebases all commits in the current branch starting from the repository’s first commit (the root). Ideal for cleaning up early history in a project. - git rebase --edit-todo
Opens the rebase TODO list in an editor. You can rearrange or squash commits here, even after a rebase has started. - git status
While not specific to rebase, this shows the current status during a rebase, including any pending conflict resolutions. - git pull --rebase
Pulls changes from a remote branch and rebases your local commits on top of the latest remote changes. Preferred over merge to keep history linear. - git reset
While not part of rebase, it’s often used alongside it to reset the repo to a previous state or to undo incorrect rebase steps. - git rebase --edit-todo: Opens the rebase todo file in an editor. This file lists all the commits that will be applied during the entire rebase and allows you to modify the order or squash multiple commits together.
Also read: Git Commands | Complete Guide From Basics To Advanced (+Examples)
Setting Up Branches for Rebase Workflows
To understand how git rebase fits into day-to-day Git workflows, it helps to see how developers typically organize their work using master/main and feature branches. Rebasing is especially useful when integrating feature branches with an updated main branch while keeping a clean, linear history.
Here’s how you usually set that up:
Step-by-step setup for rebasing:
1. Initialize your repository (if you haven’t already):
git init
2. Create and switch to the main branch (usually main or master):
git checkout -b main
3. Create a new feature branch off the main branch:
git checkout -b feature_branch
4. Work on your feature:
- Make changes to files
- Stage them using git add
- Commit your work with git commit
5. Keep your feature branch up-to-date by rebasing onto the latest main:
git checkout feature_branch
git fetch origin
git rebase origin/main
This applies your commits from feature_branch on top of the latest changes in main, ensuring a linear and updated history.
6. Resolve any conflicts, then continue the rebase:
git status # Check files with conflicts
git add <filename> # After resolving
git rebase --continue
7. Switch back to the main branch and merge your rebased feature (optional):
git checkout main
git merge feature_branch
8. Push changes to remote:
git push origin main
Splitting Commits In Git Rebase
Splitting commits is a useful technique to make your Git history clearer and more organized. Here's how you can split a commit into smaller commits:
- Identify the commit you want to split: Use the git log command to identify the commit hash of the commit you want to split.
- Create a new branch: Before making any changes, create a new branch to work on so you can keep your original commit intact. You can use the command git checkout -b <new_branch_name> to create a new branch and switch to it.
- Use the interactive rebase: Use the interactive rebase feature in Git to split the commit. The interactive rebase allows you to modify your commit history by editing individual commits. Use the following command to start the interactive rebase: git rebase -i <commit_hash>^
- Edit the commit: In the interactive rebase screen, locate the commit you want to split and replace the word "pick" with "edit" next to it.
- Split the commit: After saving the changes to the interactive rebase file, Git will move you to the commit you want to split. Make your changes, and then stage the changes for commit using the git add command.
- Commit the changes: Once you have staged your changes, commit them using the git commit command. This will create a new commit that contains the changes you made.
- Repeat the process: Repeat steps 5 and 6 until you have split the commit into the smaller commits you want.
- Complete the rebase: Once you have split the commit into smaller commits, use the git rebase --continue command to complete the rebase.
- Push your changes: Finally, push your changes to the remote public repository using the command git push <remote_name> <new_branch_name>.
Labelling Conflicts Markers
When there are content conflicts and spurious conflicts, the merge machinery tries to annotate each side’s conflict markers with the commits where the content came from.
- Since the apply backend drops the original information about the rebased commits and their parents (and instead generates new fake commits based off limited information in the generated sequence of patches and patch hunk), those commits cannot be identified.
- Instead it has to fall back to a commit summary. Also, when merge.conflictStyle is set to diff3 or zdiff3, the apply backend will use "constructed merge base" to label the content from the merge base, and thus provide no information about the merge base commit whatsoever.
The merge backend works with the full commits on both sides of history and thus has no such limitations.
Rebasing Commits Against A Branch
Rebasing is a process of moving a stable master branch to a new base commit. It is useful when you want to incorporate changes from one topic branch into another topic branch, or when you want to clean up the commit history of a branch.
To rebase commits against a branch, follow these steps:
-
Switch to the branch that you want to rebase against.
git checkout <branch>
- Fetch the latest changes from the remote repository.
git fetch
- Rebase the branch against the latest changes.
git rebase origin/<branch>
-
This will move the branch to the head of the remote branch <branch>, replaying your local commits on top of the latest changes.
-
Resolve any conflicts that arise during the rebase process.
If any conflicts occur during the rebase, you will need to resolve them by editing the relevant files and adding them back to the index. Once the conflicts are resolved, continue the rebase process by running:
git rebase --continue
- Push the changes to the remote repository.
Once the rebase is complete, push the changes to the remote repository using:
git push --force
Be careful when using the --force flag, as it can overwrite changes made by others on the remote branch.
How To Recover From Upstream Git Rebase?
Recovering from an upstream rebase can be a bit tricky, but the following steps and default strategy can help you get back on track:
- Check your git log: First, check your git log to see if you have any commits that were lost during the rebase. If so, note the commit hashes.
- Create a new branch: Create a new branch from your current state to ensure that you don't lose any work. You can use the following command: git checkout -b <new_branch_name>
- Merge the lost commits: If you lost any commits during the upstream rebase, merge them back into your new branch using the command git cherry-pick <commit_hash> for each commit you need to merge.
- Merge the upstream branch: Once you've merged any lost commit pick, merge the upstream branch into your new branch using the command git merge <upstream_branch>. This will bring in all of the changes from the upstream branch and merge them with your work.
- Resolve conflicts: If there are any conflicts between your work and the upstream changes, resolve them by editing the affected untracked files and then using git add <filename> to mark them as resolved.
- Push your changes: Finally, push your changes to the remote repository using the command git push <remote_name> <new_branch_name>.
That's it! You should now have a new branch that incorporates all of the upstream changes as well as any of the intermediate commits that were lost during the upstream rebase.
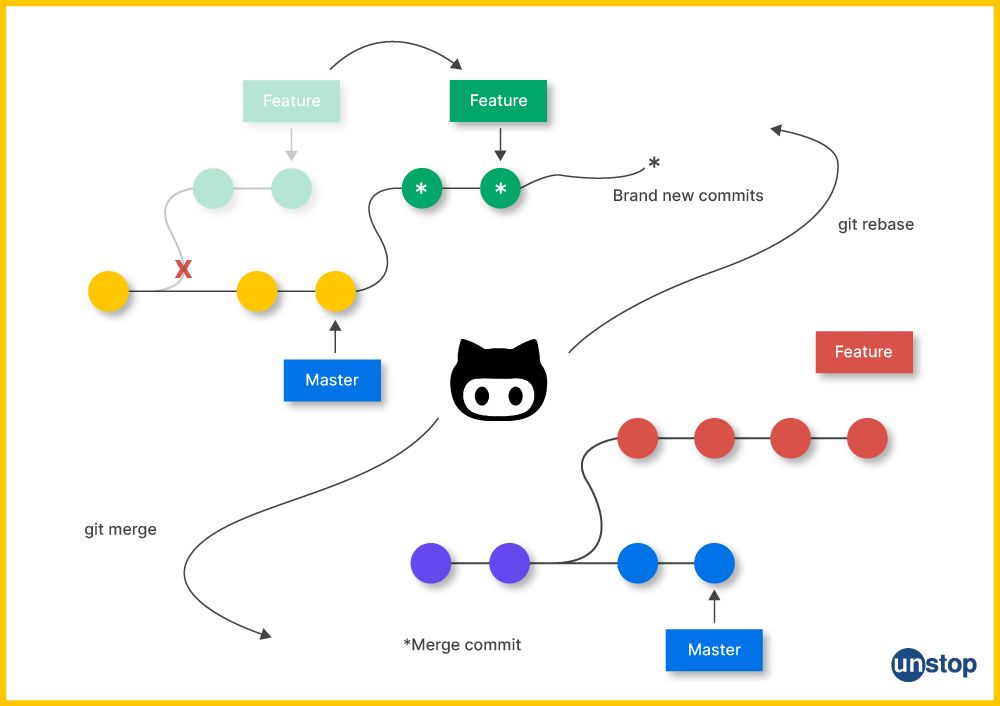
Git Rebase Vs. Git Merge
Git rebase and merge commands are both used to combine changes from one branch into another. However, they work in different ways and have different use cases.
- Git merge creates a new commit that combines the changes from two or more branches. The new commit in the simple rebase merge operation has two parent commits, one from each of the merged branches.
- The resulting branch history is a graph (tree structure) with multiple paths that show where the merges occurred. Merging can be performed on both public and private branches.
- Git rebase, on the other hand, moves the current working branch to a new base commit during playback and then applies the changes from the previous branch on top of that.
- This results in a linear history that records previous commits and fresh commits together. Here, the sequence of commits appears to have been made directly on the new base branch. The old branch is essentially discarded and replaced by the rebased branch.
Here are some of the behavioral differences between Git rebase vs. merge:
- Git merge preserves the original branch history, while Git rebase rewrites it.
- Git merge creates a single commit that combines the changes from two branches, while Git rebase re-applies the commits from one branch onto another.
- Git merge is a good choice when you want to preserve the entire history editing of multiple branches, while Git rebase is useful when you want a clean, linear project history in a complex merge.
In general, you should use Git merge as the default option when you want to combine changes from multiple branches and preserve their history. Use Git rebase when you want a clean, linear history or need to update your branch with changes from another branch. However, there are legitimate reasons why a developer may want to recreate merge commits: to keep the branch structure (or "commit/ branch topology") when working on multiple, interrelated branches.
Best Practices For Using Git Rebase
While git rebase is a powerful feature, it can also be easy to misuse. Here are some best practices to keep in mind when using git rebase:
- Use git rebase for small changes: Git rebase works best for small, incremental changes. If you have a large number of changes that need to be applied to a branch, it may be better to use a merge instead. This will help keep the commit history clean without any fake commits and is easy to understand.
- Be careful when rebasing a branch that others are working on: If you are working on a branch others are also working on, it's important to be careful when using git rebase. If you rebase your remote branch and then push the changes to a shared repository, it can cause problems for other team members who are working on the same codebase. It's important to communicate with your team members before using an advanced rebase application on a shared branch.
- Always test your changes before pushing: Before pushing changes to a shared repository in the remote branch, it's important to test your changes in the lines of context to make sure they work as intended. This can help catch any errors, unwanted patches, or issues and commit without warning messages before they are introduced to the main codebase.
- Use git rebase interactive mode for more control: If you need more control over the changes that are applied during a git rebase, you can use the interactive mode. The pairs of options in interactive mode will allow you to review each commit range individually and make changes as needed in the linear process. The interactive mode is meant for this type of workflow in the context region.
- Keep backups of your work to avoid unintended consequences: When using git rebase, there is always a risk of losing work and exit code without any previous warning if something goes wrong.
Git Rebase Quiz – Ready to Test Yourself?
You might also be interested in reading the following:
- Git Tag | Easily Create, List, Remove, Push Tags & More
- Git Delete Branch | Local & Remote Branches With Examples
- Git Hooks | Definition, Usage, Types, Workflow & More (+Examples)
- Git Rename Branch | How To Rename Local & Remote Branch With Ease
- Git Submodule: Add, Remove, Pull Changes & More (With Examples)
Login to continue reading
And access exclusive content, personalized recommendations, and career-boosting opportunities.
Don't have an account? Sign up
Never miss an
Update

Featured Opportunities
Top-Rated Practice by Students


Subscribe
to our newsletter


Comments
Add comment