- What Is GitHub?
- Git And GitHub- A Comparison
- How To Use GitHub?
- Components Of GitHub
- GitHub For Developers
- Tips To Create Your GitHub Portfolio
- Who Uses GitHub?
- Conclusion
- Frequently Asked Questions
- How Well Do You Know GitHub? Take A Quiz!
- What Is Git? Basics
- How Git Works?
- The Git Lifecycle
- About The Git Architecture
- The Different Types Of Git Workflows
- Common Functions Of Git
- Conclusion
- Frequently Asked Questions
- Think You Understand Git? Prove It!
- What Is Git?
- What Is GitHub?
- Git Vs. GitHub (Difference Comparison Table)
- Git vs.GitHub: Differences Explained
- Git Vs. GitHub: The Similarities
- How To Integrate Git & GitHub?
- Common Git Commands to Know
- Conclusion
- Frequently Asked Questions
- Git vs. GitHub Quiz – Let’s See What You Know!
- What Is Git?
- Git Commands: Working With Local Repositories
- Git Commands: Working With Remote Repositories
- Branch- Git Commands
- Git Checkout Commands
- Merge- Git Commands
- Clone- Git Commands
- Commit- Git Commands
- Config- Git Commands
- Pull- Git Commands
- Push- Git Commands
- Rebase- Git Commands
- Stash- Git Commands
- Remote- Git Commands
- Some Advanced Git Commands
- Conclusion
- Frequently Asked Questions (FAQs)
- Know Your Git Commands? Let’s Test That!
- What Are Git Submodules?
- How Git Submodules Work?
- How To Add Git Submodule?
- How To Remove Git Submodule?
- Pulling In Upstream Changes From The Submodule Remote
- Git Submodule Commands
- Uses Of Git Submodules
- Mastered Git Submodules? Test Yourself!
- What Is Branch In Git?
- Why Are Git Branches Essential?
- How To Create A New Git Branch?
- Managing Git Branches
- Merging Git Branches
- How To Delete A Git Branch?
- Git Branch: Commands
- Git Branching Quiz – Test Yourself!
- Prerequisites For Git Create Branch Process
- How To Create A New Branch In Git?
- Branch Naming Conventions | Git Create Branch
- Different Ways Of Creating New Git Branch
- Git Create Branch In Visual Studio
- How To Delete A Git Branch?
- Conclusion
- Git Create Branch Quiz– How Well Do You Know It?
- Frequently Asked Questions
- How To Switch A Branch In Git? | Solutions To Git Problems
- Switching Branches In Git Using Git Checkout Commands
- What Is The Detached HEAD State?
- Switching Branches In Git Using The Git Switch Commands
- Switching Branches In Git Using GitKraken
- Difference Between Git Checkout & Git Reset
- Difference Between Git Checkout & Git Restore
- Difference Between Git Checkout & Git Clone
- Conclusion
- Frequently Asked Questions
- How Well Do You Switch Git Branches? Take A Quiz
- What Is A Git Repository?
- What Are Git Branches?
- Naming Convention For Git Branches
- Why Is Name Important?
- How To Rename A Branch In Git?
- How To Rename Local Git Branch?
- How To Rename Remote Git Branch?
- How To Rename A Git Branch Locally In Command Line?
- How To Rename A Branch In Github?
- Conclusion
- Frequently Asked Questions
- Git Branch Renaming Quiz– Ready for the Challenge?
- What Branches Are In Git?
- Git Delete Branch: The Fundamentals
- When To Delete Branches?
- What Happens When A Git Branch Is Deleted?
- Git Command For Creating A New Branch
- How To Git Delete A Local Branch?
- How To Git Delete A Remote Branch?
- How To Delete A Branch On GitHub?
- Remove Vs. Local Git Branch Delete
- Git Push & Delete Remote Branch
- What Are Tracking Branches And How To Delete Them?
- Can I Recover A Deleted Branch in Git?
- Conclusion
- Frequently Asked Questions
- Ready To Test Your Git Branch Skills? Take A Quiz
- What is Git Rebase?
- How Git Rebase Works?
- Git Rebase Configuration
- Git Rebase Options
- Merge Strategies In Git Rebase
- Git Rebase Example
- Types of Git Rebase
- Git Rebase Commands
- Setting Up Branches for Rebase Workflows
- Splitting Commits In Git Rebase
- Labelling Conflicts Markers
- Rebasing Commits Against A Branch
- How To Recover From Upstream Git Rebase?
- Git Rebase Vs. Git Merge
- Best Practices For Using Git Rebase
- Git Rebase Quiz – Ready to Test Yourself?
- What Is Merge In Git?
- How Git Merge Works?
- Essential Commands To Perform Merge In Git
- Steps To Merge A Branch In Git
- Git Merge Conflict
- Types Of Git Merge Conflicts
- How To Resolve Merge Conflicts?
- Git Commands To Resolve Conflicts
- Conclusion
- Caught Up On The Basics? Let’s Test Your Skills!
- Frequently Asked Questions
- What Is Git Rebase?
- What Is Git Merge?
- The Working Of Git Rebase Vs. Git Merge
- Git Rebase Vs. Git Merge | The Differences
- Git Merge Vs. Rebase | Differences Explained
- Git Rebase & Git Merge Similarities
- Advantages & Disadvantages Of Git Merge
- Advantages & Disadvantages Of Git Rebase
- How Do You Use Git Rebase & Git Merge Together?
- Git Rebase vs. Merge. Which Is Better & When to Use?
- Conclusion
- Frequently Asked Questions
- Git Rebase vs Merge Quiz – Can You Choose Right?
- Introduction To Git stash
- Importance Of Git Stash
- How To Use Git Stash Command?
- Git Stash Commands
- Git Stash Options
- Git Stash vs. Git Commit
- Git Stash vs. Git Reset
- Git Stash vs. Git Stage
- Best Uses/ Practices Of Git Stash
- Conclusion
- Frequently Asked Questions
- Git Stash Quiz – Are You Ready?
- What Is Git Cherry Pick?
- When To Use Git Cherry Pick Command?
- How To Use Git Cherry Pick?
- Git Cherry Pick For Multiple Commits
- Undo Changes & Restore Lost Commits With Git Cherry Pick
- Git Cherry Pick Example (Command Line)
- What Happens When We Cherry Pick A Git Commit?
- Sequencer Subcommands In Git Cherry-Pick
- Does Git Cherry Pick Create A New Commit?
- Git Cherry Pick Conflict
- Git Cherry Pick vs. Git Rebase
- Is Git Cherry Pick The Same As Merge?
- Advantages and Disadvantages Of Git Cherry Pick
- Hidden Git Cherry Pick Commit
- Conclusion
- Frequently Asked Questions
- Think You’ve Mastered Cherry-Picking? Take A Quiz!
- When To Use Git Tags?
- Creating A Git Tag
- Types Of Git Tags
- Listing Git Tags
- Tagging Old Commits
- ReTagging Or Replacing Old Git Tags
- Sharing: Pushing Git Tags To Remote
- Deleting Git Tags
- Checking Out Git Tags
- Git Tags: Manage & Add Versions To Project History
- Git Tags & History of Commits
- Conclusion
- Common Git Tags Questions/FAQs
- Git Tag Quiz – Ready to Test Yourself?
- What Are Git Hooks?
- How To Create GIT Hooks?
- Scripting Languages In Git Hooks
- Scope Of Git Hooks
- Types Of Git Hooks
- Difference Between Client-Side & Server-Side Hooks
- Local Git Hooks & Workflow
- Types Of Server-Side Hooks & Their Functions
- How To Use Different Git Hook Scripts?
- Application Of Git Hooks With Examples
- How To Find and Fix Trailing Whitespace In Commits?
- Tips For Writing Effective Git Hooks
- Conclusion
- Frequently Asked Questions
- Git Hooks Quiz – How Well Do You Know Them?
Git Merge Strategy & Conflict Resolution Explained (With Examples)
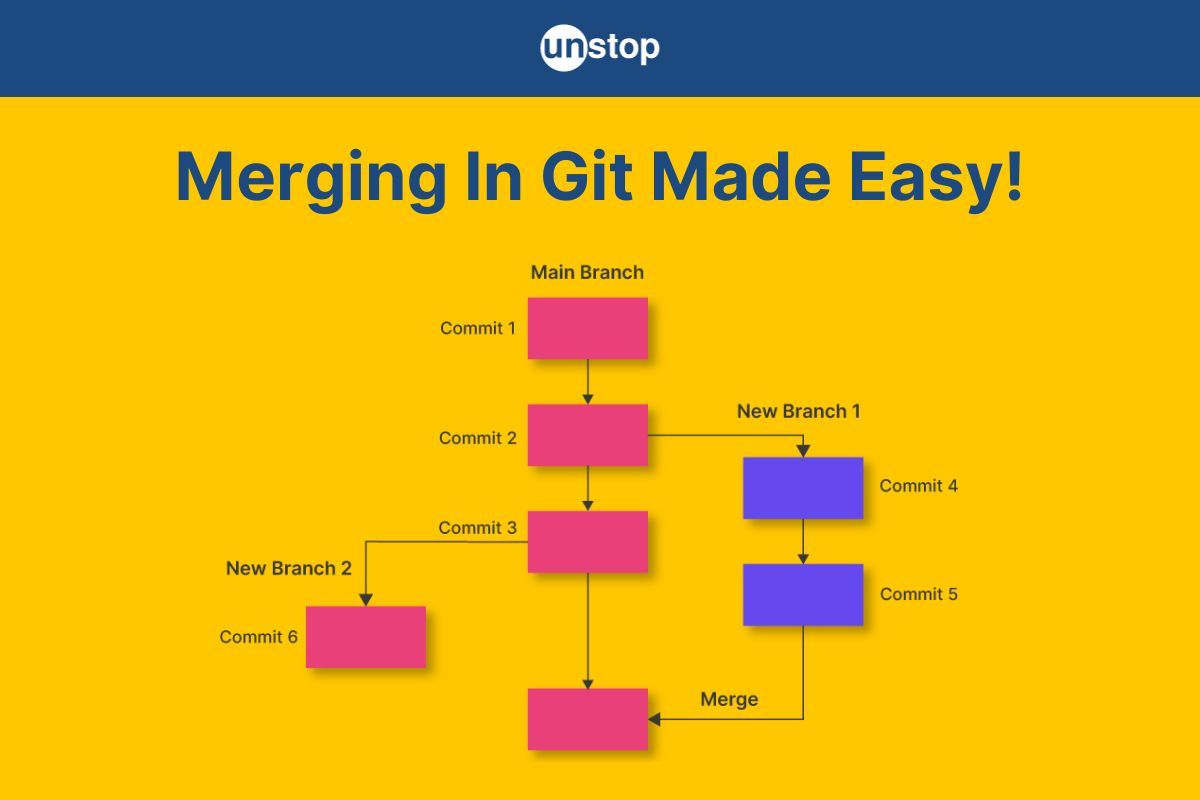
Git is a powerful version control system that has become an integral part of modern software development. One of its key features is the ability to manage multiple branches, allowing developers to work on different features or fixes simultaneously. However, at some point, these branches need to be integrated into a single codebase, and that's where the Git merge operation comes into play.
In this article, we will explore the process of merge in Git in detail, its purpose, how it works, and best practices for using it effectively.
What Is Merge In Git?
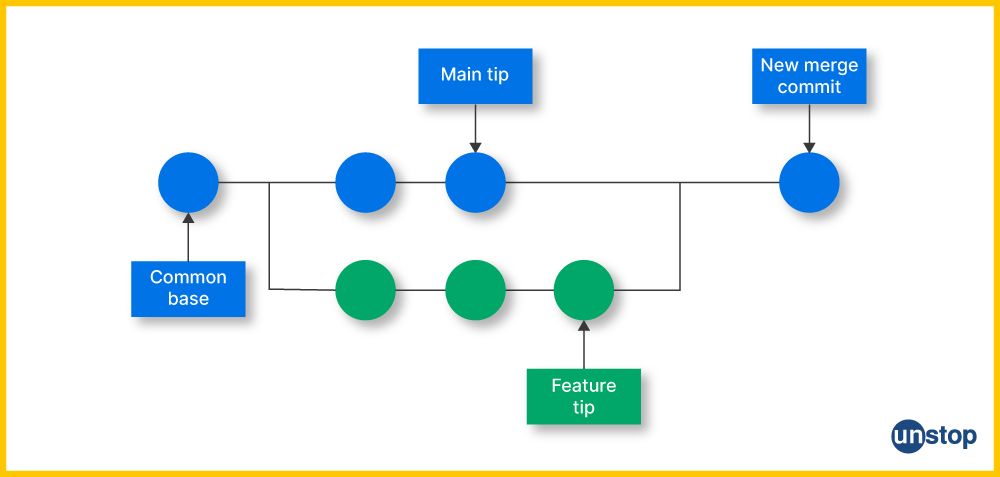
Git merge is a fundamental operation in Git that combines changes from one Git branch into another. It is primarily used to integrate the work done in feature branches, bug-fix branches, or any other parallel development paths into the common base (usually the main or master branch). The primary objective of merging is to unify code changes and ensure that all team members have access to the latest updates in the codebase.
The Need For Merging In Git
In collaborative software development, multiple developers often work on different aspects of a project simultaneously. Each developer may create an upstream branch to work on a specific task or feature. While this approach allows for parallel development, it also results in divergent codebases. Merging these changes is, hence, essential to maintain code consistency and ensure that all features are available in the main project.
Also read- 10 Ways To Create A Git Branch Explained (With Examples)
How Git Merge Works?
Git provides different strategies for merging production branches. However, the most common are the fast-forward merging strategy and the 3-way merge algorithm.
Fast-Forward Merging Strategy
A fast-forward merge is the simplest type of merge two branches that are in a linear path. That is, when there are no new commits on the main branch since the creation of the feature branch. In this case, Git can directly move the main branch pointer to the latest commit of the feature branch, as there are no divergent changes to reconcile.
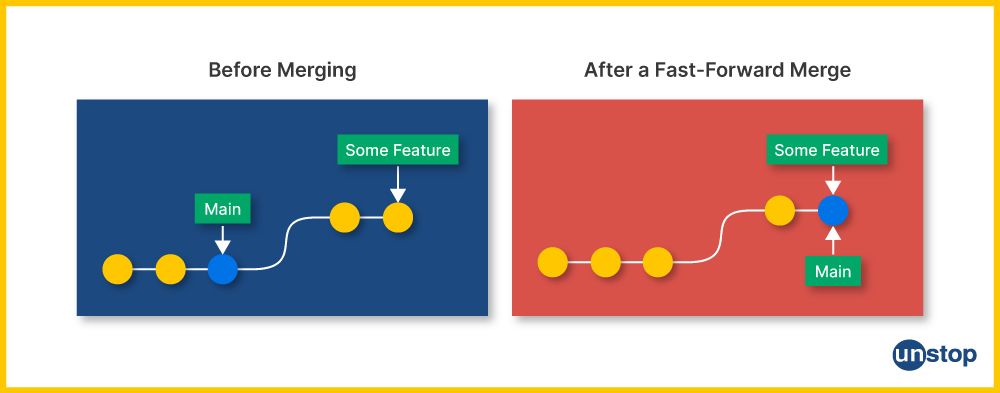
Instead of merging the branches, think of this process as compiling the history by moving from the current branch head/ tip to the targeted tip. The same is shown in the image. To perform a fast-forward merge, you just have to follow the below-mentioned steps:
- Check out the main/ master branch using the git checkout command.
- Use the git merge command with the name of the feature branch.
Example:
git checkout main
git merge feature-branch
However, it is important to note that the Fast-forward merge will not work if the branches we want to merge diverge from a linear path. In such a case, one might use other methods like recursive merging, three-way merging, etc.
Three-Way Merge Strategy
A 3-way merge is used when divergent changes exist in both the main/ master branch and feature branches. In other words, when both the master branch and the feature branches are being worked on, and changes are being made to both. This results in a non-linear path to the target branch, and Git has no choice but to combine them via a 3-way merge.
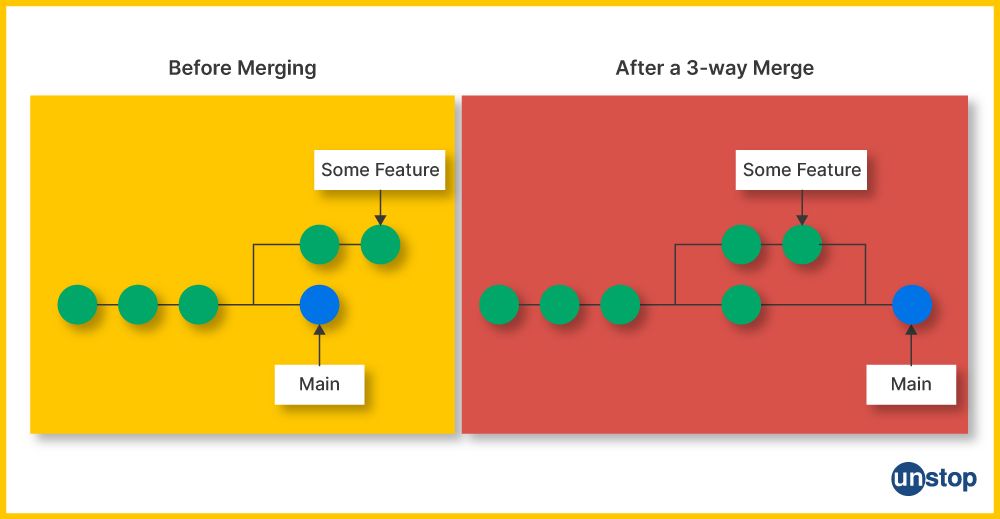
A 3-way merge uses a dedicated commit to tie together the two histories. The nomenclature comes from the fact that Git uses three commits to generate the merge commit, i.e., the two branch tips and their common ancestor. Git performs a three-way merge by finding a common ancestor commit between the two base branches and then applying the changes from both branches to create a new merge commit.
Given below are the steps to follow when performing a three-way merge:
- Check out the main/ master branch using the git checkout command.
- Then, use the git merge command with the name of the feature branch.
Example:
git checkout main
git merge feature-branch
Git will open a text editor for you to enter a merge message. This message should summarize the changes being merged.
Recursive Merge Strategy
Say we have some new commits on the master branch and have also made changes to the feature branch. When we want to merge such branches, Git will recurse over the branch and create a new merge commit which will have two parents/ ancestors.
This way, the recursive merge strategy operates on two heads and is the default strategy/ default merge strategy used whenever we want to pull or merge one branch. Note that it can detect and handle merges with renames but cannot detect copies of the same name.
Essential Commands To Perform Merge In Git
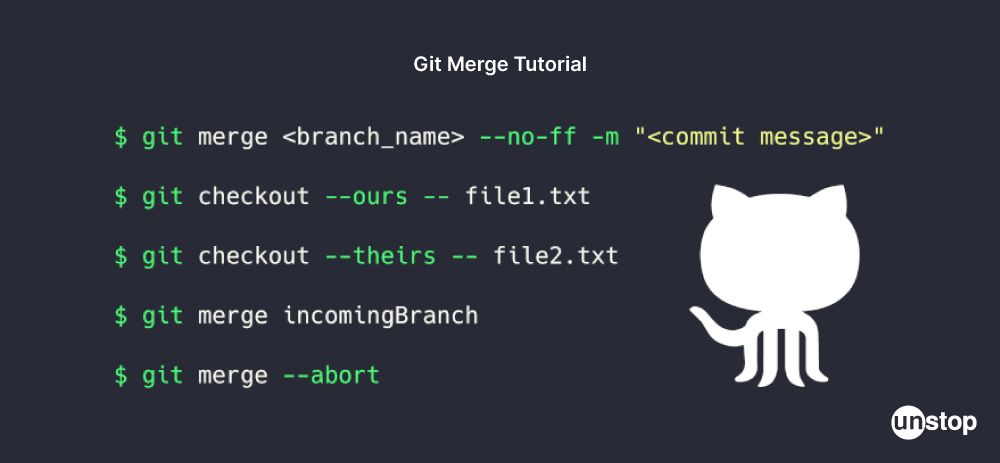
Performing Git merging is a fundamental aspect of managing version control in collaborative software development. To effectively merge branches in Git, you need to be familiar with several essential commands. Here are the key Git commands for merging:
-
git merge: This command is used to combine changes from a single branch (maybe an active branch) into another. It creates a new merge commit that integrates the changes. The basic syntax is git merge <branch-name>.
- git checkout: Before performing a merge, you often need to switch to the target branch where you want to merge changes. The git checkout command helps you switch branches. For example, the git checkout main will help you switch to the main branch.
- git pull: This command fetches changes from a remote repository and merges them into the current/ active branch. It is particularly useful when you're working with a team and want to keep your local branch up to date with the remote. The syntax is git pull origin main.
- git rebase: While not a merge operation in the traditional sense, git rebase can be used to incorporate changes from one branch onto another. It rewrites the commit history, making it appear as if you had made your changes on top of the target branch. This can create a cleaner commit history but should be used with caution, especially in a collaborative environment. The basic syntax is git rebase <target-branch>.
- git merge --abort: If you encounter conflicts or decide to abort a merge in progress, you can use this command to cancel the merge operation. For example: git merge --abort
- git mergetool: When there are conflicting paths during a merge, you can use a visual/ graphical tool to help resolve them. This can also be called the visual conflict editor or a Git merge tool, which launches using the git merge tool command. The configured Git merge tool assists in resolving conflicts.
- git log: After a merge, you can use the git log command to review the commit history (and hence the merged-in history) and ensure that the merge occurred as expected. This command displays the commit history, including the actual merge commits.
- git branch -d: Once a branch has been successfully merged, you may want to delete the active branch to keep your repository clean. The -d flag stands for delete. For example, git branch -d feature-branch.
These essential Git commands should equip you with the essentail tools to manage merging in your Git workflow.
Steps To Merge A Branch In Git
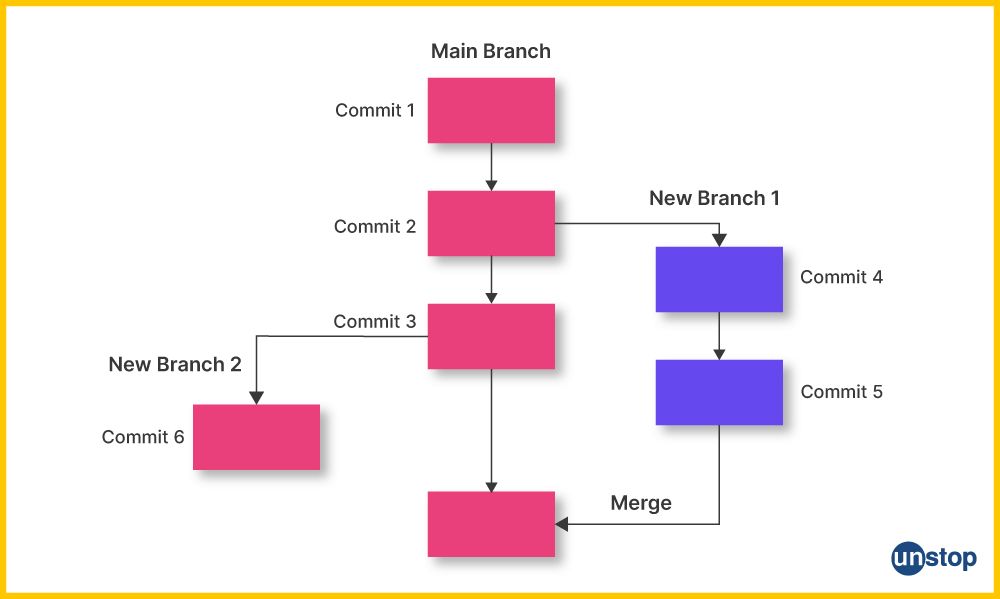
Merging a branch in Git involves combining the changes from one default branch into another branch, typically the main branch (e.g., main or checkout master). Here are the steps to follow during the merging process:
Step 1: Ensure Your Branch is up to Date
Before starting the merge process, it's essential to ensure that your working branch (the one you want to merge changes into) is up to date with the latest changes from the target branch. You can do this using the following commands:
# Switch to the target branch (e.g., main)
git checkout main# Fetch the latest changes from the remote repository
git pull origin main
Step 2: Switch to Your Working Branch
After that, you must switch back to the branch you want to merge changes from (your feature branch or any other active branch). The command to do this is-
git checkout feature-branch
Step 3: Start the Merge Process
Once you are on your feature branch, you can start the merge process using the git merge command. For example-
# Merge the changes from the target branch (main) into your feature branch
git merge main
Step 4: Resolve Conflicts (If Any)
During the merge process, Git may detect conflicts if the same lines of code have been modified differently in both branches. When conflicts occur, Git will throw an error message and mark the conflicts in the affected files, which you must resolve manually. The current conflict resolution process is as follows:
- Open the conflicted files in your code editor and look for the conflict markers (<<<<<<<, =======, >>>>>>>).
- Edit the file to resolve the conflicts, keep the changes you want, and then save the file.
After resolving conflicts in all affected files, add the resolved files to the staging area using git add. For example:
git add conflicted-file1.txt conflicted-file2.txt
Step 5: Commit the Merge
After resolving conflicts and adding the resolved files to the staging area, commit the merge by running the following command-
git commit -m "Merge main into feature-branch"
It is one of the best practices to leave a commit message that describes the purpose of the merge and any significant changes introduced during the merge.
Step 6: Verify the Merge
Once the merge commit is created, you can use the git log command to verify that the merge has been successfully completed and that your branch now includes the changes from the target branch.
Step 7: Push Your Branch
If you want to share your merged changes with others or if you are working in a team, you can push your branch to the remote repository with the following command-
git push origin feature-branch
Step 8: Cleanup
If your feature branch is no longer needed and has been successfully merged, you can delete it to keep your repository clean. For this you must use the git branch command with -d option and feature branch name.
git branch -d feature-branch
However, make sure you have pushed the branch and verified the merge before deleting it.
Merging Branches In A Local Repository
This refers to the process of combining changes from one branch into another within a Git repository that is stored locally on your computer. This is a common operation in Git, often used to integrate feature branches or bug-fix branches into the main development branch, such as the main or master branch.
Merging Main Into A Branch
Merging the main branch (or the primary development branch) into another branch is a Git operation that incorporates the latest changes from the main branch into a feature or topic branch. This helps keep feature branches up to date with the most recent developments in the project.
Git Merge Conflict
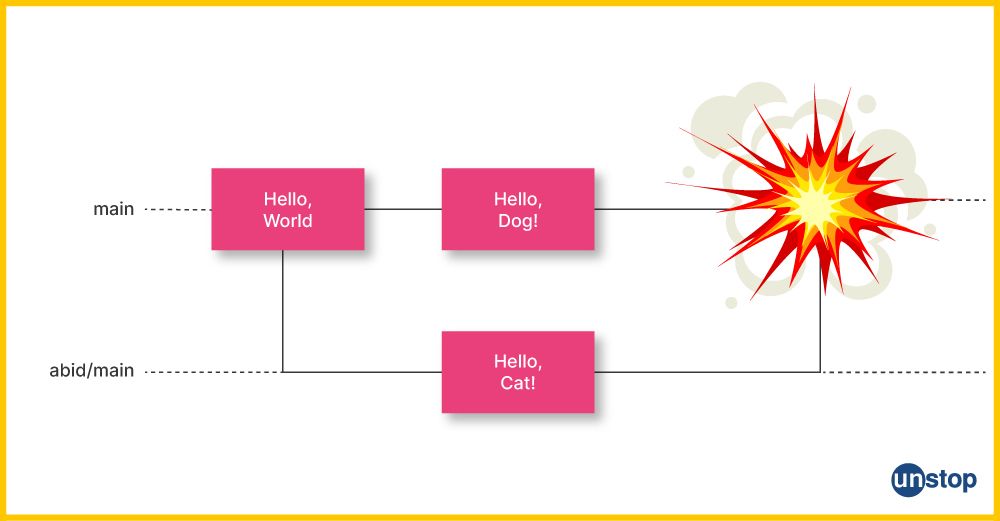
A Git merge conflict occurs when Git is unable to automatically combine changes from two different branches during a current merge operation. It happens when both branches being merged have made conflicting modifications to the same part of a file (conflicting paths) or when Git cannot determine which changes to keep. Merge conflicts are a natural part of collaborative software development, especially when multiple developers are working on the same codebase.
Here's a more detailed explanation of a Git merge conflict:
1. Conflicting Changes: Merge conflict errors arise when two branches have made conflicting changes to the same file section. For example, if one developer modifies a specific line of code in a file in the main branch, and another developer modifies the same line in a feature branch. In this case, Git will not know which change to accept when merging the two branches, leading to tricky merge conflicts.
2. Conflict Markers: When Git detects a conflict, it marks the conflicted area within the affected file with special conflict markers. These markers typically look like this:
<<<<<<< HEAD
Code from the current branch (e.g., feature-branch)
=======
Code from the branch being merged (e.g., main)
>>>>>>> main
The <<<<<<< HEAD marker indicates the start of the changes from the current branch (feature-branch), while >>>>>>> main indicates the end of the changes from the branch being merged (main). The ======= marker separates the conflicting changes.
3. Manual Resolution: Resolving a tricky merge conflict involves manually editing the conflicted file to decide which changes to keep and which to discard. You can choose to keep changes from the current branch, the incoming branch, or a combination of both.
4. Saving Changes: After making your decisions and editing the conflicted file to your satisfaction, you must remove the conflict markers and save the file. The file should contain the desired merged code without the conflict markers.
5. Staging the Resolved File: Once you've edited the file and resolved the conflict, you need to stage the resolved file using git add filename.ext.
6. Committing the Merge: After staging the resolved file, you can commit the merge to complete the process. Use git commit as you would for any other commit, with a descriptive commit message.
Types Of Git Merge Conflicts
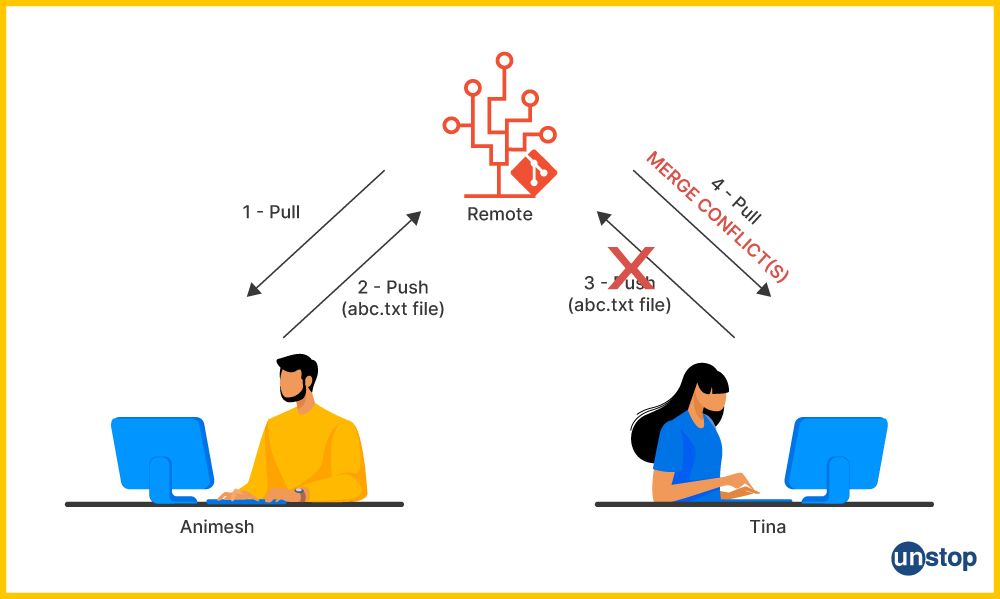
Git merge conflicts can occur at two main stages, i.e., when starting the merge process and during the merge process itself. Here's an explanation of both types of merge conflicts:
Merge Conflict Errors at the Starting of Merge Process:
When you initiate a merge (e.g., git merge source branch), Git will try to automatically combine changes from the source branch into the target branch. However, conflicts can arise during the initial phase of the merge process if Git cannot determine how to merge changes cleanly. Here are some common scenarios that can lead to conflicts when starting the merge process:
- File-Level Conflicts: This occurs when the same file has been modified in both the source and target branches. Git doesn't know which changes to keep, so it marks the file as conflicted.
- Renaming or Moving Files: If a file has been renamed or moved in one branch but modified in another, Git may not be able to reconcile these changes automatically.
- Deletion Conflicts: If a file was deleted in one branch but modified in another, Git may consider this a conflict because it doesn't know whether to keep the deleted state or apply the modifications.
- Binary File Conflicts: Git struggles to merge binary files (e.g., images, compiled code) because it cannot perform a line-by-line comparison. Any conflicting changes in binary files will result in a conflict.
When these types of conflicts occur during the initial phase of the merge, Git will halt the process and inform you about the conflicted files by sending an error message. You'll need to resolve these conflicts manually before proceeding with the merge.
Merge Conflict Errors During the Merge Process
Once you've resolved the conflicts from the initial phase and run the git commit command to carry out actual merge commits, you might still encounter conflicts. That is, if changes from the source branch and the target branch are still conflicting, even after manual resolution.
- These conflicts are similar to the conflicts encountered during the initial merge phase. You'll need to open the conflicted files, resolve the conflicts by editing the code to your desired state, and then commit the changes again to finalize the merge.
- In both cases, Git helps you by marking the conflicted areas in the files with special markers, such as (<<<<<<<), (=======), and (>>>>>>>), to indicate the conflicting sections from both branches.
- Your task is to edit the file to retain the desired changes and remove the conflict markers.
To summarize, Git merge conflicts can occur both when starting the merge process and during the merge process itself. They usually involve conflicts at the file or line level where Git cannot automatically determine how to merge the changes cleanly. Resolving these conflicts is a manual process that requires your intervention.
How To Resolve Merge Conflicts?
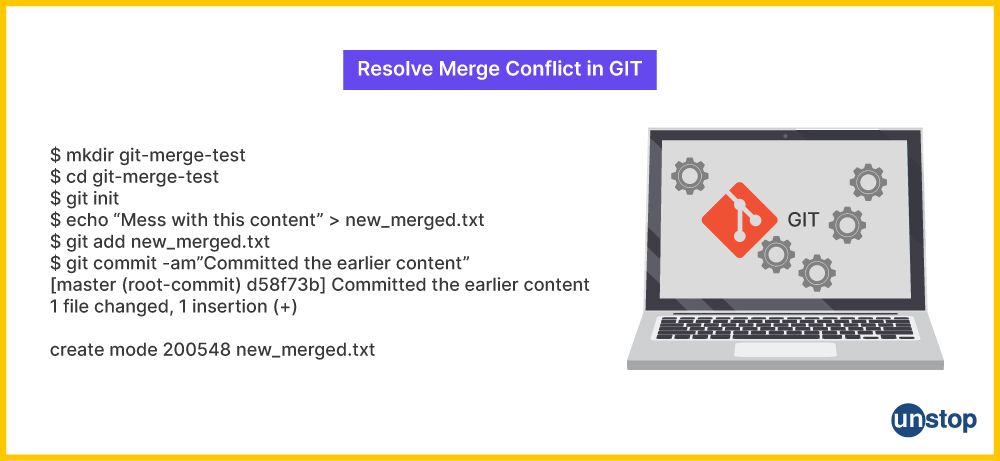
Resolving merge conflicts in Git involves manually reconciling conflicting changes between branches. When Git encounters a conflict during a merge, it will mark the conflicted areas in the affected files with conflict markers. Here's a step-by-step guide on how to resolve merge conflicts:
-
Identify Conflicted Files: Git will notify you of the conflicted files when you attempt to merge. You can also check for conflicted files using the git status command, where conflicted files will be listed as "both modified."
-
Open Conflicted Files: Use a text editor or an integrated development environment (IDE) to open the conflicted files. Inside the file, you will see conflict markers indicating the conflicting sections of code.
For example:
<<<<<<< HEAD
The code between <<<<<<< HEAD and ======= represents the changes from the current branch, while the code between ======= and >>>>>>> source-branch represents the changes from the source branch.
// Code from the current branch
=======
// Code from the incoming branch
>>>>>>> source-branch
-
Manually Resolve Conflicts: Review the conflicting code and decide which changes to keep. You must choose whether to accept the changes from the current branch head (i.e., the branch being merged) or a custom combination of both unmerged paths. You can also choose to rewrite the code entirely to resolve the conflict. Either way, edit the file to remove the conflict markers and retain the desired code.
For example, you might resolve a conflict like this:
// Resolved conflict:
// Keep changes from both branches
<<<<<<< HEAD
// Code from the current branch
Some changes from the current branch.
=======
// Code from the incoming branch
Some changes from the incoming branch.
>>>>>>> source-branch
-
Remove Conflict Markers: Ensure that all conflict markers (e.g., <<<<<<<, =======, >>>>>>>) are removed from the current version of the file. You should aim to have a clean and valid code version without these markers.
-
Save the File: Save the file with your resolved changes.
-
Add and Commit the Resolved Files: After resolving conflicts in one or more files, add them to the staging area using git add. You can add specific files or use the git add command to add all resolved files. Once the resolved files are staged, commit the changes using git commit.
For example-
git add resolved-file1.txt resolved-file2.js
git commit -m "Resolve merge conflicts"
-
Continue the Merge Process: If you were in the middle of a merge operation, you can continue the merge by running git merge --continue or git commit commands, depending on your Git version.
-
Finish the Merge: You can finish the merge process after resolving all conflicts and committing the changes. If you were in the middle of a merge, it will be completed, and a new merge commit will be created.
-
Push the Merge Commit: If you were merging changes from a local branch into a remote branch, you might need to push the merge commit to the remote repository using git push.
git push origin your-branch
That's it! You've successfully resolved the merge conflicts and completed the merge.
Git Commands To Resolve Conflicts
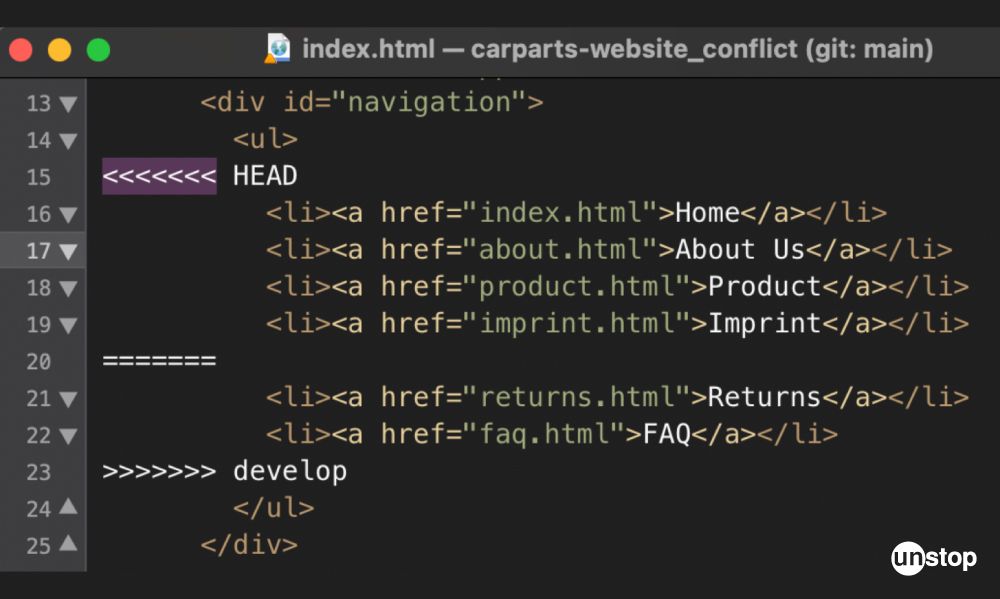
In this section, we will discuss a few important commands you will need when resolving merge conflicts.
The git log --merge Command
This command helps view the commit history, particularly the actual merge commits. It displays a list of commits that resulted from merging one branch into another.
git log --merge
Use in Conflict Resolution: When resolving conflicts, you should inspect the commit history to understand how conflicts arose and how they were resolved in the past. Using git log --merge, you can see which commits were merge commits, the associated commit messages, and the branches that were merged together. This can provide valuable context for resolving current conflicts.
The git diff command
This command shows the differences between two commits, branches, or files. In other words, it helps you identify what has changed in your code.
git diff
Use in Conflict Resolution: After manually resolving conflicts in conflicted files, you can use git diff to review your changes before staging and committing them. This helps ensure that you've resolved the conflicts correctly and that your changes align with your intentions.
The git checkout Command
The git checkout command is versatile and can be used for various purposes. It is commonly used to switch branches or restore files to a specific state.
git checkout <branch-name> (for switching branches)
Use in Conflict Resolution: If you mistakenly made changes during conflict resolution that you want to discard or start over, you can use git checkout to reset a file to its state in the current branch before the conflict. For example, git checkout -- path/to/conflicted-file.txt will discard changes and restore the file to its pre-conflict state.
The git reset --mixed Command
The git reset command is used to move the HEAD pointer to a specific commit, which effectively 'unstages' the changes that were previously staged for a commit. The --mixed option resets the staging area to match the specified commit while keeping your changes in the working directory.
git reset HEAD <file> (for unstaging a specific file)
Use in Conflict Resolution: If you've mistakenly staged changes during conflict resolution that you want to unstage (but not discard), you can use git reset --mixed. This command will unstage the changes, allowing you to re-add and commit them properly after conflict resolution.
The git merge --abort Command
The git merge --abort command is used to abort an ongoing merge operation. It undoes the merge and restores the branch to its state before the merge started.
git merge --abort
Use in Conflict Resolution: If you encounter insurmountable conflicts or issues during a merge and want to start over, you can use git merge --abort to cancel the merge in progress. This will return your working directory and branch to their pre-merge states.
The git reset Command
The git reset command, without any options, is used to move the HEAD pointer to a specific commit, effectively resetting the branch's state to that commit. It has various options (--soft, --mixed, --hard) that determine how it affects the working directory and the staging area.
git reset [--soft | --mixed | --hard] <commit> (where --soft keeps changes, --mixed unstages changes, and --hard discards changes)
Use in Conflict Resolution: Depending on your requirement during conflict resolution, you might use git reset to reset the branch to a specific commit to reapply changes or to undo changes made during conflict resolution. The choice of reset option (--soft, --mixed, or --hard) depends on whether you want to keep, un-stage, or discard the changes, respectively.
Each of these Git commands plays a specific role in conflict resolution, allowing you to inspect changes, switch branches, un-stage changes, abort merges, and reset the branch's state to resolve conflicts effectively.
Conclusion
Git merge is a fundamental operation that enables teams to collaborate and integrate changes effectively. Understanding the merge process, strategies, and best practices is essential for efficient and error-free code management. Whether you're working on feature branches or coordinating with remote repositories, mastering Git merge will be a valuable asset in your development journey.
Caught Up On The Basics? Let’s Test Your Skills!
Frequently Asked Questions
Q. What is a Git merge?
Merge in Git is a version control operation that combines the changes from one branch (source branch) into another branch (target or destination branch). The process creates a new commit that represents the merged state of both branches. Merging integrates code changes, features, or bug fixes from one branch into another. Git employs various merge strategies, including fast-forward and regular merges, depending on the branch's history and the nature of the changes being merged.
Q. What is the difference between a fast-forward merge and a regular merge?
A fast-forward merge and a regular merge are two different methods for combining changes from one dev branch into another branch head in Git. Here are the key differences between them:
Fast-Forward Merge:
-
No New Merge Commit: In a fast-forward merge, no new merge commit is created if there are no divergent changes between the source and target branches. Instead, the branch pointer of the target branch is simply moved forward to the branch tips of the source branch.
-
Linear History: The commit history remains linear because there is no additional merge commit. The master branch's development history is a direct continuation of the source branch's history.
-
Common Scenario: This type of merge is commonly used when the source branch has been created from and developed in sync with the target branch, meaning there are no commit sequences on the target branch since the source branch was created.
-
Fast and Clean: It is typically a fast and clean way to incorporate changes from one branch into another when there are no conflicting changes.
Regular Merge:
-
Creates a Merge Commit: In a regular merge, a new merge commit is created even if there are no conflicts between the source and target branches. This dedicated commit records the fact that a merge operation occurred.
-
Non-Linear History: The history of commits becomes non-linear because merged commits create multiple parent-child relationships. Each merge commit has two or more parent commits, representing the source branches being merged.
-
Common Scenario: Regular merges are used when there are divergent changes between the source and target branches. It is also used when it is important to maintain a clear merged-in history or a record of when and where merges occurred.
-
Clear Documentation: They provide a clear and explicit record (merged-in history) of when branches were merged, making it easier to trace the forked history of the project.
Q. Explain the 3-way merge algorithm in detail.
The 3-way merge algorithm is a fundamental technique used in version control systems like Git to automatically reconcile and combine changes from different branches while preserving the common ancestor's state. It's called a 3-way merge process because it involves three main reference points:
- The Current Branch: The branch you are currently on when you initiate the merge. It may be referred to as the active branch.
- The Target Branch: The branch you want to merge changes into (often referred to as the base or destination branch).
- The Common Ancestor: The most recent previous commit where the current branch and target branch share a common unified history. This common ancestor serves as the reference point to determine what has changed in each branch.
Here's a step-by-step explanation of the 3-way merging algorithm:
-
Identify the Common Ancestor: The first step is to find the single commit where both branches (the current branch and the target branch) diverged from a common base ancestor. This is typically the point where the two branches were initially created, or last merged.
-
Compare Changes: Once the direct ancestor is identified, the 3-way merge algorithm compares the changes made in each branch since the common ancestor. Changes include additions, modifications, and deletions of actual files and lines within files.
-
Incorporate Non-Conflicting Changes: Changes that do not conflict (i.e., changes made to different parts of the same file or changes that don't overlap) are automatically incorporated into the merged result. These changes are applied without any intervention.
-
Detect Conflicts: When the algorithm detects conflicting changes, it marks the affected areas in the files with conflict markers (e.g., <<<<<<<, =======, >>>>>>>). Conflicts occur when both branches have made changes to the same part of a file or when one branch modified a file while the other deleted it.
-
Manual Conflict Resolution: Users are responsible for manually resolving conflicts by editing the conflicted files. They must decide which changes to keep and how to combine conflicting changes. The goal is to remove the conflict markers and create a final version of the file that incorporates the desired changes.
-
Staging Resolved Files: After manually resolving conflicts, users stage the resolved files by using git add to mark them as resolved.
-
Commit the Merge: Once all conflicts are resolved, and the resolved files are staged, users commit the merge to create a new merge commit. This merge commit has two parent commits, one from the current branch and one from the target branch.
-
Continue the Merge Process: If the merge involves multiple branches or commits, users can continue the merge process to incorporate additional changes until all desired changes are integrated.
The 3-way merge algorithm is designed to efficiently combine changes from different branches while ensuring that conflicts are surfaced for manual resolution. It leverages the common ancestor as a reference point to determine how to merge the changes made in each branch, providing a structured and systematic approach to merging in version control systems like Git.
Q. Is it possible to merge multiple branches at once in Git?
Yes, it is possible to merge multiple branches at once in Git. This can be done by specifying multiple branch names in the git merge command. Git will create a single merge commit that includes changes from all the specified branches. Here's the basic syntax to merge multiple branches into the current branch:
git merge branch1 branch2 branch3 ...
When you run this command, Git will create a new merge commit that combines changes from all three branches into your current branch. This can be useful when you have several feature branches that need to be integrated into a main branch. Or when you want to consolidate changes from multiple sources into a single branch.
Q. Can I merge changes from a remote repository in Git?
Yes, you can merge changes from a remote repository into your local Git repository by first fetching the remote changes using the git fetch command. Afterward, you can merge the remote changes into your local branch using the git merge command or create a new local branch based on a remote branch.
If there are conflicts, you'll need to resolve them manually. Finally, commit the changes locally and push them to the remote repository if you want to share the merged changes with others. This process is commonly used in collaborative development and when working with remote Git repositories hosted on platforms like GitHub or GitLab.
By now, you must know how to merge in Git and how to resolve potential conflicts. You might also be interested in reading the following:
- Git Hooks | Definition, Usage, Types, Workflow & More (+Examples)
- Git Tag | Easily Create, List, Remove, Push Tags & More!
- Git Cherry Pick Command | How To Use, Undo, Resolve Conflicts & More!
- What Is GitHub? An Introduction, How-To Use It, Components & More!
- Introduction To Git Stash | How To Use Git Stash Commands
An economics graduate with a passion for storytelling, I thrive on crafting content that blends creativity with technical insight. At Unstop, I create in-depth, SEO-driven content that simplifies complex tech topics and covers a wide array of subjects, all designed to inform, engage, and inspire our readers. My goal is to empower others to truly #BeUnstoppable through content that resonates. When I’m not writing, you’ll find me immersed in art, food, or lost in a good book—constantly drawing inspiration from the world around me.
Login to continue reading
And access exclusive content, personalized recommendations, and career-boosting opportunities.
Subscribe
to our newsletter




Comments
Add comment