- What Is GitHub?
- Git And GitHub- A Comparison
- How To Use GitHub?
- Components Of GitHub
- GitHub For Developers
- Tips To Create Your GitHub Portfolio
- Who Uses GitHub?
- Conclusion
- Frequently Asked Questions
- How Well Do You Know GitHub? Take A Quiz!
- What Is Git? Basics
- How Git Works?
- The Git Lifecycle
- About The Git Architecture
- The Different Types Of Git Workflows
- Common Functions Of Git
- Conclusion
- Frequently Asked Questions
- Think You Understand Git? Prove It!
- What Is Git?
- What Is GitHub?
- Git Vs. GitHub (Difference Comparison Table)
- Git vs.GitHub: Differences Explained
- Git Vs. GitHub: The Similarities
- How To Integrate Git & GitHub?
- Common Git Commands to Know
- Conclusion
- Frequently Asked Questions
- Git vs. GitHub Quiz – Let’s See What You Know!
- What Is Git?
- Git Commands: Working With Local Repositories
- Git Commands: Working With Remote Repositories
- Branch- Git Commands
- Git Checkout Commands
- Merge- Git Commands
- Clone- Git Commands
- Commit- Git Commands
- Config- Git Commands
- Pull- Git Commands
- Push- Git Commands
- Rebase- Git Commands
- Stash- Git Commands
- Remote- Git Commands
- Some Advanced Git Commands
- Conclusion
- Frequently Asked Questions (FAQs)
- Know Your Git Commands? Let’s Test That!
- What Are Git Submodules?
- How Git Submodules Work?
- How To Add Git Submodule?
- How To Remove Git Submodule?
- Pulling In Upstream Changes From The Submodule Remote
- Git Submodule Commands
- Uses Of Git Submodules
- Mastered Git Submodules? Test Yourself!
- What Is Branch In Git?
- Why Are Git Branches Essential?
- How To Create A New Git Branch?
- Managing Git Branches
- Merging Git Branches
- How To Delete A Git Branch?
- Git Branch: Commands
- Git Branching Quiz – Test Yourself!
- Prerequisites For Git Create Branch Process
- How To Create A New Branch In Git?
- Branch Naming Conventions | Git Create Branch
- Different Ways Of Creating New Git Branch
- Git Create Branch In Visual Studio
- How To Delete A Git Branch?
- Conclusion
- Git Create Branch Quiz– How Well Do You Know It?
- Frequently Asked Questions
- How To Switch A Branch In Git? | Solutions To Git Problems
- Switching Branches In Git Using Git Checkout Commands
- What Is The Detached HEAD State?
- Switching Branches In Git Using The Git Switch Commands
- Switching Branches In Git Using GitKraken
- Difference Between Git Checkout & Git Reset
- Difference Between Git Checkout & Git Restore
- Difference Between Git Checkout & Git Clone
- Conclusion
- Frequently Asked Questions
- How Well Do You Switch Git Branches? Take A Quiz
- What Is A Git Repository?
- What Are Git Branches?
- Naming Convention For Git Branches
- Why Is Name Important?
- How To Rename A Branch In Git?
- How To Rename Local Git Branch?
- How To Rename Remote Git Branch?
- How To Rename A Git Branch Locally In Command Line?
- How To Rename A Branch In Github?
- Conclusion
- Frequently Asked Questions
- Git Branch Renaming Quiz– Ready for the Challenge?
- What Branches Are In Git?
- Git Delete Branch: The Fundamentals
- When To Delete Branches?
- What Happens When A Git Branch Is Deleted?
- Git Command For Creating A New Branch
- How To Git Delete A Local Branch?
- How To Git Delete A Remote Branch?
- How To Delete A Branch On GitHub?
- Remove Vs. Local Git Branch Delete
- Git Push & Delete Remote Branch
- What Are Tracking Branches And How To Delete Them?
- Can I Recover A Deleted Branch in Git?
- Conclusion
- Frequently Asked Questions
- Ready To Test Your Git Branch Skills? Take A Quiz
- What is Git Rebase?
- How Git Rebase Works?
- Git Rebase Configuration
- Git Rebase Options
- Merge Strategies In Git Rebase
- Git Rebase Example
- Types of Git Rebase
- Git Rebase Commands
- Setting Up Branches for Rebase Workflows
- Splitting Commits In Git Rebase
- Labelling Conflicts Markers
- Rebasing Commits Against A Branch
- How To Recover From Upstream Git Rebase?
- Git Rebase Vs. Git Merge
- Best Practices For Using Git Rebase
- Git Rebase Quiz – Ready to Test Yourself?
- What Is Merge In Git?
- How Git Merge Works?
- Essential Commands To Perform Merge In Git
- Steps To Merge A Branch In Git
- Git Merge Conflict
- Types Of Git Merge Conflicts
- How To Resolve Merge Conflicts?
- Git Commands To Resolve Conflicts
- Conclusion
- Caught Up On The Basics? Let’s Test Your Skills!
- Frequently Asked Questions
- What Is Git Rebase?
- What Is Git Merge?
- The Working Of Git Rebase Vs. Git Merge
- Git Rebase Vs. Git Merge | The Differences
- Git Merge Vs. Rebase | Differences Explained
- Git Rebase & Git Merge Similarities
- Advantages & Disadvantages Of Git Merge
- Advantages & Disadvantages Of Git Rebase
- How Do You Use Git Rebase & Git Merge Together?
- Git Rebase vs. Merge. Which Is Better & When to Use?
- Conclusion
- Frequently Asked Questions
- Git Rebase vs Merge Quiz – Can You Choose Right?
- Introduction To Git stash
- Importance Of Git Stash
- How To Use Git Stash Command?
- Git Stash Commands
- Git Stash Options
- Git Stash vs. Git Commit
- Git Stash vs. Git Reset
- Git Stash vs. Git Stage
- Best Uses/ Practices Of Git Stash
- Conclusion
- Frequently Asked Questions
- Git Stash Quiz – Are You Ready?
- What Is Git Cherry Pick?
- When To Use Git Cherry Pick Command?
- How To Use Git Cherry Pick?
- Git Cherry Pick For Multiple Commits
- Undo Changes & Restore Lost Commits With Git Cherry Pick
- Git Cherry Pick Example (Command Line)
- What Happens When We Cherry Pick A Git Commit?
- Sequencer Subcommands In Git Cherry-Pick
- Does Git Cherry Pick Create A New Commit?
- Git Cherry Pick Conflict
- Git Cherry Pick vs. Git Rebase
- Is Git Cherry Pick The Same As Merge?
- Advantages and Disadvantages Of Git Cherry Pick
- Hidden Git Cherry Pick Commit
- Conclusion
- Frequently Asked Questions
- Think You’ve Mastered Cherry-Picking? Take A Quiz!
- When To Use Git Tags?
- Creating A Git Tag
- Types Of Git Tags
- Listing Git Tags
- Tagging Old Commits
- ReTagging Or Replacing Old Git Tags
- Sharing: Pushing Git Tags To Remote
- Deleting Git Tags
- Checking Out Git Tags
- Git Tags: Manage & Add Versions To Project History
- Git Tags & History of Commits
- Conclusion
- Common Git Tags Questions/FAQs
- Git Tag Quiz – Ready to Test Yourself?
- What Are Git Hooks?
- How To Create GIT Hooks?
- Scripting Languages In Git Hooks
- Scope Of Git Hooks
- Types Of Git Hooks
- Difference Between Client-Side & Server-Side Hooks
- Local Git Hooks & Workflow
- Types Of Server-Side Hooks & Their Functions
- How To Use Different Git Hook Scripts?
- Application Of Git Hooks With Examples
- How To Find and Fix Trailing Whitespace In Commits?
- Tips For Writing Effective Git Hooks
- Conclusion
- Frequently Asked Questions
- Git Hooks Quiz – How Well Do You Know Them?
Switching Branches In Git | Checkout, Switch, Detached Head & More

Git is a distributed version control system used by developers collaborating on projects to work simultaneously on multiple branches. Its popularity is largely due to its ability to provide users with the scope to carry out multiple modifications in the branches without affecting the main project. Thus, switching branches in Git is an important concept that every Git user must understand. The idea of stitching branches helps one navigate through Git branches seamlessly and facilitates an organized developmental workflow and coding experience.
In this article, we will discuss how to switch branches in Git and other related concepts in detail.
How To Switch A Branch In Git? | Solutions To Git Problems
In Git, branches are separate lines of development that allow developers to work on different features, bug fixes, or experiments without directly affecting the main codebase. And Git's functionality yields branch management.
When you switch a Git branch, you simply change your working directory and your repository's state to match a particular branch. This way, any changes you make will be isolated from those made in the master branch until they are merged. There are multiple options for switching branches in Git, the most common of which is the Git checkout command. We will discuss these in the following sections.
When & Why To Switch Branches In Git?
Switching branches in Git is essential when developers need to work on different aspects of a project independently or in a controlled manner. It allows them to separate their changes from the main codebase until they are ready to merge them back to the main/ master branch. Here are some examples of when and why to switch branches in Git:
- Feature Development: Developers can create dedicated branches for each feature when introducing/ developing new functionalities. This helps produce a tidy and well-organized codebase up until the feature is finished and prepared for integration.
- Bug Fixing: Another reason for switching branches in Git is when developers encounter bugs. In this case, they can create separate Git branches to fix the bugs without disrupting the ongoing tasks.
- Experimentation: Developers can create branches to test and iterate when exploring new ideas or experimental changes without impacting the main project.
- Release Management: Before a major release, a release branch can be established to prepare and finalize the code for deployment, ensuring a stable and polished version.
- Collaboration: Creating branches and switching branches in Git facilitate collaboration among team members. Each developer can independently work on their tasks in their respective branches and merge the changes into the main project later.
Switching Branches In Git Using Git Checkout Commands
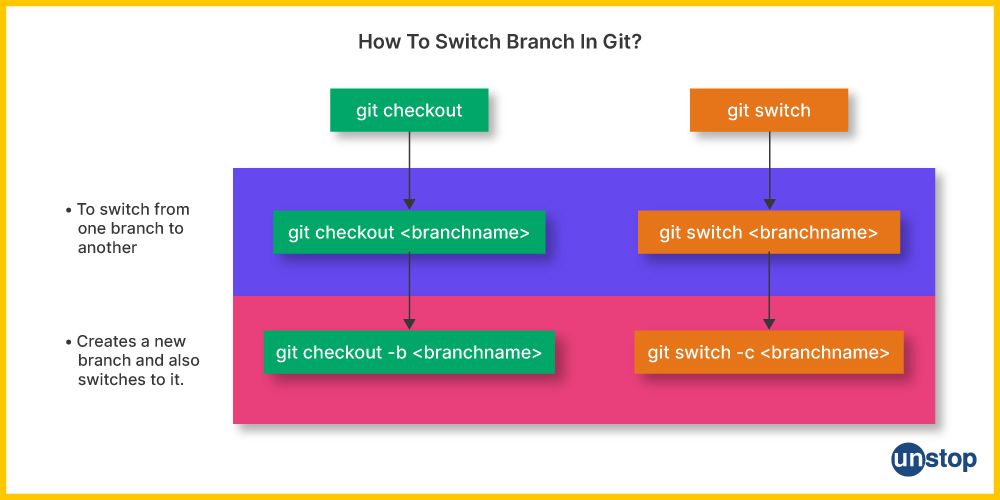
Git checkout is one of the most commonly used Git commands. It allows efficient branch switching and navigation to specific points in the history of the codebase. The two primary purposes of the Git checkout branch command are as follows:
- Switching Branches: One of the primary functions of Git checkout is to switch between different branches in a Git repository. When you switch branches, Git updates your working directory, staging area, and project history to reflect the content of the target branch. It effectively allows you to move your HEAD (the current position) to the specified branch, making it the active branch in your working directory.
- Navigating Commits and Tags: Besides Git branch switching, the Git checkout command also enables you to navigate to specific commits or tags within the repository. This is useful when you want to explore the state of the project at a particular point in history or access code associated with a specific release.
Syntax For Git Checkout Branch Command
The basic syntax for the checkout operations in Git are given below-
git checkout <branch-name>
git checkout <commit-hash>
git checkout <tag-name>
How Does Git Checkout Branch Work For Switching Branches?
Switching branches in Git using the git checkout command consists of the following steps:
- Confirm your current branch and any uncommitted changes with git status.
- If you have pending changes, commit them using git commit or stash them using git stash command to avoid data loss.
- Now, zero in on the branch you want to switch to. You can use an existing branch or create a new one using git branch <new-branch-name>.
- Use git checkout followed by the branch name to switch, i.e., git checkout <branch-name>.
- Verify that you're on the desired branch (i.e., you made a successful branch switch) using git status or git branch.
- Start making changes and commits on the newly switched branch.
Remember that if you have uncommitted changes, it's a good practice to commit or stash them before switching branches in Git to prevent conflicts or data loss.
Important Notes:
- When switching branches in Git, use the git checkout command to ensure that your working directory is clean (no uncommitted changes) or use git stash to save your changes before switching.
- If you have uncommitted changes in the current branch, then try switching to another branch. This is because Git will ask you to either commit, stash, or discard those changes.
- Be cautious when using git checkout with commit hashes, as it places your repository in a 'detached HEAD' state, where you are no longer on a specific branch. To avoid this, creating a new branch from the commit is better if you intend to make changes.
- The git checkout command is highly powerful, but it can be destructive if used incorrectly. Always double-check your intended branch, commit, or tag before executing the command.
Now that we know the essential aspects of the Git checkout command, let's explore how to change branch in Git using this command. We will discuss how to switch to an existing Git branch, a new branch, or a remote branch, as well as how to switch to a new Git branch from a specific commit.
Switching Branches In Git- To An Existing Branch Using Git Checkout
With the help of this method, the user can change the existing work environment of one branch with another, given the target branch already exists in the repository. This operation comes in handy when the focus is to be shifted to a different line of development or work has to be continued on an existing feature.
Basic Syntax for Git Checkout:
git checkout
Here is how switching branches in Git works when you want to switch to an existing branch:
- Check the available branches in the repository before switching branches in Git. You can use the git branch command to accomplish this.

-
Then, identify the existing branch you want to switch to from within the list of available branches.
- Use the git checkout command followed by the name of the existing branch to initiate the switch.

- After executing the git checkout command, Git will update your working directory and files to reflect the content of the target branch. Use git status to verify that you are now on the correct branch.

Switching Branches In Git To A New Branch Using Git Checkout
As discussed above, we can switch from one Git branch to another existing branch. Another way is to create a new branch for switching purposes. In other words, you can create a new branch is created and move it into the repository.
This allows developers to isolate changes from the main codebase until they are ready to be integrated. It also allows users to work on specific tasks without interfering with the existing code.
Basic Syntax for Git Checkout Branch to Switch to a New Branch:
git checkout -b <new-branch-name>
Here is how to switch a branch in Git to a new branch using Git checkout:
-
Screen the list of existing branches in the repository to ensure that the name you chose for the new branch is not duplicated. You can use the git branch command to access the Git list branches (just like in the previous section).
- Use the git checkout command with the -b option, followed by the desired name for the new branch. This will create the branch and immediately switch your working directory to the newly created branch.

- After executing the git checkout branch command, you can use git status to confirm that you are now on the new branch and ready to start working.
Switching To A Remote Branch In Git Using Checkout
In Git, a remote branch refers to a branch that is located in a remote repository, like on a server or platform such as GitHub. It mirrors a branch from the remote source, enabling developers to follow and cooperate on alterations made by others. It further facilitates the exchange and harmonization of code between collaborators and their respective local repositories.
The git checkout command allows developers to switch their working directory to a branch located on a remote repository. By switching to a remote branch, developers can view, modify, and contribute to the codebase hosted on the remote repository.
Syntax For Switching Branches In Git To Remote Branch:
git checkout -b <local-branch-name> <remote-name>/<remote-branch-name>
Here is how you can go about switching branches in Git when you want to switch to a remote branch:
- In order to see the list of available remote branches, use the git branch -r command.

- Use the git checkout command with the -b option followed by the desired name for the local branch and the remote name, followed by a slash and the remote branch name. This will create a new local branch tracking the remote branch and switch your working directory to it.

Switching Branches With Git Checkout To New Branch From A Specific Commit
This Git operation allows developers to create a new branch starting from a specific commit in the repository's history. Developers can work on code from a desired point in time, effectively branching off the project's history and preserving the state of the codebase at that specific commit. Changes made by the developers will not affect the original branch, which makes it ideal for bug fixing or working on experimental features.
Syntax:
git checkout -b <new-branch-name> <commit-hash>
Here is how you can switch to a new branch from a specific commit using the Git checkout command options:
- First, identify the commit hash or unique identifier of the specific commit from which you want to create the new branch. You can find the commit hash using git log command or other Git history commands.

- Use the git checkout branch command with the -b option, followed by the desired name for the new branch and the commit hash. This will create a new branch starting from the specified commit and switch your working directory to the new branch.

- Use git status to confirm that you are on the newly created branch, starting from the specific commit.

Git Checkout Configuration
As the name suggests, Git checkout configuration refers to the process of configuring and customizing the behavior of the git checkout command using various options and settings. Git has several configuration options related to branch switching, improving the checkout process, and tailoring it per the project requirements.
Basic Syntax:
git checkout.<option> <value>
Follow the steps mentioned below:
- Before configuring Git's checkout behavior, you must view the current configuration using the git config command with the -l or --list option.
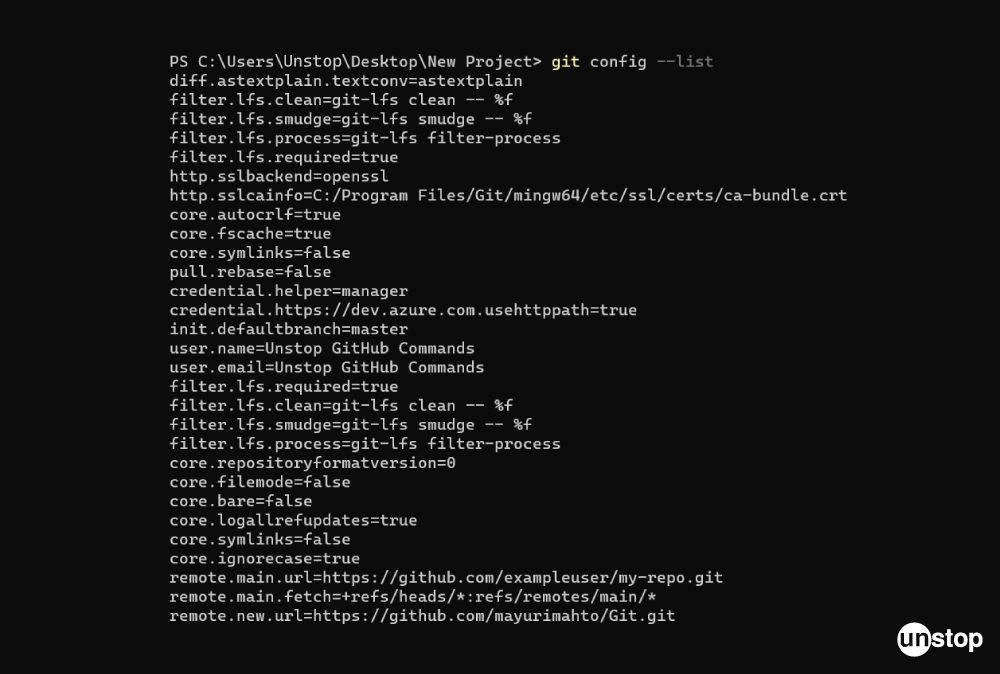
- To customize the git checkout behavior, use the git config command with the checkout.<option> and <value> arguments.
- The <option> represents the specific configuration option you want to set.
- And the <value> represents the value you want to assign to that option.
- By default, the configuration settings are applied only to the current repository. If you want to set these configurations globally, add the --global flag to the git config command.

How To Find A Commit SHA?
This refers to the process of locating a unique identifier, or SHA-1 hash, for a specific commit within a repository's history. SHA (Secure Hash Algorithm) is a 40-character hexadecimal string that uniquely identifies each commit.
Identifying the commit SHA is useful for referring to or inspecting a particular commit, viewing its changes, creating branches from specific commits, or reverting changes to a specific point in the project's history. The steps involved in finding the commit SHA are as follows:
- View Commit History: Use the git log command, which displays the repository's commit history, listing the most recent commits first.
- Locate the Commit SHA: Each commit in the history is identified by a unique 40-character hexadecimal string known as the SHA-1 hash. The commit SHA is displayed on the left-hand side of each commit in the log.
- Locate Recent Commits: Use the git show command to locate your most recent commits.
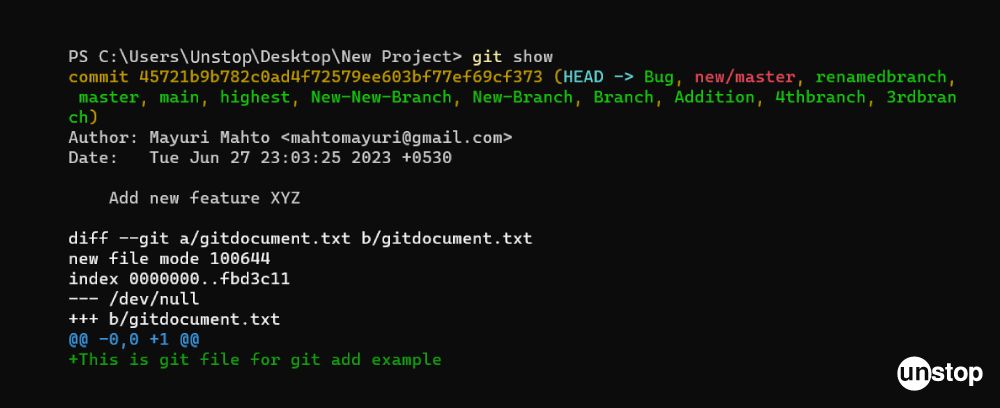
Finding the commit SHA is crucial when working with Git as it allows developers to reference specific commits accurately and perform various operations, such as creating branches, merging changes, or reverting to previous states in the project's history.
What Is The Detached HEAD State? 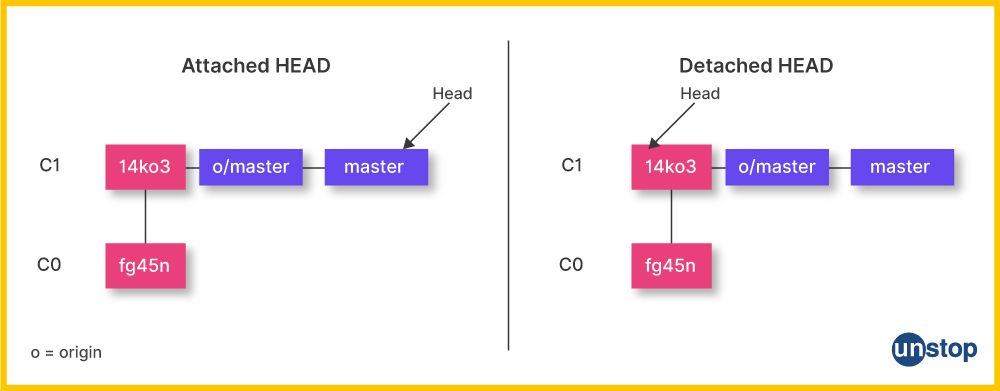
In Git, HEAD is a symbolic indicator pointing to the most recent commit within the present branch. It helps in managing alterations and changes. The HEAD empowers developers to explore and effectively engage with the most recent code snapshot. A detached HEAD is a situation where the currently checked-out commit is no longer associated with a specific branch.
- In this state, the HEAD reference points directly to a specific commit rather than a branch reference.
- This typically occurs when you Git checkout a specific commit hash, tag, or commit that isn't at the tip of a branch.
- In a normal branch-based workflow, the HEAD reference points to the tip of a branch, and as you make new commits, the branch reference moves forward automatically.
- However, when you directly check out a commit hash or a tag, Git can't determine which branch you are on, so it places you in a detached HEAD state.
- It will also establish a new tracking relationship between your remote and local branches.
While in a detached HEAD state, any new commits you create will not be part of any branch, making them harder to reference and potentially lost if you switch to another branch. This state is often used for inspection purposes, like reviewing past commits or checking out specific versions of the code, but it's not recommended for making new changes.
To avoid losing commits made in a detached HEAD state, you can create a new branch based on the commit you're on. This way, you'll give those commits a branch reference and prevent them from being inadvertently discarded.
Mentioned below are the steps to help you fix a detached HEAD state in Git:
- First, find the commit you want to work on. You can use the git log to see the commit history and pick the commit's hash.
- Create a new branch at the detached HEAD commit using the commit hash: git branch new-branch-name commit-hash.
- Switch to the new branch you just created: git checkout <new-branch-name>.
- You can now continue working on the new branch with all your changes.
Remember to replace <new-branch-name> with a suitable name for your new branch and commit-hash with the actual hash of the commit you want to work on. This process ensures that your changes are safely placed on a branch, preventing the detached HEAD state.
Switching Branches In Git Using The Git Switch Commands
Git switch acts as a simple alternative for Git checkout. It makes switching between branches in a Git repository easier and faster.
- It is user-friendly and has a concentrated syntax designed exclusively for branch switching, allowing developers to switch between several branches without additional options or arguments.
- Git switch was created to take the role of the conventional git checkout -b and git checkout for creating and switching to new branches.
- It also fulfils the role of the git checkout command for switching between the current branch and the destination branch.
Process Of Switching Branches In Git Using Switch Command
Step 1- Check Available Branches: It is good practice to check the existing/ available branches in the repository before switching branches in Git using the switch commands. You can use the command git branch to accomplish this. 
Step 2- Switch to an Existing Branch: To switch to an existing branch using Git switch, use the command followed by the name of the branch you want to switch to. For example, to switch to a branch named main, you would use the command- git switch <branch-name> 
Step 3- Creating and Switching to a New Branch: Use the Git switch command to create and switch to a new branch simultaneously while providing the name of the new branch as an argument.
For instance, to create and switch to a new branch called highest, you would use the git switch -c <branch-name> command. 
Step 4- Verify the Switch: After executing the Git switch command, your working directory will be updated to reflect the content of the newly switched or created branch. You can use the git status command to verify the branch you're currently on. 
How To Switch Between Local Git Branches?
Local Git branches refer to distinct paths of progress within a Git repository. They enable programmers to tackle various errors and setbacks without impacting the primary code. Each local branch retains its unique sequence of commits, facilitating the ability to make and assess modifications autonomously before merging into the primary branch.
Thus, navigating from one branch to another within your repository is essential when switching local branches in Git. The process to do this is listed below.
- Browse through the list of available branches to ascertain which ones you can switch to. For this, use the git branch command.
- Once you have decided on the branch you want to switch to, execute the git switch <branch-name> command. After this, you can continue to add modifications to your code.
How To Change Branch Name While Switching Branches In Git With Switch Command?
An existing branch in a Git repository can be renamed using the git switch command. It is a streamlined way to rename a branch while also switching to it and is much more convenient than the traditional process of using separate commands to rename and switch branches.
Use the git switch command with the -m option, followed by the new name you want to assign to the branch. This command renames the branch and switches to it simultaneously.

Using git switch -m <branch-name> simplifies the workflow, especially when you want to quickly rename and work on a branch simultaneously.
Switching Branches In Git | Switching To A Non-Existing Branch
The way to switch to a nonexisting branch in Git is by using the -c option with the git switch command. This command indicates that you want to create a new branch if the specified name doesn't exist. It creates a new master branch and switches your working directory to the new branch, allowing you to start working on it.
Remember that if you're switching to a non-existing branch from the previous branch and you want to base it on an existing branch's content, you can also provide the existing branch name as a second argument to the git switch -c command. This will create a new branch from the content of the existing branch.
Basic Syntax:
git switch -c <new-branch-name>
Why Git Switch Is Needed?
Git switch is a newer command introduced to enhance and simplify the process of switching between branches in a Git repository. While both git switch and git checkout can be used for branch switching, git switch is designed to address some of the complexities and potential pitfalls associated with the traditional git checkout command.
Here's why Git switch is needed and its benefits, illustrated through various use cases:
Use Case 1: Switching to an Existing Branch
The first use case is when you want to switch to an existing branch. Here-
- One option is to use the git checkout command, followed by the name of the branch. For example- git checkout master. This command will switch you to the 'master' branch.
- The alternative approach is to use the git switch command with the name of the branch you want to switch to. For example, git switch main, which will help you switch to the 'main' branch.
Both work similarly here, but the git switch has a more focused syntax. It is needed to streamline the command and make it more intuitive for branch-switching tasks.
Use Case 2: Creating and Switching to a New Branch
The second use case is when you want to create a new branch and then switch to it from the existing branch you are on. For this-
- You can use the git checkout command with the -b option, followed by the name of the new branch. For example, git checkout -b main.
- The alternative is to use the git switch command with the -c option, followed by the name of the new branch you want to create. For example, the git switch -c highest command will switch you to a new branch named highest.
- The -c option of the Git switch tool lets users actively create and switch to new branches. This reduces the chances of accidental confusion, as the intention to create a new branch is clearer.
Use Case 3: Handling Detached HEAD State
Both git checkout and git switch also come in handy when we want to handle the detached head state. The snippet in the image below showcases how to use the git checkout branch in this case.

Alternatively, you can use the git switch command as well.

Both commands function similarly here, but the git switch aligns with its main purpose, i.e., switching branches in Git while reducing the likelihood of detaching the HEAD unintentionally.
Use Case 4: Creating Remote Tracking Branches
Another use case that shows why we need the git switch command for switching branches in Git is when we want to create tracking branches. The git checkout command with the -b option followed by the branch name can help us create remote-tracking branch. For example:
git checkout -b Branch new/master
This command will switch you to the new branch called 'Branch' and will also set this branch to track 'new/master'.
As an alternative, using the git switch command with the -c option also gets the same work done. Additionally, it provides a consistent syntax for creating and switching to remote-tracking branches, simplifying the process and making it more discoverable.

It must be evident by now that git switch is better than git checkout in many ways. Some of them have been clearly listed below:
- Clearer Intent: Git Switch focuses explicitly on current branch reference switching, which clarifies the command's purpose in contrast to Git Checkout, which has multiple uses.
- Reduced Ambiguity: The simple syntax of Git switch reduces ambiguity and reduces the risk of unintended consequences, such as accidentally detaching the HEAD.
- Better Defaults: Git Switch sets better default behaviors, like creating new branches when needed and helping users perform common tasks without extra steps.
- Improved Usability: For new users, Git Switch simplifies the learning curve by providing a more intuitive and consistent command structure.
Git Switch is intended to offer a targeted, approachable, and secure mechanism to switch branches. Git Switch offers a well-organized and more user-friendly approach than Git Checkout, making it a preferable option for many typical branching scenarios even though Git Checkout is still available.
Other Git Switch Commands
Some of the additional Git Switch Commands that can be handy for your development processes are:
- git switch -d <branch-name> or git switch --detach <branch-name>: These commands detach the HEAD and switch to the specified commit, tag, or branch, creating a detached HEAD state. It is useful for inspecting previous states without altering branches.
- git switch --orphan <new-branch-name>: This command creates a new orphan branch that has no commit history in common with any other branch. It's often used to start a new isolated line of development.
- git switch -f <branch-name> or git switch --force <branch-name>: This forces the switch to the specified branch even if your working directory has uncommitted changes. However, this must we used with caution, as it can lead to the loss of unsaved changes.
- git switch --guess: This command intelligently guesses which branch you intend to switch to based on your recent activities. It's particularly useful when you have similarly named branches.
- git switch --quiet <branch-name>: With the exception of error warnings, the output is suppressed as this command changes to the selected branch. It proves useful for scripting or automating tasks.
- git switch -q <branch-name>: Similar to the previous command, this is a shorthand version to switch branches without verbose output quickly.
- git switch --patch <branch-name>: This command interactively code reviews and switches to the specified branch. It's like using git add -p for branches, allowing you to apply changes selectively.
- git switch --no-track <branch-name>: By default, Git sets up tracking for the branch you switch to. This command prevents automatic tracking configuration.
- git switch --recurse-submodules[=<check>] <branch-name>: When you switch branches, Git updates the submodules to match the new branch. This command controls how submodules are updated during the switch.
- git switch --create-reflog <branch-name>: Creates a new reflog entry when switching branches. This can help in tracking changes and the history of branch switches.
These additional git switch commands provide further customization, automation, and control over your branching workflow, catering to various scenarios and preferences.
Switching Branches In Git Using GitKraken
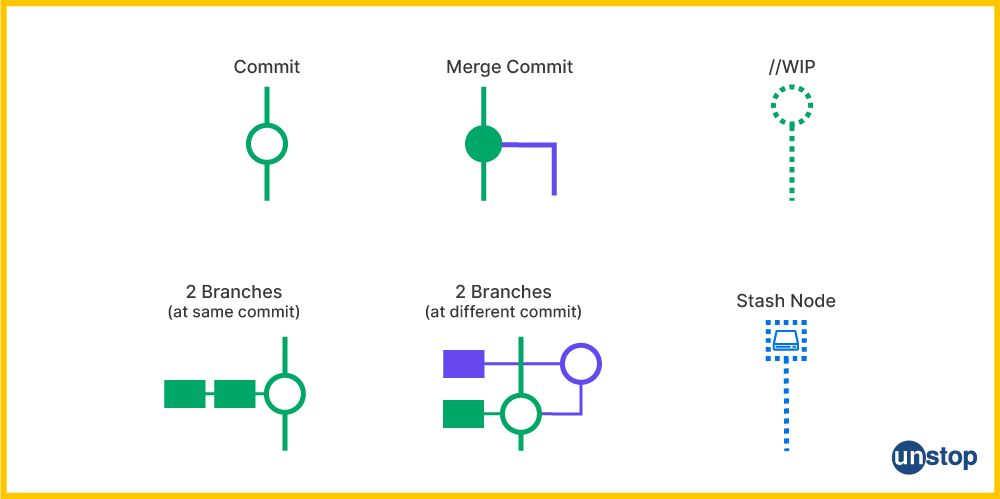
GitKraken is a user-friendly GUI(graphical user interface) for Git that removes the complexities of version control. It is a simple platform that allows team collaboration when programming, keeps track of repositories, visualizes commit history, and tracks changes in the most common scenarios.
- GitKraken improves accessibility and productivity in handling Git activities with an interface designed for both rookie and experienced developers.
- A significant advantage of GitKraken is its user-friendly feature that readily displays your collection of local and remote branches.
- With this, there is no necessity to commit branch names to memory or spend time navigating through Git's branch list.
All in all, you can easily locate your list of branches within GitKraken. Also, navigating branches in GitKraken is a breeze thanks to two simple components:
- Left-Side Panel: Easily spot your branch list on the left-hand panel.
- Central Graph: Alternatively, you can find branches in the central graph area.
The steps to follow for switching branches in Git using GitKraken are-
- Step 1: Right-click or double-click on the branch name you want to select.
Step 2: Opt for the Checkout command from the resulting context menu.
In addition to this, the GitKraken Fuzzy Finder provides an alternative approach for switching branches in Git. For this,
- First, trigger with the keyboard shortcut Cmd/Ctrl + P. This will open a small typebox.
- Then, type 'checkout' and the specific branch name you intend to transition to.
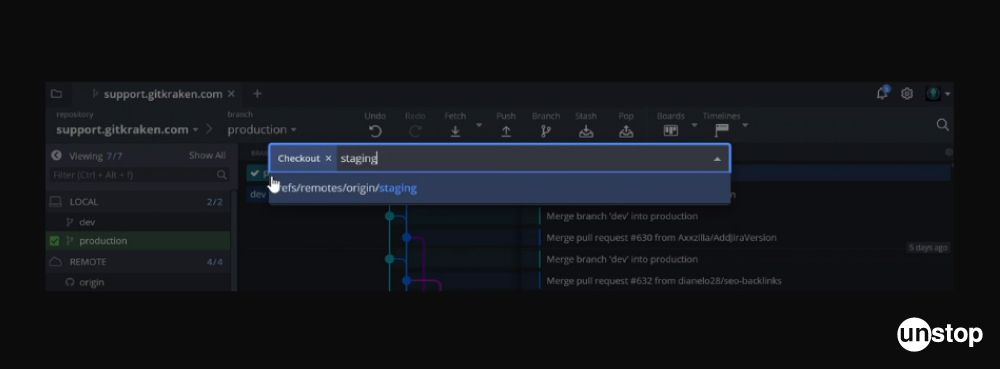
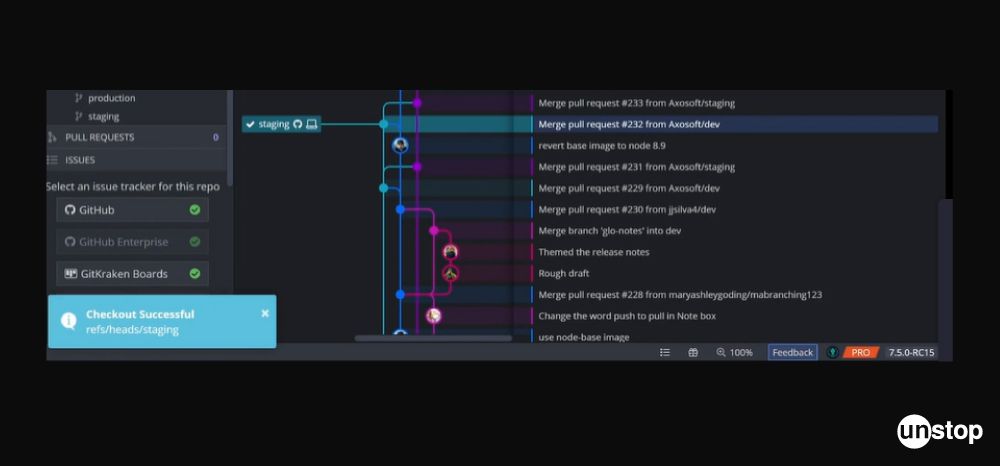
This is how switching branches in Git is made simple and easy with the help of the GitKraken feature, eliminating the need for manual branch identification and streamlining branch browsing.
Difference Between Git Checkout & Git Reset
Both git checkout and git reset commands are indispensable in Git and cater to distinct objectives. The git checkout predominantly facilitates switching branches in Git and branch creation, whereas git reset moulds commit history and reverses changes.
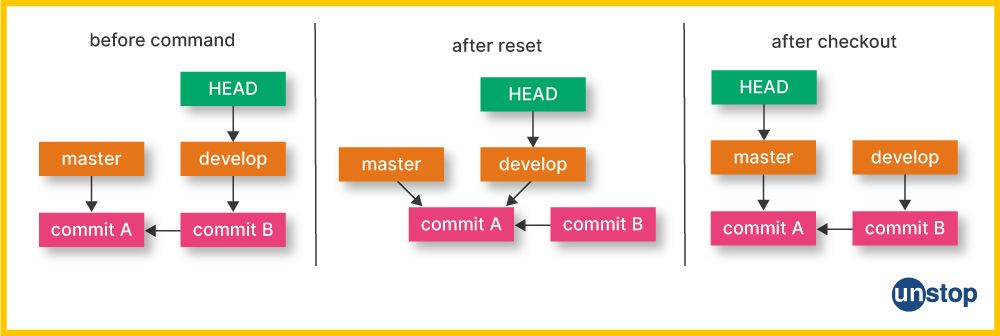
The primary differences between these two commands are given in the table below.
| Aspect | git checkout | git reset |
| Purpose | Switch branches & create new branches. | Reset the active branch to a given commit. |
| Use Case |
|
|
| Target | Branches, commits, tags. | Commits, HEAD, branch pointers. |
| Effect on Working Directory | No changes to the working directory. | git reset can change files and the working directory. |
| Commit History | Unaffected. | Commit history can be rewritten with --hard. |
| Reset Type | Not applicable. | Soft, mixed, and hard resets. |
| Command Example | git checkout <branch> | git reset --hard <commit> |
Difference Between Git Checkout & Git Restore
Both git checkout and git restore are valuable Git commands that serve different purposes. The git checkout primarily deals with branch manipulation and switching branches in Git. On the other hand, git restore focuses on managing changes within the working directory.
| Aspect | git checkout | git restore |
| Purpose | Switch branches & create new branches. | Discard changes in the working directory. |
| Use Case |
|
|
| Target | Branches, commits, tags. | Files in the working directory. |
| Effect on Working Directory | Files can be updated or overwritten. | The prior state of the files is recovered. |
| Commit History | Unaffected. | No impact on commit history. |
| Reset Type | Files may be staged or checked out. | Changes are applied directly to files. |
| Command Example | git checkout <branch> | git restore <file> |
Difference Between Git Checkout & Git Clone
While both git checkout and git clone are crucial Git commands, they have distinct purposes. The git checkout is primarily for branch manipulation and switching, while the git clone is used to duplicate an entire repository to a new location, often from a remote source.
| Aspect | git checkout | git clone |
| Purpose | Switch branches and create new branches. | Copy an entire repository to a new location. |
| Use Case |
Switching branches<br> Creating and switching to new branches |
Obtaining a complete copy of a repository |
| Target | Branches, commits, tags. | The entire repository and its history. |
| Effect on Working Directory | Files can be updated or overwritten. | Creates a new directory with repository content. |
| Reset Type | Not applicable. | Soft, mixed, and hard resets. |
| Command Example | git checkout <branch> | git clone <repository-url> |
Conclusion
It is safe to say that switching branches in Git is a vital concept that developers must understand if they wish to realize the true potential of version control and collaboration. We have discussed all approaches for switching branches in Git, in detail, emphasizing the how, when, and reasons behind each strategy.
- To begin with, the git checkout command facilitates effortless navigation between branches. Understanding its configuration options, such as detaching HEAD or creating new branches, allows us to manage codes and projects precisely.
- The newer commands in the Git ecosystem, like the git switch command, also make switching branches in Git seamless. Branch switching has been further simplified, and the overall process has also become much more intuitive and secure, courtesy of this command.
- The git restore command is a recent addition to the git command set, which is mostly used for recovering files and repositories.
- The concept of HEAD is important in Git, as it signifies the current branch or commit under consideration. Understanding this can help developers avoid multiple pitfalls.
- We have also discussed the distinctions between git checkout, git restore, and git clone commands. Of these, git checkout is primarily used for switching branches in Git and restoring working tree files, git restore solely takes up the task of efficient file restoration, and git clone creates copies of Git repositories.
Understanding these concepts and gaining control over how and when to use them is crucial and will help you as a developer in making correct judgments when switching branches in Git.
Frequently Asked Questions
Q. What happens to the local code when we try to switch the branch?
When switching branches in Git, the local code mirrors the content of the branch being switched to. Any pending changes in your working directory that clash with the new branch's content might necessitate committing, stashing, or discarding prior to the switch. It is important to understand that branch switching may result in changes to files in your working directory, possibly involving additions, alterations, or deletions to match the state of the selected branch.
Q. How to switch branches in Git without deleting local changes?
You can use the following command to switch branches in Git without discarding local changes-
git stash -u && git checkout <branch-name> && git stash pop
This sequence temporarily stashes your changes, switches to the desired branch, and then restores your stashed changes, allowing you to switch branches without losing your local modifications.
Q. How does a Git repo enter a detached HEAD state?
A Git repository enters a detached HEAD state when the HEAD reference (a pointer to the current branch or commit) points directly to a specific commit rather than a named branch. This can occur when you use commands like checking out a specific commit, tag, or detaching HEAD explicitly. In this state, new commits won't be associated with a branch, i.e., you will work directly with a specific commit snapshot.
Q. How to keep the ignored files when switching branches in Git?
You can use the following command to retain ignored files when switching branches in Git-
git stash push --include-untracked
This command saves all modifications made (even the ones that were ignored) before switching branches in Git. Then, after the switch, you can use the following command to reapply the stashed changes, keeping the ignored files intact-
git stash pop
Q. How to switch branches with the help of Git GUI?
The steps for switching branches in Git using a Git GUI are as follows:
- Open the GUI tool and navigate to your repository.
- Locate the 'Branches' panel or similar section.
- Select the desired branch from the list.
- Click the 'Switch' or 'Checkout' button.
- Confirm the switch if prompted.
The GUI will update your working directory to the selected branch's content.
Q. How to switch branches for a subdirectory in Git?
A Git repository's subdirectory is a folder that houses its own collection of files and subfolders. You can use the git checkout command with a --flag for switching branches in Git for a specific subdirectory. The --flag indicates that you're specifying a path. This way, you only switch the contents of the subdirectory to the branch you desire while leaving other files and folders untouched.
Here is how to switch branches for a subdirectory in Git:
- Use the git checkout <branch-name> command to switch branches globally.
- For specific subdirectories, use git checkout <branch-name> -- <subdirectory-path>.
Q. How to switch Git branches without file checkout?
You can use the following command when switching branches in Git without checking out files-
git symbolic-ref HEAD refs/heads/<branch-name>
Here, replace <branch-name> with the name of the branch you want to switch to. This command updates the HEAD reference directly without modifying the working directory, thus allowing switching branches in Git without changing the files in your working directory.
How Well Do You Switch Git Branches? Take A Quiz
Do check out the following:
- Git Hooks | Definition, Usage, Types, Workflow & More (+Examples)
- Git Vs. GitHub | 11 Differences, Applications, Prices & More
- Git Rebase | Strategies, Commands, Best Practices, Examples & More
- Git Cherry Pick Command | How To Use, Undo, Resolve Conflicts & More
- Git Delete Branch | Local & Remote Branches With Examples
An economics graduate with a passion for storytelling, I thrive on crafting content that blends creativity with technical insight. At Unstop, I create in-depth, SEO-driven content that simplifies complex tech topics and covers a wide array of subjects, all designed to inform, engage, and inspire our readers. My goal is to empower others to truly #BeUnstoppable through content that resonates. When I’m not writing, you’ll find me immersed in art, food, or lost in a good book—constantly drawing inspiration from the world around me.
Login to continue reading
And access exclusive content, personalized recommendations, and career-boosting opportunities.
Subscribe
to our newsletter


Comments
Add comment