- How To Compile & Run A C Program With IDE
- Execution Process Of C Program
- How To Run C Program Without Using Any IDE
- How To Run C Program In Visual Studio Code
- Conclusion
- Frequently Asked Questions
How To Run C Program | Step-by-Step Explanation (Images + Example)

C is a middle-level procedural programming language, meaning it provides both low-level features to access memory addresses and high-level features such as functions, structures, etc. It is one of the earliest and most influential programming languages that inspired the syntax of other languages like C++, C#, Java, Javascript, etc. Note that the C language is platform-dependent and must be compiled into object code by a compiler for execution of C programs. Wondering how? In this article, we will discuss everything you need to know about how to run a C program.
We have given step-by-step instructions on how to run/ execute a C program with and without an IDE and in the Visual Studio code editor (e.g., VSCode).
How To Compile & Run A C Program With IDE?
A number of IDEs (Integrated Development Environments) are available for C language to type, compile, debug, and run C source code. Some of them are Code::blocks, Eclipse, Netbeans, Dev-C++, etc.
In this section, we will showcase how to run C program using Code::Blocks, one of the most popular IDEs for C and C++ programming languages. We will see how to set up the environment and create a source code file, compile, and run it.
Step 0: Set up the Environment/IDE
Code::Blocks is an IDE, so it doesn’t come with a C language compiler by default. However, you can select and download the codeblocks-20.03mingw-setup.exe from the official website. This is a package of the IDE + Mingw C compiler.
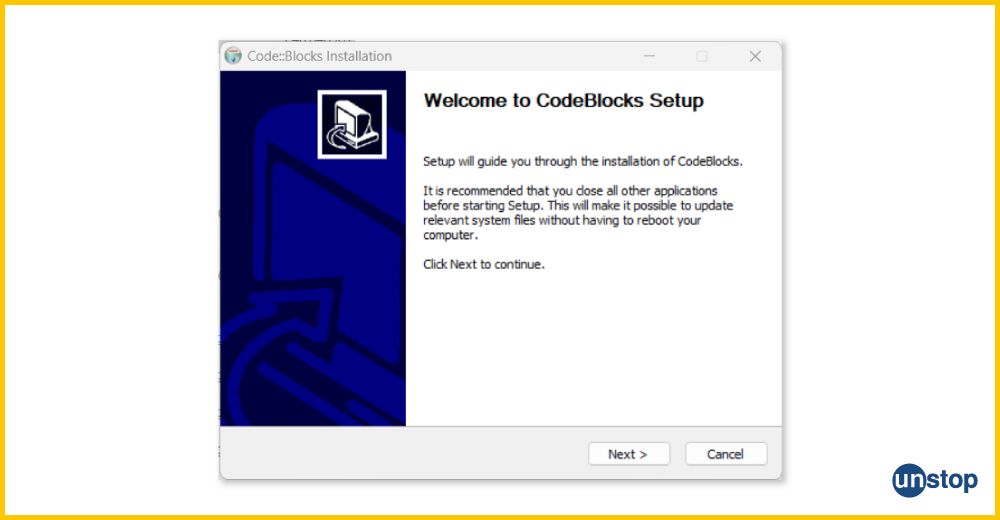
Alternatively, you can also download the IDE and the compiler separately, with the codeblocks-20.03-setup.exe and follow the instructions to set up the C compiler covered in the later part of the article.
- Once downloaded, right-click and select 'Run as Administrator' => 'Install button' to start the installation process.
- Select the MinGW Compiler Suite option when the window prompts.
- The installation process will take some time, after which you can open and use the Code::Blocks application.
Step 1: Creating a Source Code
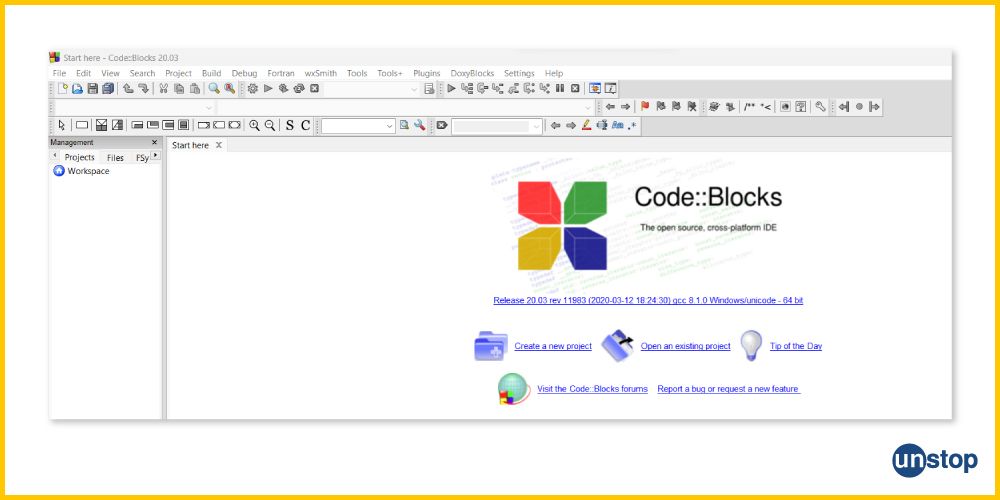
Open the Code::Blocks application. The opening window should look like the image given below. In there, click on the file button/ icon in the top left corner. Then select Empty File and save the file in a folder of your choice with the extension .c. This will be your source file, which stores the code.
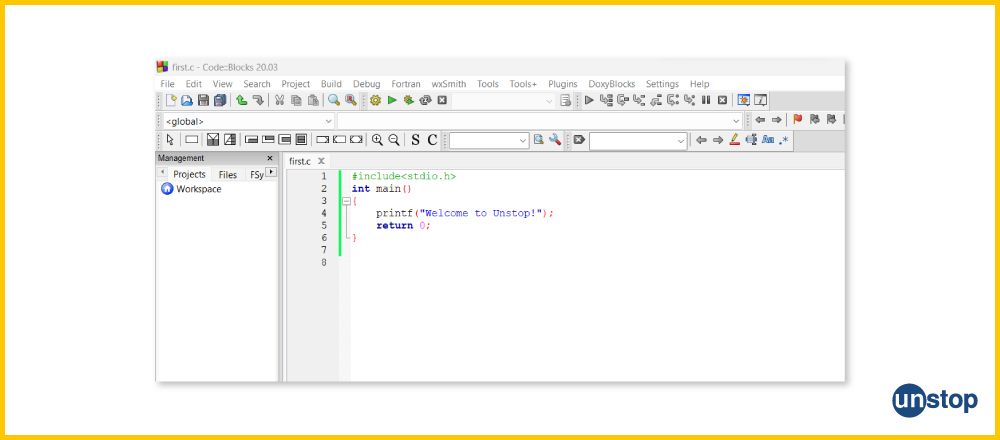
Next, type in your C source code. For the purposes of this article, we have used a very simple C program example code. After typing, you can go ahead and save it.
Step 2: Compile Source Code
To start the compilation process, you must first create the source code. To do this, you can press the build icon at the top of the window.

Alternatively, you can press Ctrl + Shift + F9 to compile the current program file. If successfully compiled, it shows a descriptive message at the bottom of the window and the object file and the executable file will be created in the folder where the program file lies.
If the compilation is not successful, then an error message will be displayed informing you about the issues in compiling code into machine code.
Step 3: Executing / Running Executable File
After the file has been compiled, the next step is to run the C program. For this, press the run icon at the top of the window, or press Ctrl + F10 to run the executable file created. Code::blocks displays the output in the console window within the IDE itself, as shown in the image below.
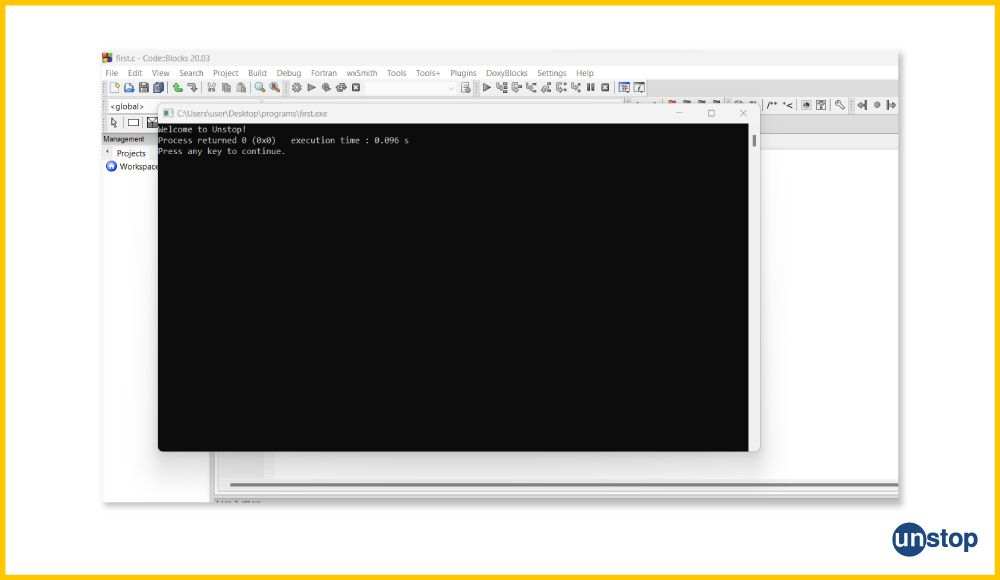
You can press any key to exit, and you have successfully executed your first C Program.
C Program Example
Let's look at an example C code, where we use the function printf() to display a string message to the console.
Code Example:
            #include  //header file

int main() { //main function where the execution starts

printf("Welcome to Unstop!"\n); //print text on console

return 0;

}
I2luY2x1ZGUgPHN0ZGlvLmg+IC8vaGVhZGVyIGZpbGUKCmludCBtYWluKCkgeyAvL21haW4gZnVuY3Rpb24gd2hlcmUgdGhlIGV4ZWN1dGlvbiBzdGFydHMKCnByaW50ZigiV2VsY29tZSB0byBVbnN0b3AhIlxuKTsgLy9wcmludCB0ZXh0IG9uIGNvbnNvbGUKCnJldHVybiAwOwoKfQ==
The output achieved on running the C program is:
Welcome to Unstop!
Explanation:
In the simple C code example, we first include the essential header file <stdio.h> for input output operations.
- We then initiate the main() function, which as mentioned in the code comment is the entry point of the program's execution.
- Next, we use the printf() function to display a string literal- "Welcome to Unstop!", to the console. Here, we use the newline escape sequence (\n) to shift the cursor to the next line after the message is printed.
- Finally, the main() function completes with a return 0 statement indicating successful execution.
Execution Process Of C Program
For the complete execution of a C Program to take place, there are several behind-the-scenes processes that occur, so that the output to be produced. We have discussed these in detail in this section.
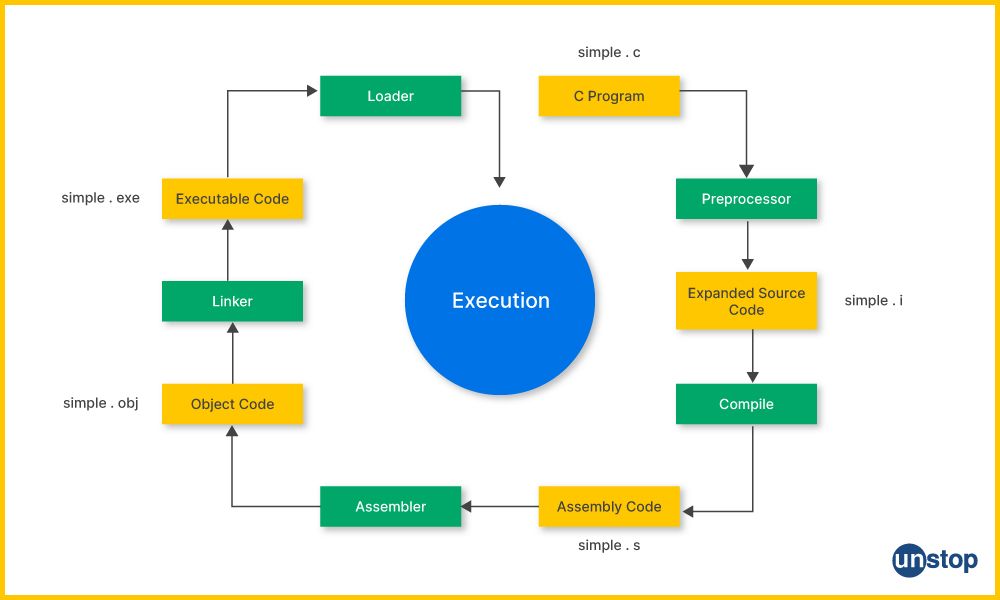
Once the green flag for compilation of the .c file is given by the user, the compiler converts the language source code file to machine code. The underlying processes/ stages that occur are listed below.
1. Pre-processing: This stage involves the expansion of the marcos mentioned in the source code.
- This also consists of inclusion of the header files/ preprocessor directives mentioned in the header file code (which is a part of the source code).
- In some sense, the pre-processor takes the source code and produces a preprocessor file, which is then used by the compiler as input.
2. Compilation: The preprocessed source code is then converted to machine code, where syntax checking and optimization of code take place. In short, here, the compiler checks the code for any errors, and all of this is written in an object file. This step plays a critical role in detecting errors in the C program.
3. Assembly: In this step, the assembly code generated by the compiler is translated to machine-understandable object code. In other words, the object file produced in this step contains the machine code and other information that is needed for linkage to other object libraries and files.
4. Linking: This is the final step in the process, where the object code produced by the assembler is converted to an executable format.
- That is, the object code is linked to respective library functions and other object files.
- It involves several important tasks, such as symbol resolution, relocation, and static and dynamic linking. The result is an executable file that can directly be executed by the operating system.
- The output of the linking phase is the a.out file (output file) which is the name given by default. Users can specify the name of the file with the -o option when entering the compile command.
5. Loader: Here, the operating system loads the executable file into the memory, where allocation of memory takes place, and the execution of the program begins.
6. Execution: The execution stage consists of numerous things happening one after the other as the system reads the program instructions.
- The execution starts with the main() function and is followed by reading input from user/files, processing of data, calling functions, and finally, output generation.
- Once the program is executed completely, a status code of 0 is returned to the operating system to indicate success. In case an error occurs, a non-zero value is returned to indicate errors or termination of the program.
In the end, the operating system frees up the resources that were allocated to the program for execution.
Check out this amazing course to become the best version of the C programmer you can be.
How To Run C Program Without Using Any IDE?
To run a C program without the help of an IDE, one needs to have a C compiler, a command prompt (cmd), and a text editor.
Step 1: Install a C Compiler
MinGW compiler is one of the most popular software used for installing GCC compilers for C languages. We are using this compiler for the purposes of this article. However, you are free to choose any compiler of your choice. To get started, download and install the MinGW compiler from the official website and follow the setup instructions.
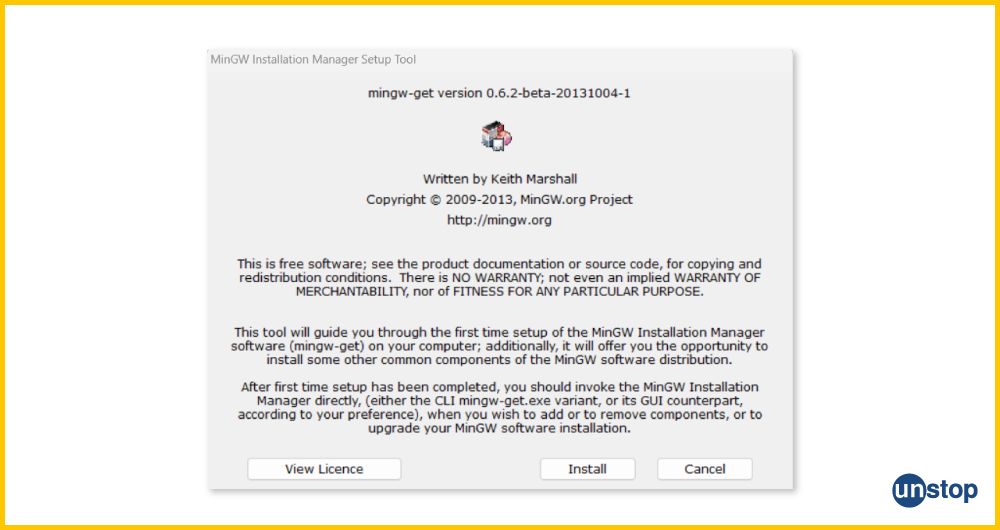
After the setup is done, a folder name MinGW will be created in the C drive.
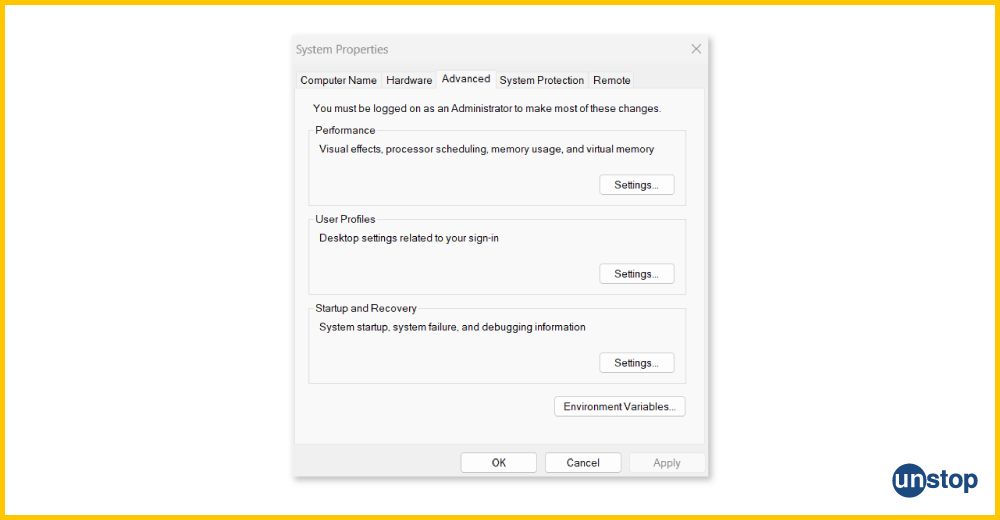
And post that, you can edit the environment variables under system properties, and add the path of this folder under system variables. For this, double-click on the Path variable in the Systems Variable section, which opens a new window => Click the New button => Add C:\mingw\bin under all the other existing paths in your system.
To check whether the C compiler is being recognized, open cmd and type gcc. If the following message is displayed, then the compiler is correctly installed.

Step 2: Writing the C Code (In a Text Editor)
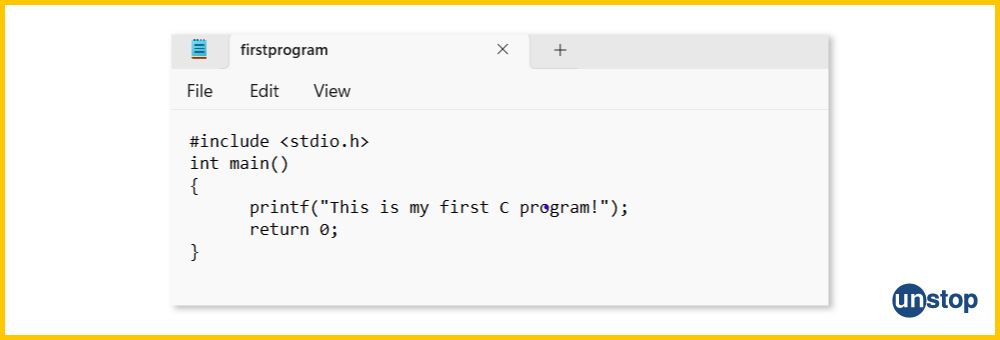
The next step is to open the text editor of your choice and type in the C source code to be executed, and save it. In the image below, we have saved the file as firstprogram.c.
Step 3: Run the File in the Command Prompt (cmd)
To run the file, open the command prompt window. From there, navigate to the folder where the code file is present by using the cd command. As shown in the compiler path (image below), we have saved the file under the C programs folder on the Desktop.
After that, type in gcc firstprogram.c or gcc -o first firstprogram.c to compile the C program. The executable file will be created in the same folder as the file is present, which by default will be named a unless a name is specified next to -o as shown here.

Now type in first.exe (or a.exe or whatevername.exe) to run the executable file.

If there are errors present, then this file won’t be generated, and an error message will be displayed, as shown in the image below.

This brings us to the end of our discussion on how to run a c program without an IDE. Now let's take a look at another basic C program example for iterative understanding of how you can write and run a C program.
Code Example:
            #include  //header file

int main(){ //main function where the execution starts

printf("This is first C program!");//print text on console

return 0;
}
I2luY2x1ZGUgPHN0ZGlvLmg+IC8vaGVhZGVyIGZpbGUKCmludCBtYWluKCl7IC8vbWFpbiBmdW5jdGlvbiB3aGVyZSB0aGUgZXhlY3V0aW9uIHN0YXJ0cwoKcHJpbnRmKCJUaGlzIGlzIGZpcnN0IEMgcHJvZ3JhbSEiKTsvL3ByaW50IHRleHQgb24gY29uc29sZQoKcmV0dXJuIDA7Cn0=
Output:
This is first C program!
Explanation:
As in the previous C code example, we include the essential header file and initiate the main function. When working with a C compiler, you will type this into the window beginning with the #include preprocessor directive.
- We then initiate the main() function and use the standard library function printf() inside it to print a string message- "This is first C program!", to the console.
- You must then close the program with a return 0 statement and the closing bracket.
Once you press the "Run" button on the compiler, it will do all the processing and produce the output in the respective window.
Also read- Data Types In C | A Comprehensive Guide (With Examples)
How To Run C Program In Visual Studio Code
Visual Studio Code is one of the most popular code editors, which can be used to duplicate the properties of an IDE by installing extensions. Here to run a C file, one must pre-install a C compiler. Let's take a look at the steps that show how to run a C program in VSC.
Step 1: Install a C Compiler
The first step of the process is to install a C compiler, just like we discussed above.
Step 2: Download and Install VSc
The next step is to download from VSCode from the official website. And then, install VSc from the file VSCodeUserSetup-x64-1.77.3. Then click on the option to set the path while installing. Check if the VSCode is correctly installed by typing- code –version.

Then download the extensions- C/C++ extension pack and Coderunner(optional)
Step 3: Run the C Program File
Create a file in a folder of your choice with the extension .c. Here the previous program is used. Under the play button on the right top corner of the screen, select run C/C++ file.
Then make sure to select the compiler.
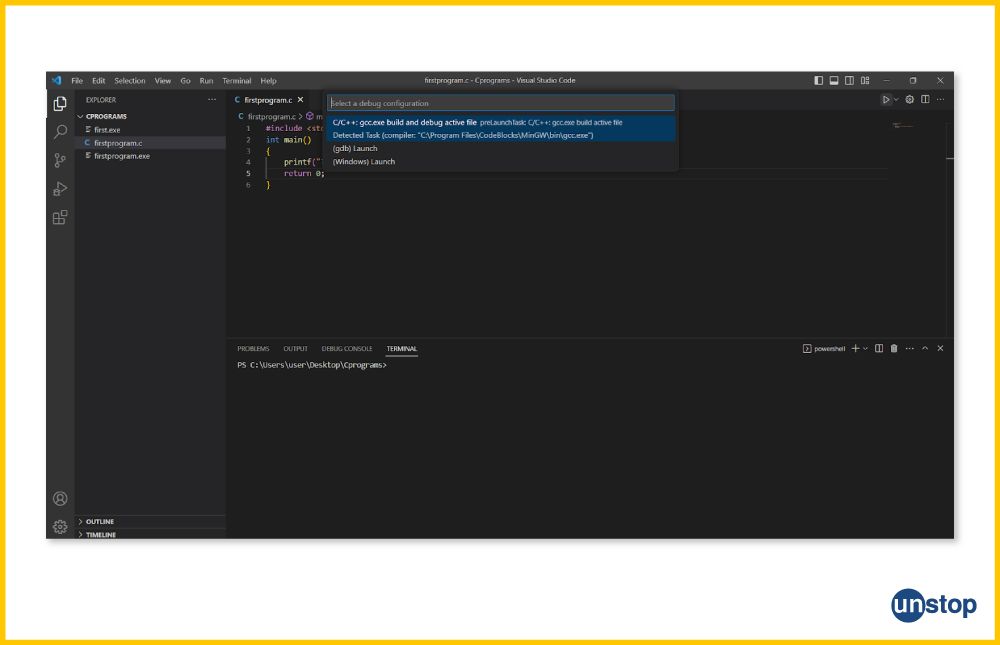
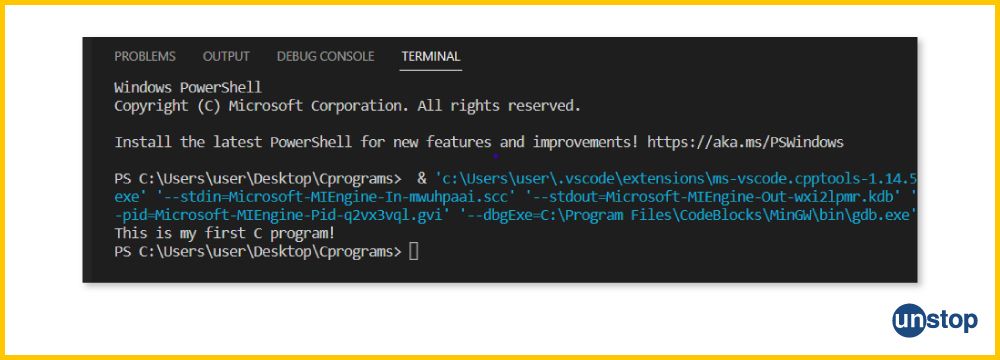
Then it automatically creates a .exe of the same filename as the program name and executes it under the VScode terminal!
Looking for mentors? Find the perfect mentor for select experienced coding & software experts here.
Conclusion
If you have reached the end of this article, you must know that running a C program is not as complicated as it seems. We have covered how to run a C program with an IDE, without an IDE, and with VSC. Remember, the extension of .c is very important in whenever you are writing and running a C program, as without it, the C compiler may not recognize it as a C source code.
Also Read: 100+ Top C Interview Questions With Answers (2024)
Frequently Asked Questions
Q1. How to compile C code?
To compile a c code using the command prompt-
- Navigate to the folder where the file exists in the type gcc fileaname.c. and compile this file.
- If no errors are detected, the C compiler will create an executable file by the name a (by default, if no name is specified next to -o in the compilation command).
- Then run this executable file by typing a.exe (or whichever name is specified next to -o). The two ways are given below:

Alternatively, you can use an IDE to achieve the compilation of a C program. Note that a C compiler should be compulsorily installed in your system.
Q2. How do I run an existing project code in Visual Studio?
Open the existing project in Visual Studio Code and simply select the play button at the top right corner. Then click on the 'run C/C++ file' button, given that the appropriate extension is installed. Here the extension name is the C/C++ extension pack.
Q3. How to run a C program in Visual Studio using the keyboard?
To run a C program in Visual Studio-
- Save the source code file with the extension .c or open an already existing c file.
- Make sure that there is a C compiler and all other relevant extensions in VSC are installed/ available on the system.
- Finally, to run the program using only the keyboard, first, debug the program by pressing F5. If you wish to run it without debugging, then press Ctrl + F5.
Q4. What is the C compiler used in Visual Studio?
The Visual Studio is a code editor which works like IDE and functions with any compiler that is installed on the system. In fact, it automatically detects a compiler on the system and does the needful. So you can choose any compiler of your choice, download and install it to work with VS.
Q5. What are some other C compilers available?
There are a number of C compilers available other than the MinGW Gcc compiler, such as Microsoft Visual C++, which is provided by Microsoft and is included in Visual Studio IDE. Clang is an open-source C compiler for Windows, macOS, and Linux. Also, TCC (Tiny C Compiler) is a C compiler that is known for fast compilation and low memory usage.
Q6. How to run a C program in Windows 10?
It is essential to have a C compiler like MinGW gcc, Microsoft Visual C++, or Clang to run any C file. After this, there are a number of ways to run a C program in Windows 10.
- You can either download an IDE like Code::blocks, Eclipse, Netbeans, Dev-C++, etc.,
- Create a new file, type in the C source code you want to run, and then save it with the extension .c.
- Finally, compile and run the file.
An alternative way to run the file without IDE is to navigate to the folder where the file exists and type gcc filename.c to compile it and then a.exe to run the executable file that gets generated if no errors in the source code are found by the compiler.
Q7. Is there a way to run a C program without using an IDE or Command Prompt?
No, to run a C file locally on the system, you either need to use an IDE or cmd. But a number of online C compilers are available on the web, like OnlineGDB, CodeChef IDE, and Repl. They allow users to compile and run a C program without the need to install any software.
Q8. How to run a C program in the command prompt?
After downloading a C compiler and typing the C source code in any text editor, navigate to the location of the file in cmd. Type 'gcc filename.c' to create the executable file. And finally, execute the a.exe file to get the output.
This compiles our discussion on how to run C programs. Do check out the following for informative reads:
- Keywords In C Language | Properties, Usage, Examples & Detailed Explanation
- Operators In C Programming: Explained With Examples
- Pointers In C | Ultimate Guide With Easy Explanations (+Examples)
- Control Statements In C | The Beginner's Guide (With Examples)
- Identifiers In C | Rules, Types, Valid, Invalid & More (+Examples)
- Arrays In C | Declare, Initialize, Manipulate & More (+Code Examples)
An economics graduate with a passion for storytelling, I thrive on crafting content that blends creativity with technical insight. At Unstop, I create in-depth, SEO-driven content that simplifies complex tech topics and covers a wide array of subjects, all designed to inform, engage, and inspire our readers. My goal is to empower others to truly #BeUnstoppable through content that resonates. When I’m not writing, you’ll find me immersed in art, food, or lost in a good book—constantly drawing inspiration from the world around me.
Login to continue reading
And access exclusive content, personalized recommendations, and career-boosting opportunities.
Subscribe
to our newsletter


Comments
Add comment